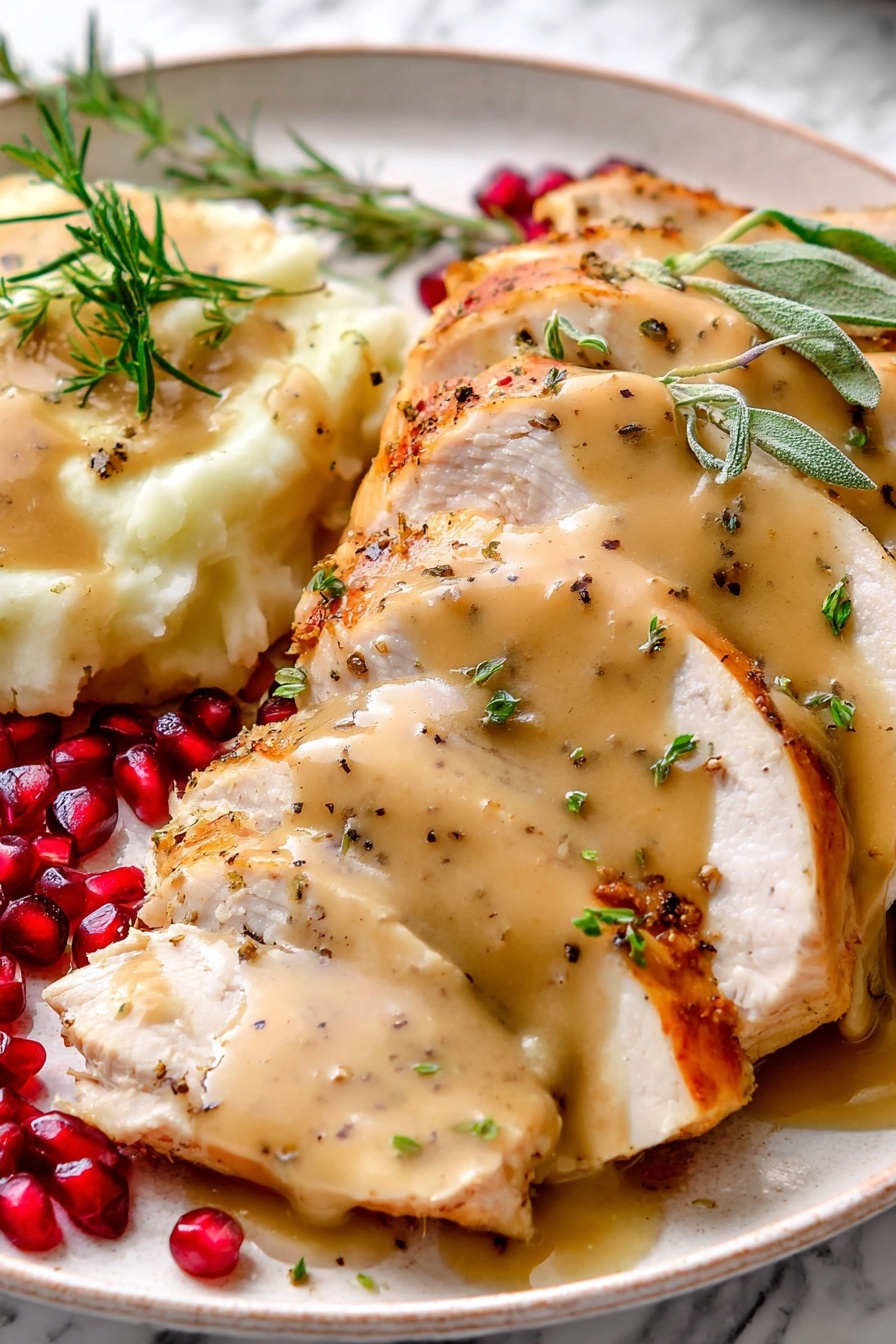
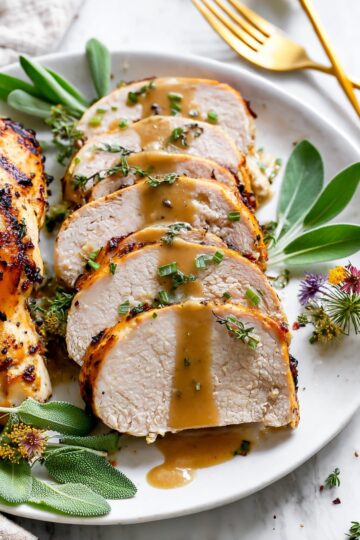
There’s something truly magical about a rich, flavorful gravy that comes straight from the pan drippings of a perfectly roasted bird. This Homemade Turkey Gravy from Drippings Recipe is the secret to elevating your meal with deep, comforting flavor, and I can’t wait to share how simple it is to get it just right every time.

Jump to:
- Why You'll Love This Recipe
- Ingredients & Why They Work
- Make It Your Way
- Step-by-Step: How I Make Homemade Turkey Gravy from Drippings Recipe
- Top Tip
- How to Serve Homemade Turkey Gravy from Drippings Recipe
- Make Ahead and Storage
- Frequently Asked Questions:
- Final Thoughts
- Homemade Turkey Gravy from Drippings Recipe
Why You'll Love This Recipe
Making gravy from turkey drippings feels like bringing all those wonderful cooking aromas right into your bowl—and ultimately onto your plate. I’ve made this homemade turkey gravy more times than I can count, and it never fails to impress guests or family, especially when paired with mashed potatoes or stuffing.
- Rich Flavor Boost: Using the actual drippings from your turkey means no imitation flavors—just pure, savory goodness.
- Perfectly Smooth Texture: Taking the time to make a golden roux ensures a silky gravy without a single lump in sight.
- Customizable Seasonings: You can easily tweak herbs and spices to match your family's favorite flavor profile.
- Easy to Make: With just a few pantry staples and your turkey drippings, this gravy comes together in under 20 minutes.
Ingredients & Why They Work
The beauty of this Homemade Turkey Gravy from Drippings Recipe is how the ingredients harmonize to create that rich, silky sauce—the butter and flour form the foundation, while the drippings bring intense turkey flavor. Here are a few tips on each item to help you shop and prepare like a pro.
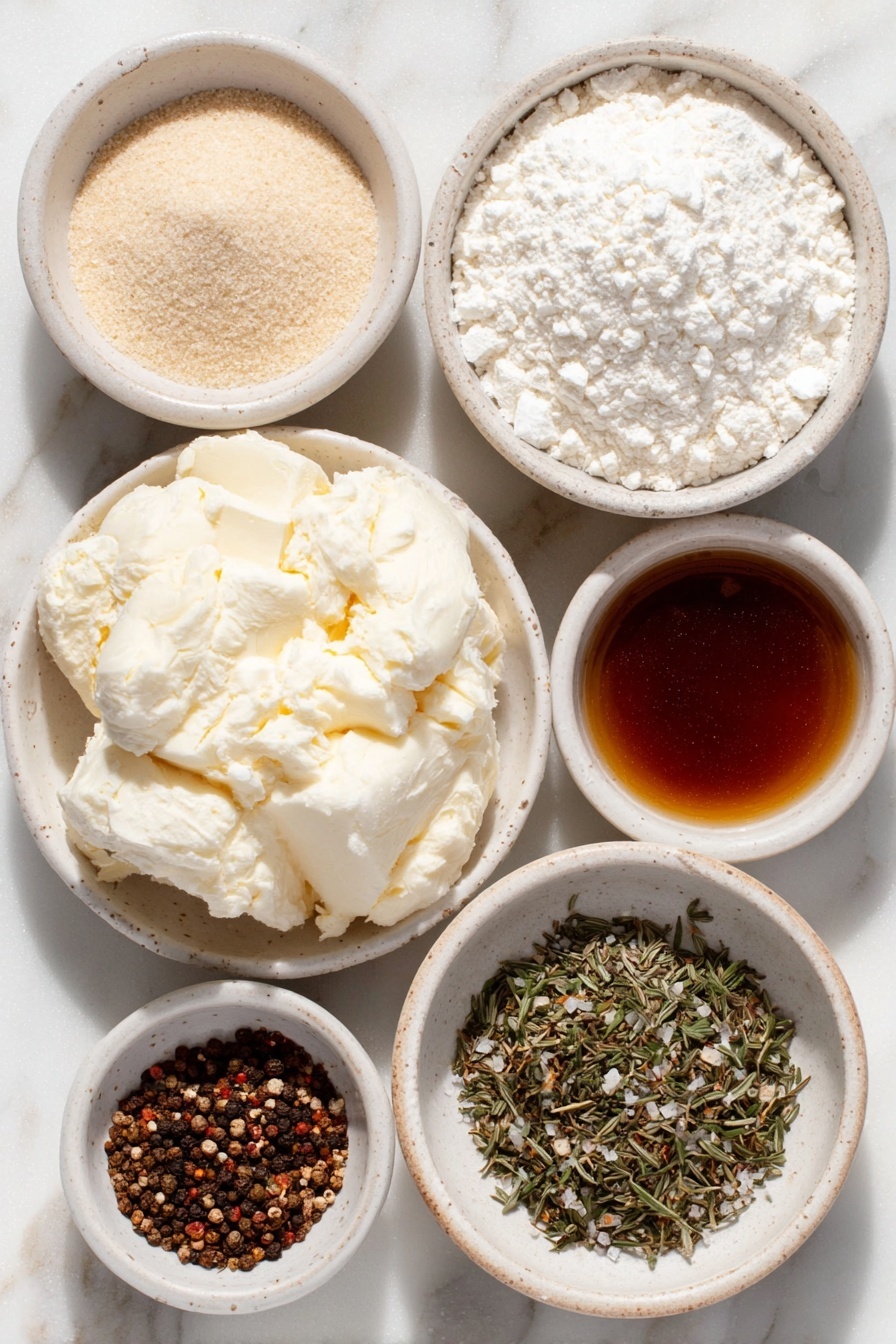
- Unsalted Butter: Starting here lets you control the saltiness of your gravy, and butter adds that luscious, creamy mouthfeel you want.
- Flour: It’s your thickening agent—don’t rush browning it! Cooking it slowly develops a nutty flavor and keeps things lump-free.
- Turkey Drippings: The star player; these are a delicious blend of juices and fat from the roasting pan. Straining and de-greasing are important for smoothness.
- Water: Used to adjust consistency—add it gradually if the gravy gets too thick or if your drippings fall short of 4 cups.
- Seasonings: Granulated chicken bouillon is a handy salt booster, plus dried parsley, thyme, garlic powder, and sage bring classic savory notes that round out the gravy beautifully.
Make It Your Way
I love this gravy just as it is, but I also like tucking in a little extra fresh sage when I roast my turkey in the fall, which naturally flavors the drippings and takes my turkey gravy up a notch. Feel free to adjust the herbs and seasoning to suit your personal taste.
- Variation: For a gluten-free version, swap the all-purpose flour for a gluten-free blend or cornstarch slurry—just whisk cornstarch into cold water and add it at the end to thicken.
- Vegetarian Version: If you don’t have drippings, use reduced sodium vegetable or mushroom broth with a touch of soy sauce for depth.
- Herb Boost: Fresh herbs like rosemary or thyme stirred in at the end add a lovely bright flavor.
Step-by-Step: How I Make Homemade Turkey Gravy from Drippings Recipe
Step 1: Strain and Degrease the Drippings
Once your turkey finishes roasting, pour all the pan drippings (liquid and bits) through a fine mesh sieve into a fat separator or a large freezer bag. Let it sit for a few minutes so the fat rises to the top. Using the freezer bag method is a neat trick—make a small cut in one corner and gently drain the bottom, fat-free juices into a measuring cup. Aim for 4 cups total—you can top off with water if you’re short.
Step 2: Make a Golden Roux
Melt 6 tablespoons of unsalted butter over medium-low heat. Stir in ⅓ cup plus 1 tablespoon of flour. Now, don’t skip the slow cooking here—whisk constantly for 4 to 5 minutes until it turns a deep golden color with a slightly nutty aroma. This step is where a lot of folks get lumps, so patience and steady whisking is key.
Step 3: Whisk in the Drippings
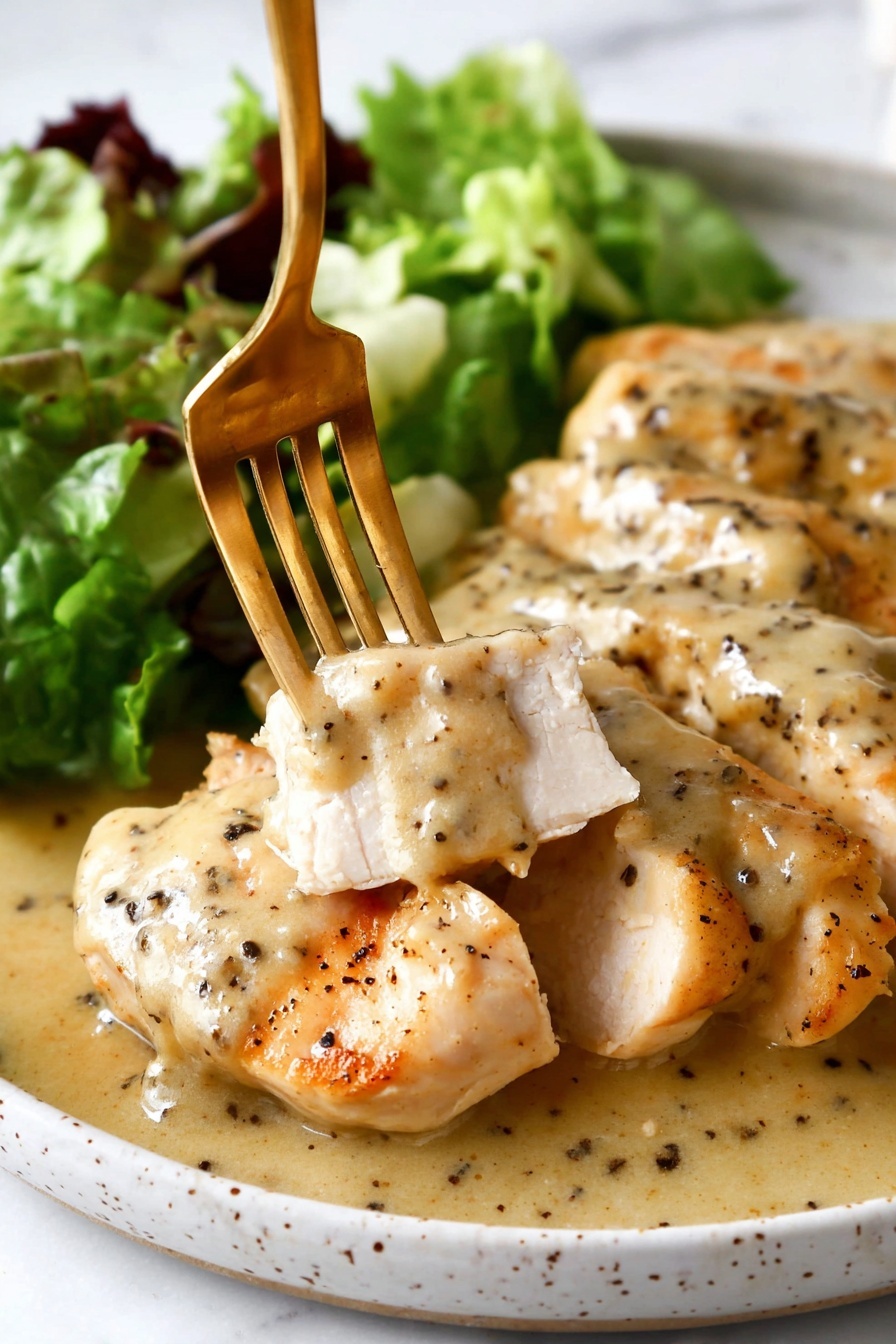
Lower the heat and slowly start whisking the strained drippings (or broth if you went that route) into your roux, a little at a time. Keep whisking until everything is smooth and combined. Turn the heat up just enough to bring it to a gentle simmer while whisking constantly—that’s the moment it thickens beautifully.
Step 4: Season and Adjust
This is where you take charge: start by adding a little granulated chicken bouillon to boost the salty, savory punch if your drippings are mild. Then sprinkle in dried parsley, garlic powder, onion powder, thyme, sage, rosemary, and pepper—adding just a pinch at a time. Taste and adjust until it’s just right for your palate.
Step 5: Keep Warm and Serve
Keep your gravy warm over low heat and give it a stir every few minutes—it thickens as it cools, so if it gets too thick, whisk in a splash of water to loosen it. Serving it in an insulated gravy jug will help keep it smooth and warm at the table.
Top Tip
Over the years, I’ve learned a few hacks that truly make the difference between so-so gravy and a showstopper. These tips come from the times I’ve experimented and sometimes had to rescue a lumpy or bland batch.
- Patience with Roux: Don’t rush cooking the flour and butter—it’s the backbone of your gravy’s flavor and smooth texture.
- Fat Separation: Use a fat separator or the freezer bag trick to remove excess grease; too much fat makes gravy greasy and flat.
- Season Little by Little: Gravy can be easily over-salted, so add seasonings gradually and taste often.
- Adjust Consistency Last: Since gravy thickens upon cooling, it’s best to serve it warm and thin with water only at the end if needed.
How to Serve Homemade Turkey Gravy from Drippings Recipe
Garnishes
I keep garnishes simple—usually just a sprinkle of fresh chopped parsley for color and a pop of freshness. On occasion, I’ve added a pinch of crushed dried sage on top to echo the flavors inside the gravy. It’s a small touch that always gets compliments.
Side Dishes
This turkey gravy is tailor-made for classic sides like creamy mashed potatoes, buttery roasted vegetables, fluffy stuffing, and even cranberry sauce. It's like the perfect unifying sauce that ties the whole meal together beautifully.
Creative Ways to Present
For holiday dinners, I love pouring this gravy into a vintage ceramic gravy boat with a delicate pattern—it just makes the table feel extra special. Sometimes I set small ramekins of gravy at individual places, especially when serving out-of-town guests, so everyone gets their own perfectly warm portion.
Make Ahead and Storage
Storing Leftovers
Leftover gravy? No problem. Pour it into an airtight container and pop it in the fridge. It will last you about 4 days, which is plenty of time for second helpings or turkey sandwiches the next day.
Freezing
I’ve frozen turkey gravy successfully for up to 3 months. Just cool it completely and transfer to freezer-safe containers or bags, removing as much air as possible. When thawing, plan for an overnight thaw in the fridge for the best texture.
Reheating
When you’re ready to enjoy the leftovers, gently reheat the gravy in a saucepan over medium-low heat while whisking. Add a splash of water to thin it if it’s too thick. This keeps it smooth and tasty, just like fresh.
Frequently Asked Questions:
Absolutely! You can prepare the gravy up to 2 days in advance, then reheat it gently before serving. Just remember it thickens when cold, so add a bit of water when reheating to reach your preferred consistency.
The key is to whisk constantly while you gradually add the liquid drippings to the roux, and to cook the flour and butter mixture long enough until it’s golden before adding any liquid. These steps help ensure a smooth, lump-free gravy.
No worries! You can top off the drippings with water to reach the desired 4 cups of liquid for the gravy. Alternatively, you can substitute with a high-quality chicken broth or stock for best flavor.
Yes! The recipe includes an alternative version that uses reduced sodium chicken broth and seasonings to mimic the rich flavor of drippings, perfect if you’re short on pan juices or want to make gravy anytime.
Final Thoughts
This Homemade Turkey Gravy from Drippings Recipe has been my go-to for family dinners and holiday feasts for years. It’s comfort food in its purest form, made better by the love and care you put into those drippings and roux. Give it a try—you’re going to love how it brings everything on your plate to life. Trust me, once you master this, there’s no going back to gravy out of a jar.
Print
Homemade Turkey Gravy from Drippings Recipe
- Prep Time: 5 minutes
- Cook Time: 15 minutes
- Total Time: 20 minutes
- Yield: 2.5 cups
- Category: Sauce
- Method: Stovetop
- Cuisine: American
Description
This Homemade Turkey Gravy recipe uses turkey drippings for rich, flavorful gravy to complement your roasted turkey, with an alternative version using chicken broth for when drippings aren't available. Perfectly thickened with a golden roux, seasoned to taste, and easy to prepare on the stovetop.
Ingredients
Turkey Gravy with Drippings
- 6 tablespoons unsalted butter
- ⅓ cup + 1 tablespoon flour
- 4 cups turkey drippings plus water as needed
- Granulated chicken bouillon as needed (optional)
- Seasonings as needed (dried parsley, garlic powder, onion powder, dried thyme, ground sage, dried minced rosemary, pepper, salt)
Turkey Gravy Without Drippings
- 6 tablespoons unsalted butter
- ⅓ cup + 1 tablespoon flour
- 4 cups reduced sodium chicken broth
- 1 teaspoon chicken bouillon (granulated, crushed cube or base)
- 1 teaspoon dried parsley
- ½ teaspoon garlic powder
- ¼ teaspoon onion powder
- ¼ teaspoon dried thyme
- ¼ teaspoon pepper
- ⅛ teaspoon ground sage
- ⅛ teaspoon dried minced rosemary
- Salt to taste
Instructions
- Strain the drippings: Strain turkey drippings from the roasting pan through a fine mesh sieve into a fat separator or a large freezer bag, discarding solids caught in the sieve.
- Degrease the drippings: Allow drippings to rest so fat separates on top. If using freezer bag, cut a small hole in one corner and drain liquid fat-free into a measuring cup until you have 4 cups total. Add water if needed.
- Make the roux: Melt butter in a large saucepan over medium-low heat. Add flour and cook 4-5 minutes, whisking constantly until deeply golden to prevent lumps.
- Add liquid: Reduce heat to low and slowly whisk in turkey drippings or chicken broth (for non-dripping version), whisking until smooth.
- Simmer and thicken: Bring mixture to a simmer while whisking constantly. Continue simmering 6-8 minutes until desired consistency is reached. Add water in small amounts if gravy gets too thick.
- Season the gravy: For drippings gravy, season with granulated chicken bouillon by ¼ teaspoon increments before adding salt. Add dried parsley, garlic powder, onion powder, thyme, sage, rosemary, and pepper to taste. For broth gravy, add bouillon and seasonings during step 4 and adjust salt and pepper at the end.
- Keep warm before serving: Maintain gravy over low heat, stirring often, until ready to serve. Use an insulated gravy jug if possible.
- Adjust consistency if needed: If gravy thickens as it cools, reheat gently over medium-low heat and whisk in water gradually until smooth and desired thickness is restored.
Notes
- Store leftover gravy in an airtight container in the refrigerator for up to 4 days.
- Freeze gravy up to 3 months in airtight containers or freezer bags; thaw overnight in refrigerator before reheating.
- Reheat gently in a saucepan over low heat, adding water as needed to thin gravy and whisk until smooth.
- Do not shortcut cooking the roux; the deep golden color prevents lumps and improves flavor.
- If turkey drippings are unavailable, the broth gravy version offers a flavorful alternative.
Nutrition
- Serving Size: ¼ cup
- Calories: 90 kcal
- Sugar: 0 g
- Sodium: 180 mg
- Fat: 5 g
- Saturated Fat: 3 g
- Unsaturated Fat: 2 g
- Trans Fat: 0 g
- Carbohydrates: 9 g
- Fiber: 0.5 g
- Protein: 1 g
- Cholesterol: 15 mg


Leave a Reply