This might be the easiest way to get tons of flavor on your plate fast. The Antipasto Pizza Squares Recipe blends all those classic Italian deli favorites into a crispy, cheesy, handheld treat you'll want to make again and again.

Jump to:
Why You'll Love This Recipe
I fell in love with this Antipasto Pizza Squares Recipe the first time I made it for a casual get-together. It’s basically a party on a baking sheet—easy, crowd-pleasing, and packed with no-fuss ingredients. If you love bold Italian flavors without hours in the kitchen, this one’s for you.
- All-in-One Snack: Combines meats, cheeses, and peppers layered between golden crescent dough for a perfect bite.
- Hands-Off Baking: Once assembled, just pop it in the oven—no rolling dough from scratch required.
- Customizable: I’ll share ways you can tweak toppings to suit whatever you have on hand or prefer.
- Great for Any Occasion: Appetizer, snack, or game day treat—it easily steals the show.
Ingredients & Why They Work
Each ingredient in the Antipasto Pizza Squares Recipe plays a starring role. From the buttery, flaky crescent dough that crisps up beautifully, to the melty provolone and mozzarella pairing perfectly with the salty meats and tangy peppers—everything balances out for an irresistible flavor combo. When you shop for these, picking quality deli meats and fresh sliced cheeses really makes a difference!

- Crescent roll dough: Ready-to-use tubes save time and create that signature flaky, golden base.
- Provolone cheese: Offers that mild, nutty flavor to melt into the meats seamlessly.
- Deli ham: Adds a subtle smoky sweetness and tender texture.
- Hard salami: Brings a punchy, peppery bite to balance the rich cheeses.
- Pepperoni: Classic pizza topping that introduces a little spice and chew.
- Mozzarella cheese: Keeps things creamy and gooey in every bite.
- Roasted red bell peppers: Their smoky sweetness brightens and softens the layers.
- Pepperoncini peppers: Drained, these add a tangy and slightly spicy kick without being overpowering.
- Olive oil: Brushed over the dough for a glossy finish and extra crispness.
- Parmesan cheese: Sprinkled on top for that salty, nutty crunch after baking.
- Dried oregano: An herbaceous touch that whispers Italian charm throughout.
- Salt & black pepper: To season and bring all the flavors together perfectly.
Make It Your Way
One thing I love about this Antipasto Pizza Squares Recipe is how flexible it is. I often swap out the meats depending on what’s in my fridge or what my guests enjoy. You can also go vegetarian and pile in marinated veggies and olives instead—either way, the flavor stays fantastic.
- Variation: When I tried adding sun-dried tomatoes and artichoke hearts, it gave the squares a slightly tangy Mediterranean spin that was a big hit.
- Spicy kick: Feel free to add a few crushed red pepper flakes to the olive oil brush to amp up the heat just a touch.
- Gluten-Free: Use a gluten-free crescent dough alternative — it still bakes beautifully and keeps the flavor intact.
Step-by-Step: How I Make Antipasto Pizza Squares Recipe

Step 1: Prep like a pro
Start by preheating your oven to 350°F. Then lightly grease a 9×13-inch baking dish—it helps to prevent sticking and gives you that perfect crust around the edges. Unroll one can of crescent roll dough and lay it flat in the pan. Pinch together the seams so it forms one solid layer. Brush that dough with half the olive oil, then season with salt, pepper, and half the oregano. Getting this base right sets the stage for the best flavor and texture.
Step 2: Layer the goodness
Next, pile on your meats and cheeses—ham, salami, pepperoni, provolone, and mozzarella all go down in that order. Spread the sliced roasted red peppers and pepperoncini evenly over the top. I like to press everything down gently to help it meld together, but don’t worry about making it perfect—this rustic look is part of the charm.
Step 3: Top and season
Unroll the second can of crescent dough and lay it over your delicious layer, pinching seams closed again to seal. Brush with the remaining olive oil, then sprinkle with salt, pepper, oregano, and parmesan cheese. The parmesan on top adds a crispy, savory crust that I find irresistible.
Step 4: Bake it just right
Pop it in the oven for 35 minutes or until the dough turns golden brown and crispy. If you notice the crust browning too fast, tent with foil to prevent burning. Once out, give it about 15 minutes to set up before slicing—it makes serving so much easier and helps keep those layers neat.
Top Tip
After making the Antipasto Pizza Squares Recipe several times, I realized a few simple tweaks make all the difference. Let me share what really helped me nail it perfectly every time.
- Seal the seams well: Pinching the dough seams tightly keeps the filling from leaking out during baking, which keeps your squares looking neat.
- Don’t skip the resting time: Waiting about 15 minutes after baking lets everything set so the squares slice cleanly without falling apart.
- Brush with olive oil generously: This not only adds flavor but helps create that quintessential golden, crispy crust we all crave.
- Watch the oven closely: Every oven’s different—start checking around 25-30 minutes to avoid burning the top.
How to Serve Antipasto Pizza Squares Recipe

Garnishes
I usually sprinkle a handful of fresh basil leaves or chopped parsley over the top before serving—it adds a fresh, vibrant pop that balances the rich layers. A drizzle of good-quality balsamic glaze also brings a subtle sweetness that’s surprisingly addictive.
Side Dishes
When I serve these squares for dinner, I like to pair them with a crisp green salad tossed with lemon vinaigrette or a simple bowl of marinated olives and cherry tomatoes. It keeps the meal light but still satisfying. They also make fantastic finger food alongside antipasto platters featuring olives, artichokes, and Italian meats.
Creative Ways to Present
For parties, I cut these into smaller bite-sized squares and arrange them on a wooden board with toothpicks. Adding little bowls of extra pepperoncini or roasted peppers on the side lets guests customize their bites. I even like to layer them with different colored bell peppers for a festive look during holidays.
Make Ahead and Storage
Storing Leftovers
I place any leftover antipasto pizza squares in an airtight container and refrigerate them. They keep well for up to 3 days, and the flavors actually taste even better the next day once they’ve had time to meld together.
Freezing
If I plan ahead, I slice the baked squares and freeze them in single layers separated by parchment paper inside a freezer bag. That way, I can grab a few squares at a time for a quick snack or party appetizer. They freeze beautifully without losing flavor or texture.
Reheating
To reheat, I prefer the oven or toaster oven—set to 325°F for about 10 minutes until warmed through and crispy again. Microwaving works in a pinch, but you lose some of that golden crust and cheesy melty goodness.
Frequently Asked Questions:
Absolutely! Homemade pizza dough or puff pastry can work well, though the texture may differ slightly. Crescent roll dough gives that signature flaky, buttery crust with no extra effort.
The pepperoncini add just a mild tangy spice—definitely not overpowering. If you prefer less heat, reduce the amount or leave them out altogether. For extra spice, you can add a sprinkle of red pepper flakes.
Yes! Assemble the squares in the baking dish, cover tightly with plastic wrap, and refrigerate overnight. Let them sit at room temperature for 20 minutes before baking as directed.
Allow the squares to cool for 15 minutes after baking so the layers set and don’t slide apart. Use a sharp serrated knife and cut slowly with a gentle sawing motion for clean edges.
Final Thoughts
This Antipasto Pizza Squares Recipe feels like a warm hug from the Italian deli counter, but way easier. It’s one of those dishes I always come back to when I want something impressive but simple. I hope you enjoy making it, sharing it, and most of all, eating it just as much as I do. Give it a try—you might just add this to your go-to recipe list for every party or cozy night in.
Print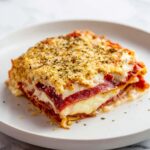
Antipasto Pizza Squares Recipe
- Prep Time: 10 minutes
- Rest Time: 15 minutes
- Cook Time: 35 minutes
- Total Time: 45 minutes
- Yield: 12 servings
- Category: Appetizer
- Method: Baking
- Cuisine: Italian
Description
Antipasto Squares combine layers of savory deli meats, cheeses, and tangy peppers between buttery crescent roll dough for a delicious and easy-to-make appetizer or snack that's perfect for parties and gatherings.
Ingredients
Dough
- 2 8 oz tubes crescent roll dough
Meats and Cheeses
- ¼ lb deli ham sliced
- ¼ lb hard salami sliced
- ¼ lb pepperoni sliced
- 8 oz provolone cheese sliced
- ¼ lb mozzarella cheese sliced
Vegetables and Seasonings
- 1 12 oz can roasted red bell peppers sliced thin
- ½ cup jarred pepperoncini peppers drained
- 2 tablespoon olive oil
- ¼ cup parmesan cheese grated
- 1 tablespoon dried oregano
- salt to taste
- black pepper to taste
Instructions
- Preheat Oven and Prepare Pan: Preheat your oven to 350 degrees Fahrenheit and lightly grease a 9x13 inch baking dish to prevent sticking.
- Arrange First Dough Layer: Unroll one tube of crescent roll dough into the prepared baking dish, pinching the seams together to form a solid base. Brush this layer with 1 tablespoon of olive oil and season with salt, black pepper, and half a tablespoon of dried oregano.
- Layer Fillings: Evenly layer the ham, salami, pepperoni, provolone, mozzarella, roasted red peppers, and drained pepperoncini peppers over the dough.
- Add Top Dough Layer: Unroll the second tube of crescent roll dough on top of the layered fillings, pinching the seams together carefully to seal the edges.
- Season and Add Cheese: Brush the top dough layer with the remaining 1 tablespoon of olive oil, season again with salt, pepper, and the remaining oregano, then sprinkle the grated parmesan cheese evenly over the top.
- Bake: Place the dish in the preheated oven and bake for 35 minutes until the dough is golden brown and crispy. If the crust begins to brown too quickly, cover loosely with aluminum foil to prevent burning.
- Cool and Serve: Remove from the oven and let cool for 15 minutes before cutting into squares and serving.
Notes
- Pinching the seams of the crescent dough is important to prevent the filling from leaking out during baking.
- If you prefer, you can substitute the meats and cheeses with your favorite antipasto ingredients.
- For added flavor, consider sprinkling some crushed red pepper flakes inside the layers for a spicy kick.
- This recipe can be made ahead and baked just before serving; simply cover and refrigerate until ready.
- Using fresh roasted red peppers instead of jarred can enhance the taste but may require chopping them finely.
Nutrition
- Serving Size: 1 square
- Calories: 230 kcal
- Sugar: 1 g
- Sodium: 480 mg
- Fat: 16 g
- Saturated Fat: 6 g
- Unsaturated Fat: 8 g
- Trans Fat: 0 g
- Carbohydrates: 12 g
- Fiber: 1 g
- Protein: 9 g
- Cholesterol: 35 mg


Leave a Reply