There's something so delightful about the blend of rich chocolate and the cool freshness of mint in every bite. This Chocolate Andes Mint Cookies Recipe brings together that perfect harmony, making your kitchen smell heavenly while baking, and your taste buds dance with joy.

Jump to:
Why You'll Love This Recipe
I’ve made lots of chocolate cookies over the years, but adding Andes mints was a game-changer that instantly became a favorite in my house. What makes this recipe stand out is the refreshing, creamy mint chunks melting into fudgy chocolate cookie dough – a real crowd-pleaser.
- Minty Freshness Meets Chocolate: The chopped Andes mints give little pockets of minty goodness inside each cookie.
- Perfect Texture: Soft and chewy in the middle with slightly crisp edges – the cookie hits all the right notes.
- Visually Stunning: Pressing a whole mint on top creates that signature look and makes for a stunning finishing touch.
- Easy to Make: Simple ingredients and straightforward steps make it beginner-friendly with delicious results!
Ingredients & Why They Work
This recipe keeps things simple but effective. The combination of basic baking staples and those iconic Andes mints is what delivers the magic here. Make sure you get good-quality unsweetened cocoa powder – it really deepens the chocolate flavor without extra sweetness.
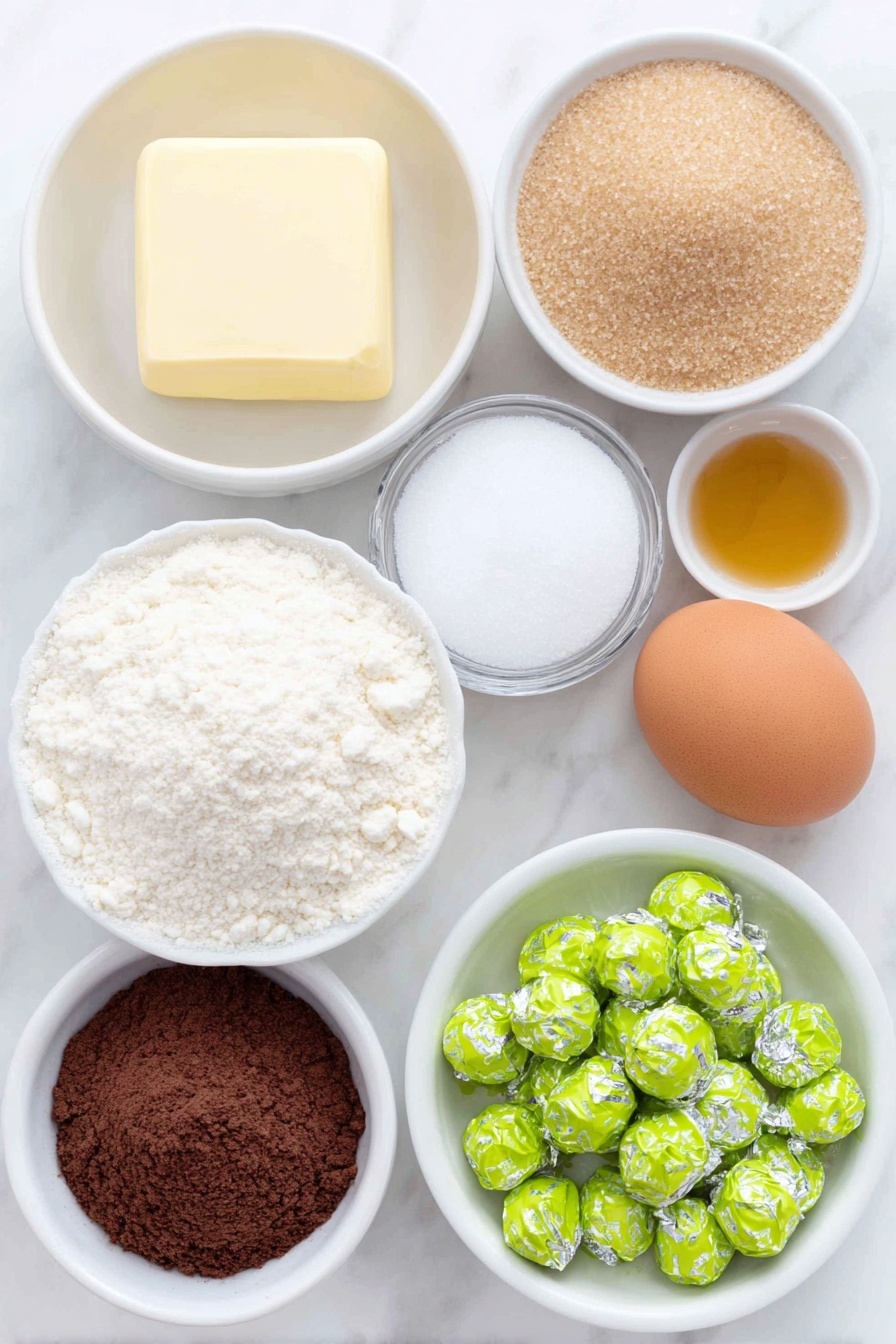
- Butter: Softened to room temperature for easy creaming, which helps the cookie achieve that fluffy texture.
- Granulated sugar: Adds sweetness and helps with spreading in the oven.
- Light brown sugar: Brings moisture and a subtle caramel flavor to keep cookies chewy.
- Egg: Binds everything together and adds structure.
- Vanilla extract: Enhances the overall flavor and rounds out the sweet notes.
- All-purpose flour: The base that gives the cookie structure – don’t skimp on the measuring here!
- Unsweetened cocoa powder: For rich chocolate flavor without sweetness overload.
- Baking soda: Helps cookies rise just enough to stay soft and puffy.
- Salt: Balances the sweetness and enhances chocolate’s depth.
- Chopped Andes mints: Little bursts of mint that melt into the dough as it bakes.
- Whole Andes mints: Placed on top for that perfect finishing touch and visual appeal.
Make It Your Way
I love playing around with this Chocolate Andes Mint Cookies Recipe. Adding a pinch of espresso powder deepens the chocolate even more, which you might enjoy if you're a coffee lover. Plus, I sometimes swap out the Andes mints for peppermint chips if I want a slightly different texture but the same minty kick.
- Variation: I tried mixing in dried cranberries once for a sweet and tart contrast, and it added a fun twist.
- Dairy-Free Adaptation: Using vegan butter works well here, just make sure it’s the type that behaves similarly to traditional butter when creamed.
- Texture Tweak: Chill the dough for the full 3 days if you want thicker cookies with a more intense flavor. I refrigerate overnight usually and find it perfect.
Step-by-Step: How I Make Chocolate Andes Mint Cookies Recipe

Step 1: Cream the Butter and Sugars Until Fluffy
Start by beating your softened butter with granulated sugar and brown sugar on medium-high speed. I usually set a timer for 3 minutes to get that light and fluffy texture. It makes a huge difference in the cookie's tenderness. Once fluffy, add the egg and vanilla, mixing until fully combined while scraping the bowl periodically so everything blends evenly.
Step 2: Mix the Dry Ingredients
Whisk together the all-purpose flour, cocoa powder, baking soda, and salt in a separate bowl. This step helps distribute the leavening evenly and prevents clumps of cocoa powder. Trust me, no one wants little patches of dry cocoa dust in their cookies!
Step 3: Combine Wet and Dry Ingredients Gently
Turn the mixer speed down to low and slowly add the dry ingredients to your wet mixture. This is a trick I picked up to minimize the flour from flying everywhere in a cloud. Once mixed, fold in the chopped Andes mints by hand with a spatula. This prevents overmixing and keeps those chocolate chunks from breaking down too much.
Step 4: Chill the Dough – Don’t Skip This!
This is the golden step. Wrap the dough tightly in plastic wrap and chill for at least 3 hours. I like to prep this the night before baking. The dough firms up, flavors deepen, and when baked, the cookies hold their shape with a perfect chewy texture. Patience here really pays off.
Step 5: Scoop and Bake
Preheat your oven to 350°F and line baking sheets with parchment paper. If the dough’s been chilling more than a day, let it rest on the counter for about 30 minutes – this helps with even spreading. Using a large cookie scoop, place dough balls 2-3 inches apart. Bake for 12 minutes until edges look set but the center is still a little soft.
Step 6: The Finishing Touch
Right when they come out of the oven, quickly press a whole Andes mint in the center of each warm cookie. Let them sit for a couple of minutes so the mint melts slightly, then swirl it with a toothpick to create a lovely marbled mint-chocolate effect. If your cookies lose shape a bit, a quick twist of a cup edge around the cookie restores that classic round look.
Top Tip
Based on my experience baking this Chocolate Andes Mint Cookies Recipe multiple times, these tips will elevate your baking game and avoid common pitfalls I encountered initially.
- Don’t Skip the Chill: I learned the hard way that skipping the chill leads to flat cookies that spread too much. Three hours minimum is where the magic happens.
- Scoop Consistently: Use a cookie scoop for evenly sized cookies so they bake uniformly and look professional.
- Press the Andes Mint Swiftly: Do it as soon as cookies come out of the oven while they’re still warm for that delicious mint melt.
- Shape Fix: If your cookies lose their perfect circle shape, use the rim of a glass or cup to gently reshape while still warm for clean presentation.
How to Serve Chocolate Andes Mint Cookies Recipe

Garnishes
I usually keep it simple and elegant—just a light dusting of powdered sugar if I want to dress them up for guests. Sometimes, I sprinkle a tiny pinch of crushed peppermint candies on top while the mint is still melting for a little extra festive crunch.
Side Dishes
Pair these cookies with a glass of cold milk or a hot cup of herbal tea like peppermint or chamomile to complement the minty flavors. I’ve also served them alongside a scoop of vanilla ice cream for a decadent dessert experience.
Creative Ways to Present
For holiday parties, I arrange the cookies on a festive platter with fresh mint leaves scattered around for color contrast. Another fun idea I tried was stacking them between layers of whipped cream and crushed Andes mints for an impromptu cookie cake that was a hit.
Make Ahead and Storage
Storing Leftovers
I store leftover cookies in an airtight container at room temperature – they usually stay fresh for up to 4 days, but honestly, they disappear fast in my house! Adding a slice of bread to the container helps keep them soft longer, a trick I swear by.
Freezing
Cookie dough can be frozen before baking, which is super handy. I portion the dough into balls, freeze them on a tray, then transfer them to a freezer bag. When ready, bake directly from frozen, adding an extra 2 minutes to the bake time. The baked cookies freeze well too—just thaw at room temperature.
Reheating
I gently warm leftover cookies in the microwave for 10-15 seconds to revive that freshly baked softness. You can also pop them in a 300°F oven for a few minutes, but keep an eye on them so they don’t dry out.
Frequently Asked Questions:
You can substitute regular chocolate chips, but you’ll miss out on the distinctive mint flavor that Andes mints provide. If you want a minty alternative, try adding a few drops of peppermint extract to the dough along with chocolate chips.
Chilling solidifies the butter, preventing the cookies from spreading too thin during baking. It also helps the flavors meld and develops a chewier texture, which is why it’s key not to skip or shorten this step.
Absolutely! Swap the all-purpose flour for a gluten-free flour blend that measures cup-for-cup. Just be sure to check your cocoa powder and other ingredients are gluten-free as well. The texture may vary slightly but the flavor stays delicious.
Chilling the dough and baking at the right temperature helps control how much the mints melt. Also, pressing the whole Andes mint on warm cookies instead of introducing them into the dough ensures the mint on top melts just enough for that beautiful swirl without disappearing completely.
Final Thoughts
This Chocolate Andes Mint Cookies Recipe has earned its place in my go-to collection for holidays, cozy nights, and anytime I want a little comfort in cookie form. The blend of rich chocolate and refreshing mint always delights friends and family alike. I can’t wait for you to try it and make it your own—it’s a joy to bake and even more of a joy to share.
Print
Chocolate Andes Mint Cookies Recipe
- Prep Time: 15 minutes
- Cook Time: 12 minutes
- Total Time: 3 hours 27 minutes
- Yield: 18 cookies
- Category: Dessert
- Method: Baking
- Cuisine: American
- Diet: Vegetarian
Description
Deliciously rich Chocolate Andes Mint Cookies featuring a tender cocoa dough studded with chopped Andes mints and topped with a melted whole Andes mint for a perfect sweet and minty treat.
Ingredients
Cookie Dough
- ½ cup butter softened to room temperature
- ¼ cup granulated sugar
- ¾ cup light brown sugar packed
- 1 large egg room temperature
- 1 teaspoon vanilla extract
- 1 ⅓ cups all-purpose flour
- ½ cup unsweetened cocoa powder
- 1 teaspoon baking soda
- ½ teaspoon salt
- 1 cup chopped Andes mints
Cookie Topping
- 18-20 whole Andes mints
Instructions
- Prepare the dough: In a large bowl, beat the butter, granulated sugar, and brown sugar on medium-high speed for 3 minutes until light and fluffy. Beat in the egg and vanilla extract, scraping down the sides as needed.
- Mix dry ingredients: Whisk together the flour, cocoa powder, baking soda, and salt in a separate bowl until combined.
- Combine wet and dry: Slowly add the dry ingredients to the wet on low speed to avoid flour flying. Stir in the chopped Andes mints using a rubber spatula.
- Chill the dough: Cover dough tightly with plastic wrap and chill in the refrigerator for at least 3 hours or up to 3 days to ensure thicker cookies.
- Preheat oven and prepare baking sheets: Set oven to 350°F and line two large baking sheets with parchment paper.
- Scoop and arrange dough: If chilled more than a day, let dough sit at room temperature for 30 minutes. Use a large cookie scoop to place dough balls 2-3 inches apart on baking sheets.
- Bake the cookies: Bake for 12 minutes until edges are set and tops appear slightly soft.
- Add mint topping: Immediately after baking, press a whole Andes mint into the center top of each warm cookie. Let sit to melt, then use a toothpick to swirl the melted mint inside.
- Shape cookies: If cookies lose their round shape during baking, gently swirl a wide-mouthed cup around the edge to recreate a perfect circle.
Notes
- Chilling the dough is essential for thicker, chewier cookies—do not skip this step.
- Let the dough come to room temperature if chilled for an extended time to ensure easier scooping.
- Use parchment paper to prevent sticking and for easy cleanup.
- Swirling the Andes mint with a toothpick enhances the minty flavor and creates a pretty marbled effect.
- These cookies store well in an airtight container for up to 5 days.
Nutrition
- Serving Size: 1 cookie
- Calories: 180 kcal
- Sugar: 15 g
- Sodium: 125 mg
- Fat: 9 g
- Saturated Fat: 5 g
- Unsaturated Fat: 3 g
- Trans Fat: 0 g
- Carbohydrates: 22 g
- Fiber: 2 g
- Protein: 2 g
- Cholesterol: 30 mg


Leave a Reply