There’s just something delightful about the swirl of dark chocolate and pale vanilla dough joining together in a cookie, isn’t there? That’s why I’m excited to share this Chocolate Pinwheel Cookies Recipe with you—these cookies are not only a feast for your eyes but also melt-in-your-mouth delicious. Perfect for holiday trays or a cozy afternoon treat!

Jump to:
Why You'll Love This Recipe
I’m honestly smitten with these cookies because they bring so much charm and flavor with such a straightforward process. Making the pinwheels together feels like a little kitchen magic — the way those two doughs twist and unfold in the oven always gets me smiling.
- Visual wow factor: The gorgeous spiral pattern makes these cookies a standout on any cookie platter.
- Balanced flavors: Combining vanilla and rich chocolate gives a perfect harmony, not too sweet but deeply satisfying.
- Make ahead friendly: You can prep the dough logs in advance, making it easier to fit cookie baking into a busy schedule.
- Fun to customize: Whether dipping in chocolate or rolling in sprinkles, you can make these uniquely yours.

Ingredients & Why They Work
The ingredient list might look simple, but oh, it’s a perfect balance. The butter and sugar give the cookie its tender, buttery crumb while the cocoa powder adds a deep chocolate richness. And the little splash of espresso powder? Trust me, it boosts the chocolate flavor without making it taste like coffee.

- All-purpose flour: Provides the perfect structure without making the cookies cakey.
- Baking powder: Just enough lift to keep the cookies tender and light.
- Salt: Balances the sweetness and intensifies the chocolate flavor.
- Unsalted butter: Room temperature to help cream smoothly and give that rich, tender crumb.
- Granulated sugar: Sweetens and aids in creating the cookie’s classic texture.
- Egg and egg yolk: Eggs bind the dough and yolk adds richness for a perfect soft but sturdy cookie.
- Vanilla extract: Enhances overall flavor with deep, comforting notes.
- Cocoa powder: Choose natural or Dutch-process for that chocolate color and earthiness.
- Milk: Helps mix the cocoa powder smoothly into the dough.
- Espresso powder (optional): A secret weapon for amplifying that chocolaty goodness.
- Chocolate for dipping (optional): Melting high-quality baking chocolate makes the final cookies elegant and extra delicious.
- Sprinkles (optional): Adds fun color and texture – great for parties or holidays.
Make It Your Way
One of the best parts about this Chocolate Pinwheel Cookies Recipe is how easy it is to personalize. I often experiment with flavors or add a fun twist depending on the season or my mood—a little customization keeps things exciting!
- Flavor twists: I like swapping the vanilla extract in half the dough for peppermint or almond extract—especially at holiday time. It adds a refreshing note without messing with the classic pattern.
- Color pop: Sometimes I add gel food coloring to the vanilla dough to create colorful pinwheels for birthdays or themed parties. It’s a hit every time!
- Texture extras: Rolling the dough logs in coarse sugar or sprinkles before slicing adds a delightful crunch and sparkle.
- Chocolate dipped finish: If you want a little extra indulgence, dipping half the cooled cookie in melted white or dark chocolate with a sprinkle of sea salt takes these to the next level.
Step-by-Step: How I Make Chocolate Pinwheel Cookies Recipe
Step 1: Whisk Dry Ingredients and Cream Butter & Sugar
Start by combining your flour, baking powder, and salt in a bowl—this gets your dry ingredients evenly mixed, which is key for consistent cookies. Then, in a separate large bowl, beat the softened butter with the granulated sugar for about 3 minutes until light and fluffy. Don’t rush this part; properly creamed butter and sugar make all the difference in texture.
Step 2: Add Eggs and Vanilla
Mix in your egg, egg yolk, and vanilla extract, beating on high speed until fully combined. Scraping the bowl a few times will ensure even mixing and no pockets of unmixed batter.
Step 3: Blend Flour and Divide Dough
On low speed, mix the flour mixture into your wet base until just combined. The dough will be thick and sticky – that’s perfect. Remove the dough from the mixer and divide it roughly in half. If one half is smaller, use that one for the chocolate—this helps with the dough’s consistency later.
Step 4: Make the Chocolate Dough
Place the smaller dough half back in the bowl and add cocoa powder, milk, and optional espresso powder. Beat until mixed thoroughly—the dough will look beautifully chocolatey now!
Step 5: Shape and Chill the Dough Blocks
This is the sticky, slightly fiddly part. Using lightly floured or cocoa-dusted hands, shape each dough half into a 1-inch-thick rectangle, about 4×5 inches. Then wrap them and pop them in the fridge for 60–90 minutes. You want them firm but still bendable—too cold and the next steps get tricky.
Step 6: Roll Out Doughs and Stack
Roll out the vanilla dough on lightly floured parchment to an 8×14-inch rectangle. Refrigerate it while you roll out the chocolate dough on another piece of floured (or cocoa-dusted) parchment, also to 8×14 inches or slightly smaller. Carefully peel and layer the chocolate dough over the vanilla one, gently patting down to remove air bubbles and patching any tears.
Step 7: Roll into Log and Chill
Use the parchment paper to help you roll the dough into a tight log, starting from one long edge. This step requires patience to avoid cracks, but a gentle touch and small patches of dough can fix most imperfections. Slice the log in half for easier handling, wrap them, and refrigerate for 2 hours to firm up.
Step 8: Slice and Bake
Preheat your oven to 350°F. Slice the chilled logs into ½-inch-thick cookies, placing them 2 inches apart on parchment-lined sheets—remember, these spread quite a bit. If your dough softens too much, a quick chill of the cut cookies for 10 minutes helps them hold their shape. Bake 14–15 minutes until edges are lightly golden.
Step 9: Optional Chocolate Dip and Decorate
Once completely cooled, dip half of each cookie in melted baking chocolate and add sprinkles if you like. Let the chocolate set at room temperature or in the fridge for crisp perfection.
Top Tip
Making the Chocolate Pinwheel Cookies Recipe was a learning curve for me—rolling sticky dough and keeping those pinwheels neat is a little art and science combined. A few pointers can save you some headaches and get you baking like a pro from the first batch.
- Chill is key: Don’t skip the chilling stages! It’s what makes the dough manageable and keeps the spirals tight.
- Flour/cocoa dusting: Coat your hands and work surfaces lightly, but not too much—you want a smooth roll, not a floury mess.
- Patch generously: Pinwheel dough tears are normal—fix them with small dough pieces and gentle pressing, no perfection required.
- Slicing with a serrated knife: I find using a very sharp serrated knife or dental floss helps cut neat slices without squashing the dough.
How to Serve Chocolate Pinwheel Cookies Recipe

Garnishes
I love adding a little sparkle—sprinkles right after the chocolate dip, or a light dusting of confectioners’ sugar just before serving to echo the visual spiral theme. A tiny sprinkle of flaky sea salt on dipped chocolate adds a grown-up contrast that's delightful.
Side Dishes
Pair these with a glass of cold milk or a steaming cup of espresso for a perfect dessert duo. They also make a lovely holiday accompaniment to warm mulled cider or hot cocoa topped with whipped cream.
Creative Ways to Present
I’ve found arranging these pinwheels in a circular pattern on a festive platter really showcases the spiral design beautifully. Sometimes for parties, I stack small batches on tiered cake stands, or dab the dipped cookies with edible gold dust for extra glam.
Make Ahead and Storage
Storing Leftovers
Leftover Chocolate Pinwheel Cookies keep wonderfully fresh stored in an airtight container at room temperature for up to a week. I recommend keeping dipped cookies separate or refrigerated to maintain that perfect chocolate snap.
Freezing
I like to freeze the dough logs wrapped tightly in plastic wrap and foil for up to three months. When I’m ready to bake, I thaw overnight in the fridge and finish slicing and baking fresh—results are just as wonderful as fresh dough!
Reheating
If you want warm cookies, a quick 10–15 second zap in the microwave brings them back to that freshly baked softness without drying them out. Just be careful not to overheat, especially if they’re chocolate dipped.
Frequently Asked Questions:
Absolutely! After dividing the dough, you can add gel food coloring to the vanilla dough to make colorful pinwheels. Just mix it well and make sure the dough is pliable enough for rolling.
Using a very sharp serrated knife or dental floss to slice helps you get clean, neat rounds without crushing or stretching the dough. Remember to chill the logs first for easier slicing.
You can try substituting all-purpose flour with a gluten-free blend, but results might vary. Make sure the blend you use has xanthan gum or a similar binder to maintain dough integrity and prevent crumbly cookies.
Espresso powder enhances the depth of the chocolate flavor without making the cookies taste like coffee. It’s a subtle boost that makes the chocolate taste richer and more complex.
Final Thoughts
I really hope you give this Chocolate Pinwheel Cookies Recipe a try—you might be surprised how such a simple dough transforms into something so elegant and delicious. It’s been a favorite in my kitchen for years, and I find it’s as fun to make as it is to eat. Plus, sharing them with friends just feels like giving a little piece of happiness in every bite. So go ahead, preheat that oven and enjoy this sweet swirl of goodness!
Print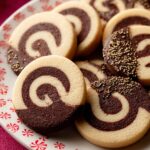
Chocolate Pinwheel Cookies Recipe
- Prep Time: 4 hours 15 minutes
- Cook Time: 15 minutes
- Total Time: 4 hours 30 minutes
- Yield: 28 cookies
- Category: Dessert
- Method: Baking
- Cuisine: American
- Diet: Vegetarian
Description
These classic Pinwheel Cookies feature a swirl of vanilla and chocolate dough, creating an eye-catching design and delightful flavor combination. Perfectly buttery and tender, they’re rolled into logs, chilled, sliced, and baked for charming, delicious treats that can be dipped in chocolate and decorated with sprinkles for extra flair.
Ingredients
Base Cookie Dough
- 2 and ⅔ cups (333g) all-purpose flour (spooned & leveled)
- ¾ teaspoon baking powder
- ½ teaspoon salt
- 1 cup (16 Tbsp; 226g) unsalted butter, softened to room temperature
- 1 cup (200g) granulated sugar
- 1 large egg + 1 egg yolk, at room temperature
- 1 and ½ teaspoons pure vanilla extract
Chocolate Dough
- 2 Tablespoons (10g) unsweetened natural or dutch-process cocoa powder
- 1 Tablespoon (15ml) milk
- Optional: ½ teaspoon espresso powder
Optional for Dipping
- 6 ounces (170g) white, semi-sweet, or dark chocolate, finely chopped
- Optional: sprinkles
Instructions
- Make the dough: Whisk the flour, baking powder, and salt together in a medium bowl. Set aside.
- Cream butter and sugar: In a large bowl using a hand mixer or stand mixer with paddle attachment, beat the butter and granulated sugar on medium-high speed until creamed and fluffy, about 3 minutes. Scrape down sides as needed. Add the egg, egg yolk, and vanilla extract and beat on high speed until combined, about 1 minute, scraping bowl as needed.
- Add flour mixture: Mix the flour mixture into the wet ingredients on low speed until combined. The dough will be thick and sticky. Remove from mixing bowl.
- Divide dough in half: You should have about 800–900g total dough. Divide into two pieces, slightly smaller half for the chocolate dough.
- Make chocolate dough: Place half the dough in the mixing bowl. Add cocoa powder, milk, and espresso powder if using. Beat on low speed until combined.
- Shape & chill dough: Place both doughs on a lightly floured surface (use cocoa powder for chocolate dough). Form each into a 1-inch thick, 4x5 inch rectangle. Wrap tightly in plastic wrap or parchment and refrigerate for 60–90 minutes until less sticky but pliable.
- Roll out doughs: Roll vanilla dough on lightly floured parchment paper to an 8x14 inch rectangle about ⅛–¼ inch thick. Refrigerate vanilla dough, then roll chocolate dough to same size on floured or cocoa powder dusted parchment. Place chocolate dough on top of vanilla dough, flattening gently to remove air bubbles and patch any tears.
- Roll into log: Starting at long side, roll doughs together tightly using parchment to assist. Patch any cracks with fingers. Cut the log in half to create two 7-inch logs.
- Chill logs: Wrap logs tightly and refrigerate for 2 hours up to 4 days.
- Preheat oven and prepare sheets: Preheat oven to 350°F (177°C). Line two baking sheets with parchment paper or silicone mats.
- Slice and bake: Slice chilled logs into fourteen ½-inch thick cookies each. Arrange 2 inches apart on baking sheets. If dough softens, chill cookies on sheets for 10 minutes before baking. Bake 14–15 minutes until edges are lightly browned.
- Cool: Let cookies cool on baking sheet 5 minutes then transfer to wire rack to cool completely.
- Optional chocolate dipping: Melt chopped chocolate in double boiler or microwave, stirring every 20 seconds until smooth. Dip half of each cooled cookie into chocolate and add sprinkles if desired. Let chocolate set at room temperature or refrigerate.
- Storage: Store cookies covered at room temperature for 1 week. Refrigerate dipped cookies after a few days.
Notes
- Baked cookies freeze well for up to 3 months; thaw overnight in refrigerator before serving.
- You can prepare dough logs and refrigerate for up to 4 days or freeze for 3 months before slicing and baking.
- Gel food coloring can tint vanilla dough for color variation if skipping chocolate dough or for festive designs.
- Flavor extracts like peppermint or coconut can be added to half or all of the dough for different tastes.
- For sprinkles or coarse sugar coating, roll dough logs in coating after chilling; use a pastry brush with water to help coating stick if needed.
- Use baking chocolate bars (Bakers or Ghirardelli) for dipping; avoid chocolate chips which do not melt properly.
Nutrition
- Serving Size: 1 cookie
- Calories: 140 kcal
- Sugar: 10 g
- Sodium: 50 mg
- Fat: 8 g
- Saturated Fat: 5 g
- Unsaturated Fat: 3 g
- Trans Fat: 0 g
- Carbohydrates: 17 g
- Fiber: 1 g
- Protein: 2 g
- Cholesterol: 30 mg


Leave a Reply