There’s something irresistibly festive about a creamy, colorful treat like this Christmas Swirl White Chocolate Fudge Recipe. It combines smooth white chocolate with vibrant red and green swirls that look like holiday magic on a plate and taste even better. Trust me, it’s worth every minute to make and share!

Jump to:
- Why You'll Love This Recipe
- Ingredients & Why They Work
- Make It Your Way
- Step-by-Step: How I Make Christmas Swirl White Chocolate Fudge Recipe
- Top Tip
- How to Serve Christmas Swirl White Chocolate Fudge Recipe
- Make Ahead and Storage
- Frequently Asked Questions:
- Final Thoughts
- Christmas Swirl White Chocolate Fudge Recipe
Why You'll Love This Recipe
I’ve made quite a few fudge recipes over the years, but this Christmas Swirl White Chocolate Fudge Recipe stands out because it’s super festive and surprisingly simple. It feels special enough for the holidays but doesn’t require fancy ingredients or tech skills.
- Beautiful swirls: The red and green gel colors create a stunning visual that’s perfect for gifting or holiday parties.
- Simple ingredients: Just white chocolate chips, sweetened condensed milk, butter, and gel food coloring.
- Rich and creamy: The texture melts on your tongue, thanks to the sweetened condensed milk and butter blend.
- Easy to customize: You can adjust the colors, add peppermint, or even swirl in nuts for a personal twist.

Ingredients & Why They Work
Every ingredient in this Christmas Swirl White Chocolate Fudge Recipe plays a key role in creating that luscious texture and festive look. Choosing quality white chocolate chips really makes a difference, and gel food coloring works better than liquid if you want vibrant, clean swirls.

- White chocolate chips: I use Ghirardelli for their creamy melt and smooth flavor.
- Sweetened condensed milk: Adds that rich sweetness and helps the fudge set perfectly without being dry.
- Unsalted butter: Provides silkiness and balances the sweetness.
- Red gel food coloring: Gel colors blend beautifully without thinning the fudge mixture.
- Green gel food coloring: Same here—important for those eye-catching festive swirls.
Make It Your Way
One of the best things about this Christmas Swirl White Chocolate Fudge Recipe is how easy it is to make it your own. I often add crushed peppermint candy on top or sprinkle chopped nuts for a crunch. You can get super creative here!
- Minty twist: I once stirred in a teaspoon of peppermint extract—so good, but go easy or it’s overpowering.
- Nutty crunch: Adding toasted pecans or walnuts in the white fudge before swirling really ups the texture.
- Different colors: Feel free to swap green for gold or silver edible glitter for an elegant holiday touch.
Step-by-Step: How I Make Christmas Swirl White Chocolate Fudge Recipe
Step 1: Set up your workspace and pan
I always start by lining an 8x8-inch straight-sided baking pan with parchment paper, leaving a nice overhang on all sides. This little trick makes removing the fudge a breeze later. I give the paper a quick spray with cooking spray or lightly rub some butter to make sure the fudge doesn’t stick.
Step 2: Melt your fudge mixture carefully
Next, in a medium saucepan over medium-low heat, combine the white chocolate chips, sweetened condensed milk, and cold, cubed butter. Stir constantly for 6 minutes until everything melts smoothly. This is key—stirring keeps the fudge from burning or getting grainy. Once smooth, remove from heat.
Step 3: Divide and color the fudge
Quickly transfer about one-third of the warm white chocolate mixture into a small bowl and add your red gel food coloring—start with a quarter teaspoon and stir until you get a uniform color with no white streaks. Repeat the process with another third for green coloring in a separate bowl. The remaining third stays white. Work fast here because the fudge firms up as it cools!
Step 4: Create your festive swirls
In your prepared pan, dollop random spoonfuls of the white, red, and green fudge mixtures. Don’t worry about being precise—this is where the fun swirl effect takes shape. Use a wooden skewer or butter knife to gently swirl the colors together for that classic Christmas swirl pattern.
Step 5: Smooth the surface and chill
Before chilling, place a small piece of parchment paper over the top and gently press down to smooth out the surface without disturbing the swirls. Pop the pan into the fridge and let it set for 3 hours until firm enough to slice.
Step 6: Slice and serve
Once set, lift the fudge using the parchment overhang onto a cutting board and slice into about 64 one-inch squares. To get clean cuts, I like warming my knife under hot water first and then drying it—this melts through the fudge smoothly without crumbling.
Top Tip
Over the years, I’ve learned a few tricks that really help the Christmas Swirl White Chocolate Fudge Recipe turn out perfectly every time. This fudge is delicate, so pacing and patience make all the difference.
- Constant stirring: Stir frequently while melting to avoid burning the white chocolate—it’s sensitive and can seize.
- Work quickly with colors: The fudge starts to firm fast, so add gel colors and dollop into the pan without delay.
- Use parchment overhang: It makes removing the fudge blocks so much easier and saves mess and frustration.
- Warm your knife: When slicing, warming the blade under hot water prevents cracking or crumbling for neat squares.
How to Serve Christmas Swirl White Chocolate Fudge Recipe

Garnishes
I love topping the fudge with finely crushed candy canes just before chilling. It adds a lovely crunch and a hint of peppermint that complements the sweetness perfectly. Sprinkleed edible gold dust also looks fantastic for more elegance at holiday gatherings.
Side Dishes
This fudge pairs beautifully with warm drinks—think mulled cider, hot cocoa with marshmallows, or even a spiced chai latte. I also like to serve it alongside cookies or at the end of a holiday meal as a bite-sized sweet treat.
Creative Ways to Present
For gifting, I’ve wrapped individual fudge squares in wax paper tied with festive twine or nestled them in mini cupcake liners in pretty holiday boxes. It’s an instant crowd-pleaser on cookie trays or at party dessert tables.
Make Ahead and Storage
Storing Leftovers
I keep leftover Christmas fudge in an airtight container in the fridge. It stays fresh and creamy for up to a week, which is perfect because honestly, I never seem to have much left after sharing!
Freezing
If I want to make them ahead, I freeze the fudge in a tightly sealed container for up to two months. Before serving, I thaw it overnight in the fridge to keep the texture just right.
Reheating
Since fudge is best served chilled or at room temperature, I don’t really reheat it. But if the fudge is a bit firm, letting it sit at room temp for 15 minutes before eating works wonders.
Frequently Asked Questions:
Gel food coloring is best because it provides richer color without thinning the fudge mixture. Liquid coloring can make the fudge runnier and affect the texture, so I don’t recommend swapping it.
It needs about 2 to 3 hours in the refrigerator to fully set and become firm enough to slice neatly. If you cut it too soon, it can be too soft and messy to handle.
Absolutely! Adding a splash of peppermint extract or mixing in chopped nuts before swirling adds delicious variations. Just don’t add too much extract or the fudge could become overpowering.
Use a sharp, large knife warmed under hot water and wiped dry before slicing. This method helps make smooth clean cuts without crumbling the fudge, giving you nice even pieces.
Final Thoughts
Honestly, I keep coming back to this Christmas Swirl White Chocolate Fudge Recipe year after year. It’s the perfect combination of simple ingredients, festive colors, and a rich, creamy flavor that makes the holidays even sweeter. I can’t recommend it enough if you want to impress friends and family with a beautiful, delicious treat—and I bet you’ll love making it just as much as eating it!
Print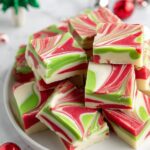
Christmas Swirl White Chocolate Fudge Recipe
- Prep Time: 15 minutes
- Cook Time: 6 minutes
- Total Time: 2 hours 15 minutes
- Yield: 64 pieces
- Category: Dessert
- Method: Stovetop
- Cuisine: American
Description
This festive Christmas fudge recipe features creamy white chocolate, sweetened condensed milk, and colorful red and green swirls. Perfect for holiday gifting or serving at your seasonal gatherings, this fudge is smooth, rich, and delightfully decorative with vibrant gel food coloring swirled through the creamy base.
Ingredients
Main Ingredients
- 22 oz white chocolate chips (2 11-oz. bags, Ghirardelli recommended)
- 14 ounce can sweetened condensed milk
- 4 tablespoons unsalted butter, cold and cut into small cubes
Coloring
- ¼-½ teaspoon red gel food coloring (Americolor brand recommended)
- ¼-½ teaspoon green gel food coloring (Americolor brand recommended)
Instructions
- Prepare Pan: Line an 8×8-inch straight sided baking pan with parchment paper, ensuring there is enough overhang on the sides to lift out the fudge easily once set.
- Melt Chocolate Mixture: In a medium saucepan over medium-low heat, combine white chocolate chips, sweetened condensed milk, and cold butter cubes. Stir constantly for 6 minutes or until chips are fully melted and mixture is smooth. Remove from heat.
- Divide Mixture for Coloring: Transfer one third of the melted mixture into a small bowl and add red gel food coloring starting with ¼ teaspoon, mixing thoroughly until color is even without streaks.
- Prepare Green Mixture: Transfer another third of the melted mixture into a separate small bowl. Add green gel food coloring starting with ¼ teaspoon, stirring until fully incorporated and uniform.
- Leave Remaining Mixture White: Keep the remaining third of the mixture white in the original saucepan or a clean bowl for swirling.
- Assemble Fudge: Drop dollops of white, red, and green mixtures randomly into the prepared pan until all mixtures are used.
- Create Swirl Pattern: Use a wooden skewer or butter knife to gently swirl the colors together, forming a decorative pattern on the top of the fudge.
- Smooth Surface: Place a small piece of parchment paper over the fudge and gently press down to create a smooth, even top without disturbing the swirl.
- Chill and Set: Refrigerate the fudge for 3 hours until fully set and firm to the touch.
- Cut and Serve: Lift the fudge from the pan using the parchment paper overhang. Place on a cutting board and slice into 64 one-inch squares. Serve and enjoy.
Notes
- Line the pan with parchment or waxed paper and lightly spray or butter it for easy release of the fudge.
- Work quickly when mixing gel food colorings into the melted chocolate, as the fudge may start to firm up.
- If the mixture becomes too firm, gently warm the bowls for 15-20 seconds or stir in a microwave in short bursts, being careful not to overheat or burn the mixture.
- Stir continuously when melting to avoid grainy texture caused by burning or separating chocolate crystals.
- Use a warm knife (run under warm water and dry) to cut clean fudge squares without sticking.
- Store fudge in an airtight container in the refrigerator up to 1 week or freeze for up to 2 months, thawing fully before serving.
- Due to the richness, serve in small one-inch squares to enjoy without overwhelming.
Nutrition
- Serving Size: 1 piece (1 inch square)
- Calories: 110 kcal
- Sugar: 15 g
- Sodium: 30 mg
- Fat: 6 g
- Saturated Fat: 4 g
- Unsaturated Fat: 1.5 g
- Trans Fat: 0 g
- Carbohydrates: 14 g
- Fiber: 0 g
- Protein: 1 g
- Cholesterol: 10 mg


Leave a Reply