There’s something delightfully festive about these little bites of joy that instantly remind me of holiday cheer. The Christmas Tree Cake Balls Recipe is not just adorable but also melts in your mouth, making holiday gatherings extra special without the fuss of traditional baking.

Jump to:
Why You'll Love This Recipe
I have to admit, these Christmas Tree Cake Balls have become my go-to treat during the holidays because they’re ridiculously easy yet impressively festive. You don’t have to be a pro in the kitchen to whip these up—plus, they’re perfect for sharing (or not, I won’t judge).
- Quick & Fuss-Free: No baking required – just mix, chill, dip, and decorate.
- Perfect Party Treat: Their festive tree shape and colors make them my top pick for holiday parties.
- Kid-Friendly Fun: Decorating is a blast with the little ones, and they love eating the results just as much.
- Customizable: You can switch up coatings or add flavors to suit your tastes or dietary needs.

Ingredients & Why They Work
Each ingredient in this Christmas Tree Cake Balls Recipe works together harmoniously to create those soft, flavorful little spheres with a crunchy chocolate shell that just screams holiday magic. When shopping, I like to pick quality products since it really shows through in the final taste.

- Little Debbie Christmas Tree Cakes: The base of these treats, already packed with moist cake and creamy filling, makes the process so easy and deliciously festive.
- Cream Cheese: Adds smoothness and a slight tang to hold everything together without overwhelming sweetness.
- White Almond Bark: Perfect for a glossy, sweet coating; melts smoothly and hardens nicely to protect your cake balls.
- Red Candy Melts: For that signature drizzled pop of red – they add color and a touch of festive charm.
- Green Sanding Sugar: Sprinkled while the coating is wet, it creates a sparkly texture that looks just like pine needles on a Christmas tree.
Make It Your Way
One of my favorite things about the Christmas Tree Cake Balls Recipe is how adaptable it is. Feel free to switch up the coatings or try different cake flavors – you’ll discover your own perfect twist!
- Variation: I once swapped the white almond bark for milk chocolate and used peppermint candy pieces instead of sanding sugar for a minty crunch. It was a hit at the office party!
- Dietary Options: You can use dairy-free cream cheese and vegan candy melts for an allergy-friendly version.
- Flavor Boosts: Adding a teaspoon of vanilla or almond extract to the cream cheese mixture can subtly enhance the flavor.
Step-by-Step: How I Make Christmas Tree Cake Balls Recipe
Step 1: Cream the Cheese and Cake Together
Start by placing the cream cheese in a large bowl. Using a hand mixer on medium speed, beat it until it’s smooth and creamy. Don’t forget to scrape down the sides to get every bit. Then, crumble the Christmas Tree Cakes into the bowl and mix everything until fully combined with no large chunks left. This step is key to getting that perfect texture—smooth yet cakey.
Step 2: Shape and Chill the Cake Balls
Grab a tablespoon cookie scoop to get evenly sized cake balls—this keeps baking consistent and neat. If the mixture sticks to your hands, lightly rub them with vegetable oil; that little trick has saved me more times than I can count! Place the balls on parchment-lined baking sheets, then pop them in the freezer for at least 2 hours or overnight for best results. They need to be firm so they hold their shape when dipped.
Step 3: Dip in Smooth White Almond Bark
Break the white almond bark into smaller pieces and microwave in 30-second bursts, stirring in between, until silky smooth. Using two forks (or a fork and a skewer), dip each chilled ball fully into the chocolate, then gently shake off the excess before transferring back onto parchment. This double-fork technique helps keep them perfectly coated without breaking them apart.
Step 4: Add the Festive Green Sprinkle Touch
While the coating’s still wet, sprinkle green sanding sugar over each cake ball. I like to do this quickly because once the coating sets, the sugar won’t stick. It adds that magical sparkle and texture that really brings the Christmas tree look to life.
Step 5: Drizzle with Red Candy Melts
Next, melt the red candy melts the same way as the almond bark. If the melted candy feels too thick, I add a little melted coconut oil gradually to thin it out—but don’t add too much at once, or it will get too runny. Pour the stems into a small bag, cut a tiny corner off, and drizzle the red candy back and forth over the truffles. Give them about 10 minutes in the fridge to set or just wait at room temperature.
Step 6: Store and Enjoy!
Once your candy drizzle is firm, these cuties are ready to serve. Store them in an airtight container in the fridge, and they'll stay fresh up to a week—though I doubt they last that long in my house!
Top Tip
From my experience, a few tricks make all the difference when making these cake balls—you want them to look as magical as they taste.
- Freezing for Firmness: Don’t skip the chilling step. Freezing the balls overnight ensures they don’t fall apart when dipped.
- Double Fork Dip Method: Using two forks or a fork and skewer helps control the coating better than just one fork, preventing cracks or breaks.
- Use Parchment Paper: Always set your cake balls on parchment paper after dipping to avoid sticking and for easy removal.
- Oil Your Hands: When rolling the mixture, lightly greasing your hands keeps the cake balls smooth and prevents excess sticking.
How to Serve Christmas Tree Cake Balls Recipe

Garnishes
I stick to classic green sanding sugar for that pine tree sparkle but sometimes toss on tiny edible silver or gold beads to mimic ornaments. It’s a simple touch but instantly ups the festive factor—and kids love helping decorate with those little sprinkles.
Side Dishes
I usually pair these with a warm cup of cocoa or peppermint tea to balance the richness of the bites. They also hold their own alongside other holiday treats like gingerbread cookies or spiced nuts.
Creative Ways to Present
One year, I stacked them in a pyramid on a cake stand to make a mini Christmas tree centerpiece—talk about dessert and decor in one! Wrapping the stand in fairy lights added a magical glow guests still talk about. You can also serve them in festive cupcake liners for individual servings.
Make Ahead and Storage
Storing Leftovers
I keep leftover Christmas Tree Cake Balls in an airtight container in the fridge. They last beautifully for up to 5 to 7 days, and honestly, mine rarely last longer than a couple of days around here.
Freezing
For longer storage, freeze them in a single layer inside a freezer-friendly container. When you’re ready, just thaw in the fridge overnight. The chocolate coating might get a little crackly, but the flavor stays spot-on. I’ve eaten mine straight from the freezer too when I needed a quick treat!
Reheating
Reheating isn’t really necessary for these cake balls, but if you want to take the chill off, simply let them sit at room temperature for about 15–20 minutes before serving. Heating them in the microwave can cause the chocolate to melt, so I avoid that.
Frequently Asked Questions:
Yes! While the Little Debbie Christmas Tree Cakes provide a perfect festive base, you can substitute with chocolate Christmas Tree Cakes or even zebra cakes for a unique twist. Just ensure they’re moist and easy to crumble.
If you don’t have candy melts, you can use white or colored chocolate chips for melting. Just be sure to add a bit of vegetable oil or shortening to get a smooth, dip-friendly consistency.
The key is chilling the cake balls thoroughly in the freezer for at least 2 hours or overnight. This firms them up so they stay intact when you dip them in the melted coating. Additionally, using two forks or a skewer to handle the balls helps minimize breakage.
Absolutely! You can make these a day or two ahead, store them in an airtight container in the fridge, and they’ll still look and taste fantastic when party time arrives. They actually taste better after sitting for a bit as flavors meld.
Final Thoughts
This Christmas Tree Cake Balls Recipe isn’t just a fun holiday project—it’s a delicious way to spread a little joy during a busy season. Every bite reminds me of the warmth and laughs shared around the kitchen table, and I know you’ll get that same cozy feeling. So grab those Christmas Tree Cakes and get dipping—you’re going to love making (and sharing) these as much as I do!
Print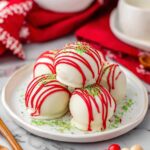
Christmas Tree Cake Balls Recipe
- Prep Time: 30 minutes
- Cook Time: 0 minutes
- Total Time: 2 hours 30 minutes
- Yield: 24 cake balls
- Category: Dessert
- Method: No-Cook
- Cuisine: American
Description
Delightful Little Debbie Christmas Tree Cake Balls combine festive cake layers with creamy cream cheese and are coated in smooth white almond bark, decorated with green sanding sugar and red candy melts for a colorful holiday treat perfect for parties and gifting.
Ingredients
Base
- 10 Little Debbie Christmas Tree Cakes (two 5 count boxes)
- 8 ounces cream cheese, room temperature
Coating
- 16 ounces white almond bark
- 1 cup red candy melts
- Green sanding sugar, as needed
Instructions
- Prepare Cream Cheese Mixture: In a large bowl, add the cream cheese and beat with a hand mixer on medium speed until smooth, scraping down the sides of the bowl as needed.
- Combine Cake and Cream Cheese: Crumble the Christmas Tree Cakes into the bowl with cream cheese and beat until well combined into a uniform mixture.
- Form Cake Balls: Line a baking sheet with parchment paper. Using a 1 tablespoon cookie scoop, scoop and roll 24 cake balls from the mixture. Lightly grease hands with vegetable or canola oil if the mixture sticks.
- Freeze Cake Balls: Place the formed cake balls on the baking sheet and freeze for at least 2 hours or preferably overnight to firm up completely.
- Melt White Almond Bark: In a medium microwave-safe bowl, melt the white almond bark in 30-second intervals, stirring between intervals until smooth and fully melted.
- Dip Cake Balls in White Chocolate: Using two forks or a fork and wooden skewer, dip the frozen cake balls into the melted almond bark. Scoop out excess chocolate by gently shaking and place the coated balls back onto the parchment paper.
- Add Green Sanding Sugar: While the white chocolate is still wet, immediately sprinkle the cake balls with green sanding sugar to decorate.
- Melt Red Candy Melts: In a small microwave-safe bowl, melt the red candy melts in 30-second intervals, stirring until smooth. If too thick, gradually add up to 1 tablespoon refined coconut oil, stirring to adjust consistency.
- Drizzle Red Candy Melt: Transfer melted candy melts to a storage bag and cut a small corner. Drizzle the red candy melts over the coated cake balls back and forth for decoration.
- Set and Store: Allow the candy melt drizzle to firm up at room temperature or chill in the fridge for 10 minutes. Store the finished cake balls in an airtight container in the refrigerator for up to 5 to 7 days.
Notes
- Christmas Tree Cakes: You can substitute the original with chocolate Christmas Tree Cakes or use Zebra Cakes if preferred.
- Storage: Keep leftover cake balls in an airtight container in the refrigerator for up to 5 days to maintain freshness.
- Freezing: Cake balls can be frozen in a freezer-safe container for 2 to 4 months; consume directly from freezer or thaw overnight in the refrigerator. Note that the chocolate coating may crack upon freezing and thawing.
- To prevent sticking while rolling, lightly greasing hands with oil is helpful.
- Adjust red candy melt consistency carefully by adding coconut oil slowly to avoid thinning it too much.
Nutrition
- Serving Size: 1 cake ball
- Calories: 180 kcal
- Sugar: 15 g
- Sodium: 110 mg
- Fat: 10 g
- Saturated Fat: 6 g
- Unsaturated Fat: 3 g
- Trans Fat: 0 g
- Carbohydrates: 20 g
- Fiber: 0.5 g
- Protein: 2 g
- Cholesterol: 15 mg


Leave a Reply