There’s something magically festive about these sweet little treats—one bite and you’ll understand why the Christmas White Chocolate Candy Bars Recipe has become my go-to holiday indulgence. The creamy white chocolate paired with bursts of chewy candy colors just screams holiday joy in every bite.

Jump to:
- Why You'll Love This Recipe
- Ingredients & Why They Work
- Make It Your Way
- Step-by-Step: How I Make Christmas White Chocolate Candy Bars Recipe
- Top Tip
- How to Serve Christmas White Chocolate Candy Bars Recipe
- Make Ahead and Storage
- Frequently Asked Questions:
- Final Thoughts
- Christmas White Chocolate Candy Bars Recipe
Why You'll Love This Recipe
I honestly can’t get enough of this recipe during the holidays. It’s simple to whip up, yet it feels so special thanks to that festive combo of white chocolate and colorful candies. Plus, it’s a real crowd-pleaser whether you’re gifting it or sharing at a family gathering.
- Super Easy to Make: No baking skills required, just melting and mixing, perfect for last-minute holiday prep.
- Festive and Fun: The red and green candies add cheerful pops of color that make it perfect for Christmas celebrations.
- Customizable: You can swap in your favorite chewy candies or add nuts for texture, making it your own special treat.
- Store-and-Go Friendly: It keeps beautifully in the fridge, so you can make it ahead and have sweets ready when guests arrive.

Ingredients & Why They Work
Each ingredient plays a key role here: the buttery white chocolate base melts into a smooth, creamy canvas, while marshmallows give this candy bars recipe just the right chewiness. The red and green gumdrops or chewy candies add bursts of fruity sweetness and a festive look.

- Butter: Helps the chocolate melt smoothly and adds richness to the bars.
- White Chocolate Chips: The star ingredient—go for good quality chips for a creamy, sweet flavor.
- Mini Marshmallows: Give the candy bars that soft, stretchy texture you want in a bite-sized treat.
- Red and Green Gumdrops or Chewy Candy: Adds color and a fun texture contrast; chop them up to distribute evenly.
Make It Your Way
I love mixing up the candies sometimes—especially if I have peppermint bits around, I toss those in for a cool mint punch. Don’t hesitate to tweak this recipe to suit your taste buds or what’s in your pantry; it’s very forgiving and fun to play with.
- Variation: Adding chopped nuts like pistachios or almonds gives a lovely crunch and a nutty twist that pairs perfectly with the white chocolate.
- Dietary tweak: Use dairy-free white chocolate chips if you need vegan-friendly bars, and double-check your candies too.
- Seasonal swap: Outside Christmas, try swapping red and green candies for pastel colors or other seasonal hues to fit any holiday.
Step-by-Step: How I Make Christmas White Chocolate Candy Bars Recipe
Step 1: Prep Your Pan and Gather Ingredients
First, line an 8x8 baking dish with parchment paper and give it a light greasing. This simple step is a game-changer later when you lift your candy bars out without any sticky mess. Have your butter, white chocolate chips, mini marshmallows, and chopped candies ready to go—melting comes fast, so prep counts!
Step 2: Melt and Mix In Stages
Pop the butter, white chocolate chips, and marshmallows into a large microwave-safe bowl. Microwave for one minute, then stir gently with a spatula greased with a bit of butter to keep it smooth. Continue microwaving in 30-second intervals, stirring after each until everything is melted and silky. Patience pays here—it’s tempting to overheat, but stirring often helps avoid scorching.
Step 3: Add Your Candies and Set
Let the mixture cool for just a minute—if it's too hot, it will melt your candies too much and they’ll lose their chew. Fold in your chopped red and green gumdrops or chewy candies gently to spread them evenly. Press the mix firmly and evenly into your pan, cover with plastic wrap, then refrigerate for at least 4 hours. I like to leave mine overnight when I can—it makes slicing so much neater.
Step 4: Slice and Enjoy!
Once chilled and firm, lift your candy squares from the pan using the parchment paper. Peel the paper off, and slice the candy into small, bite-sized pieces—perfect for sharing, snacking, and stacking on holiday trays.
Top Tip
From making Christmas White Chocolate Candy Bars Recipe myself a few times, I’ve learned a couple of handy tricks that help every batch turn out perfectly. These have saved me from sticky messes and sad broken bars more than once!
- Grease Your Spatula: When you stir the melting chocolate and marshmallows, greasing your spatula with butter helps prevent the mixture from sticking, making stirring so much easier.
- Don’t Overheat: Microwave in short bursts to avoid burning your chocolate or marshmallows; slow and steady melting ensures smooth candy bars.
- Cool Slightly Before Folding: Let the melted mixture rest for about a minute before adding chopped candies. This keeps your candies from melting and maintains that nice chew.
- Use Parchment Paper: Lining your pan is a lifesaver—lifting the candy out whole is effortless and cleanup is a breeze.
How to Serve Christmas White Chocolate Candy Bars Recipe

Garnishes
I like to sprinkle a little sea salt on top before pressing the candy mixture into the pan for a subtle sweet-salty contrast. Sometimes I add a few crushed peppermint candies on top right before chilling—it adds a festive crunch and a hint of mint.
Side Dishes
These candy bars pair wonderfully with simple holiday drinks like hot cocoa or eggnog. I also serve them alongside a cheese board for a sweet balance, or consider adding cut fruits for a refreshing touch.
Creative Ways to Present
For party trays, I stack these bite-sized bars in little festive cupcake liners or arrange them in a colorful pattern on a beautiful platter. Wrapping individual pieces in cellophane with a holiday ribbon makes for a lovely homemade gift that people really appreciate.
Make Ahead and Storage
Storing Leftovers
I store leftover candy bars in an airtight container in the fridge. This keeps them fresh and chewy for about a week. If you notice condensation, just let pieces sit at room temperature for a few minutes before serving—they soften right up.
Freezing
Freezing works well if you want to make a big batch ahead. Wrap the candy bars in parchment, then place in a freezer-safe container. When ready, thaw in the fridge overnight to preserve texture and flavor—just like fresh!
Reheating
Generally, this recipe doesn’t need reheating—it’s best enjoyed chilled or at room temperature. But if you want it softer, a few seconds in the microwave (about 5-10 seconds) does the trick without melting the candies inside.
Frequently Asked Questions:
You can, but it will change the flavor profile and appearance significantly. White chocolate gives these candy bars a creamy, sweet base and festive look, while regular chocolate will add a richer, deeper taste. If you want to try, consider using milk chocolate chips and pairing with different candies to complement the flavor.
Microwaving in short bursts and stirring frequently is the best way to avoid burning. Make sure to use a microwave-safe bowl and watch carefully once the mixture starts to melt. Using a buttered spatula to stir also helps keep the texture smooth without sticking or scorching.
Red and green gumdrops or chewy candies create that classic festive look and chewy texture, but you can also use peppermint pieces, dried cranberries, or even mini M&Ms. Just be sure to chop larger candies so the bars slice evenly and you get a good mix in each bite.
Absolutely! In fact, I recommend making these bars a day or two in advance. They firm up nicely in the fridge and actually taste better when the flavors meld. Just keep them in an airtight container to keep the texture perfect until you’re ready to serve.
Final Thoughts
Christmas White Chocolate Candy Bars Recipe is one of those simple joys that make the holiday season feel cozy and bright. It’s a treat I look forward to making with loved ones, and I hope it brings you that same holiday warmth and happiness. Give it a try—you’ll find it’s just as delightful to share as it is to eat!
Print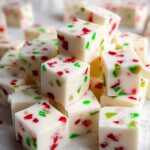
Christmas White Chocolate Candy Bars Recipe
- Prep Time: 20 minutes
- Cook Time: 0 minutes
- Total Time: 4 hours 20 minutes
- Yield: 24 servings
- Category: Dessert
- Method: No-Cook
- Cuisine: American
Description
Christmas Candy is a festive and colorful treat made with melted white chocolate, marshmallows, and red and green chewy candies. This no-bake recipe is quick to prepare and perfect for holiday parties or gift-giving.
Ingredients
Main Ingredients
- 2 tablespoons butter
- 12 oz white chocolate chips
- 10 oz mini marshmallows
- 1 cup red and green gumdrops or chewy candy, chopped
Instructions
- Prepare the baking dish: Line an 8x8 baking dish with parchment paper and lightly grease it to prevent sticking. Set aside.
- Melt the ingredients: In a large microwave-safe bowl, add butter, white chocolate chips, and mini marshmallows. Microwave for 1 minute, then stir with a greased spatula. Continue microwaving in 30-second increments, stirring between each, until the mixture is fully melted and smooth.
- Cool the mixture: Allow the melted mixture to cool for about 1 minute so it thickens slightly but remains pliable.
- Add the candies: Fold in the chopped red and green gumdrops or chewy candies evenly into the melted mixture.
- Set the candy: Transfer the mixture into the prepared baking dish and use a spatula to press it into a flat, even layer.
- Chill: Cover the dish with plastic wrap and refrigerate for a minimum of 4 hours, or up to overnight, to allow the candy to set firmly.
- Slice and store: Remove the candy from the dish by lifting the parchment paper. Peel off the paper and slice the candy into small bite-sized pieces. Store in an airtight container for best freshness.
Notes
- You can substitute gumdrops with your favorite chewy candies or holiday-themed sprinkles.
- Make sure to use a greased spatula to avoid sticking when stirring the melted mixture.
- For easier cutting, warm the knife slightly before slicing the candy.
- Store the candy in a cool place to prevent melting, especially if your environment is warm.
- This recipe can be doubled to fit a larger baking dish for more servings.
Nutrition
- Serving Size: 1 piece
- Calories: 120 kcal
- Sugar: 15 g
- Sodium: 30 mg
- Fat: 5 g
- Saturated Fat: 3 g
- Unsaturated Fat: 2 g
- Trans Fat: 0 g
- Carbohydrates: 20 g
- Fiber: 0 g
- Protein: 1 g
- Cholesterol: 10 mg


Leave a Reply