If there’s one dessert that always feels fancy yet surprisingly simple, it’s this Creamy Vanilla Crème Brûlée Recipe. With its silky custard and that signature caramelized sugar crust, it’s perfection in every spoonful. Let’s dive in and make a little French magic at home!

Jump to:
Why You'll Love This Recipe
I honestly can’t get enough of crème brûlée. It’s an elegant dessert that’s both creamy and crisp, and making it myself means I control the sweetness and the vanilla flavor, which makes it feel so rewarding every time.
- Rich, Velvety Custard: The slow baking in a water bath creates a custard that’s incredibly smooth without any curdling.
- Perfect Caramelized Crust: That crackly sugar topping done just right adds a beautiful contrast in texture.
- Impresses Every Time: Whether it’s a dinner party or a quiet treat, it always feels special and sophisticated.
- Easy to Customize: You can tweak the vanilla bean with extracts or other flavors for a personal twist.
Ingredients & Why They Work
Shopping for your ingredients? I recommend choosing the freshest and highest quality items you can find, especially the vanilla bean and the eggs, since they really shine through in this crème brûlée.
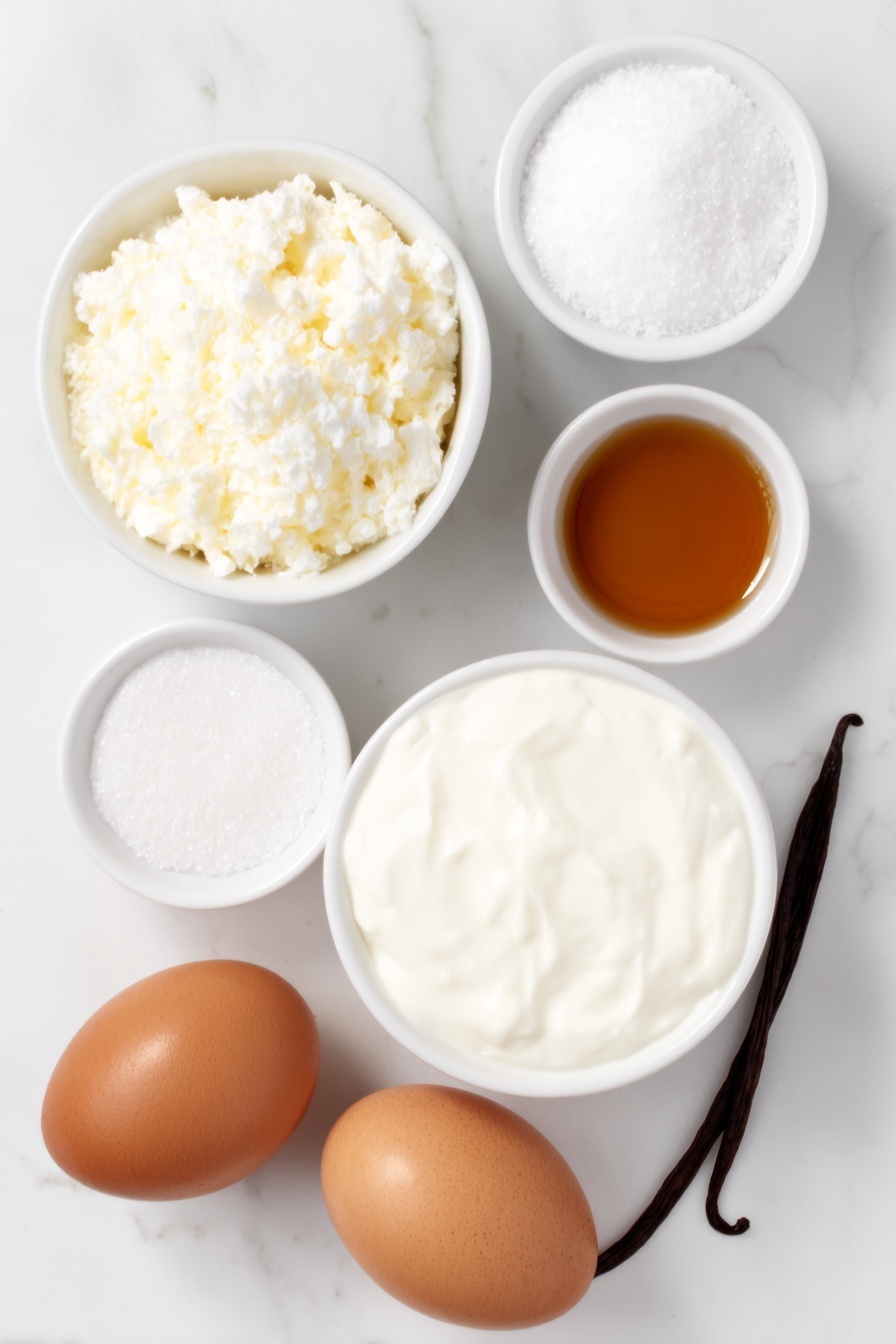
- Heavy Cream: This is the foundation of the custard, giving it richness and smooth texture.
- Granulated Sugar: Divided between the custard and the topping, it sweetens and creates that iconic brittle crust.
- Kosher Salt: Just a pinch enhances all the flavors without overpowering the delicate custard.
- Vanilla Bean: Scraped for precious seeds that infuse a deep, natural vanilla flavor.
- Egg Yolk and Large Egg: They set the custard perfectly without making it rubbery.
- Vanilla Extract: For an extra layer of vanilla aroma and flavor.
Make It Your Way
One of the best parts about this Creamy Vanilla Crème Brûlée Recipe is how easily you can customize it to suit your mood or occasion. After all, the classic base is a canvas just waiting for your creative touch!
- Almond Delight: I love swapping the vanilla bean for a splash of almond extract—it brings a subtle nutty warmth that transforms the custard into a cozy treat perfect for autumn evenings.
- Mocha Magic: Adding a teaspoon of coffee extract gives a delightful espresso twist, turning the dessert into a lively pick-me-up after dinner.
- Peppermint Twist: Around the holidays, a few drops of peppermint extract added to the custard makes for a refreshing and festive dessert that everyone enjoys.
- Fresh Berry Topping: For a lighter touch, I like to serve the brûlée with a handful of fresh raspberries or blueberries, balancing the rich custard with a bright, juicy pop.
- Dairy-Free Version: Although this recipe relies on heavy cream for that luscious texture, you can try substituting with coconut cream for a dairy-free, tropical flair. Just know the flavor and texture will be a bit different but still delicious!
Step-by-Step: How I Make Creamy Vanilla Crème Brûlée Recipe
Step 1: Preheat and Prepare the Vanilla Cream Mixture
Start by preheating your oven to 325°F, setting the stage for gentle baking that will yield the silkiest custard. Next, combine 2 cups of heavy cream, half of the granulated sugar (⅙ cup), ¼ teaspoon kosher salt, and the scraped seeds plus pod of half a vanilla bean in a small saucepan. Gently heat until it just begins to boil and simmers, filling your kitchen with that irresistible vanilla aroma. Tip: Keep an eye on it so the cream doesn’t overflow or scorch.
Step 2: Whisk the Eggs and Sugar 'Blanchir' Style
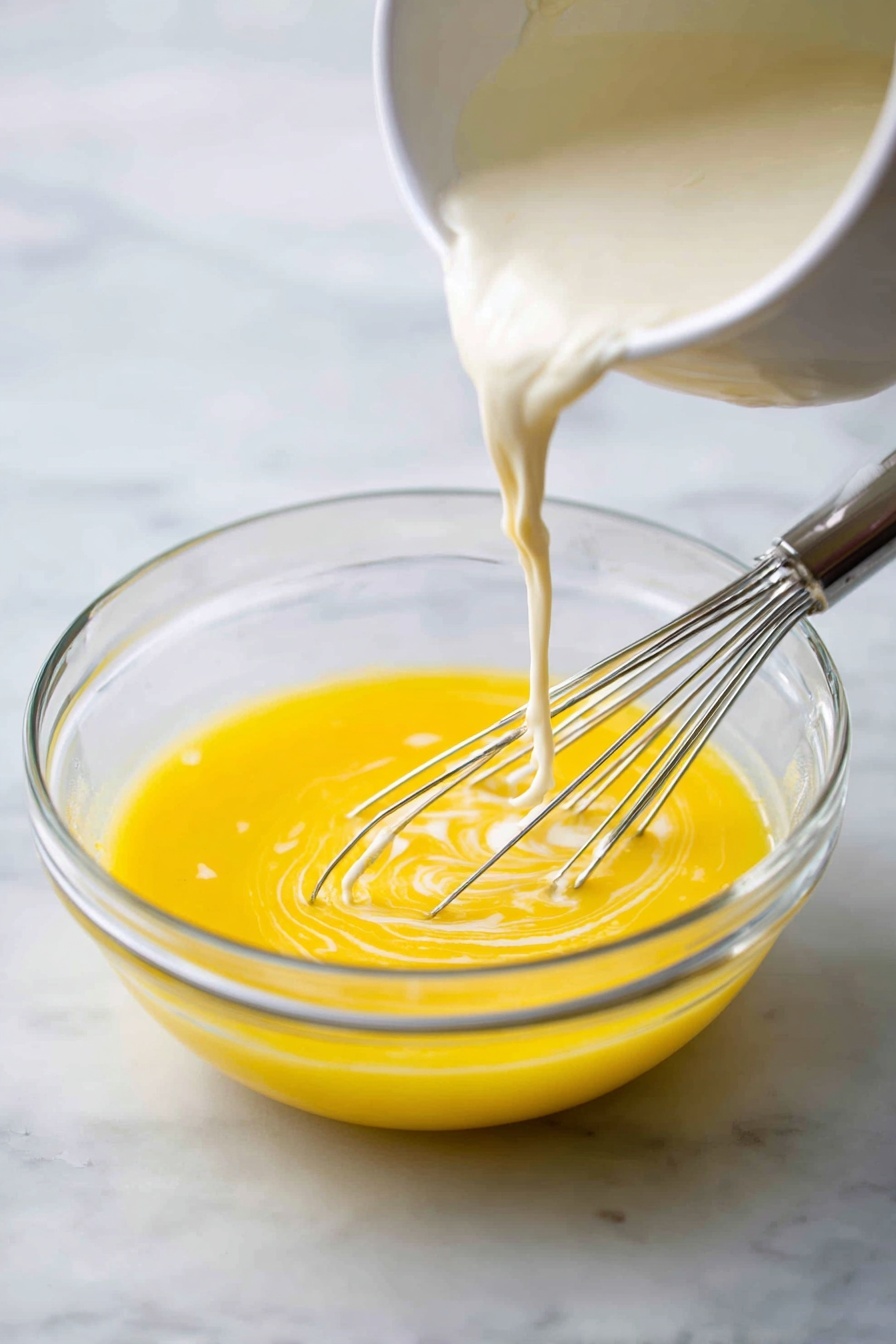
While your cream is heating, whisk together 1 egg yolk, 1 large egg, and the remaining ⅙ cup sugar vigorously in a bowl. You'll want to whisk until the mixture lightens in color and becomes a touch frothy—this French technique called blanchir adds extra silkiness and helps prevent curdling later on.
Step 3: Temper the Eggs with Hot Cream
Slowly pour the hot cream mixture into the eggs while whisking continuously; this gradual blending prevents scrambling. A helpful tip: place a kitchen towel under your bowl to keep it steady while you pour. After incorporating all the cream, skim off any foam on the surface for that perfectly smooth custard.
Step 4: Portion the Custard and Set Up the Water Bath
Divide the custard evenly into six 3-ounce ramekins. Using a kitchen scale or measuring cup ensures each ramekin gets an equal amount, making your baking uniform and professional-looking. Place the ramekins into a large, deep baking dish or roasting pan. Cover the entire pan with foil, leaving a small corner peeled back to keep an eye on things.
Step 5: Add Hot Water and Bake Gently
Carefully pour hot water from a kettle into the baking dish until it reaches halfway up the sides of the ramekins—this water bath allows slow, gentle cooking and results in that signature smooth texture. Cover the foil corner again and bake at 325°F for about 30 minutes. You’ll know it's ready when the centers jiggle like jello but are not liquid—try gently placing a spoon on top to check: it should hold its weight without sinking.
Step 6: Cool, Chill, and Prepare for Brûlée
Remove the ramekins carefully with tongs or a spatula—you don’t want any water spills! Let them cool to room temperature, then cover tightly with plastic wrap and refrigerate for at least 2 hours, preferably overnight. This chilling helps the custard fully set and lets you torch the sugar topping longer, achieving that perfect crunchy crust.
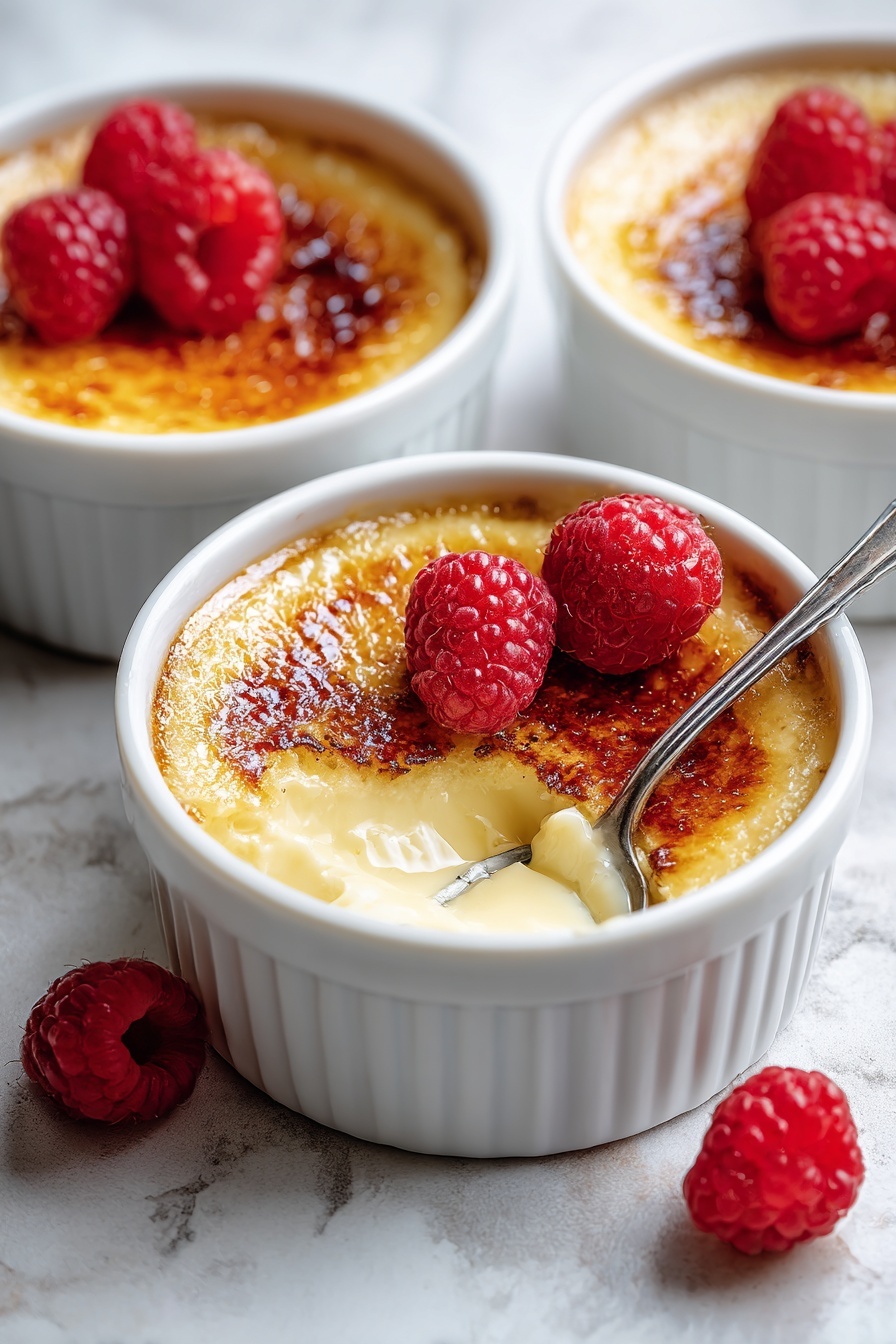
Step 7: The Crowning Glory — Caramelize the Sugar
When it’s time to serve, sprinkle about half a tablespoon of granulated sugar evenly on top of each custard. Tilt the ramekin to coat a thin, even layer—you want it thick enough to see but not so thick it obscures the custard beneath. Use a kitchen torch starting with a low flame from a distance, gradually increasing speed and intensity until the sugar melts and forms an even, dark caramel crust. Let the crust harden for roughly 3 minutes—then dive in immediately for that signature satisfying crack.
Top Tip
Mastering the perfect creamy vanilla crème brûlée is all about the details. These tips will help you achieve that signature velvety custard and crackling caramelized sugar crust every time.
- Use a Kitchen Towel Under Your Bowl: When tempering the eggs by gradually whisking in the hot cream, placing a kitchen towel under your mixing bowl keeps it steady and prevents spills—trust me, it makes the process smoother and less stressful.
- Divide Custard Evenly: Using a kitchen scale or a measuring cup to portion the custard into ramekins ensures each one cooks evenly, avoiding over- or underdone spots in your batch.
- Start Torch at a Distance: When caramelizing the sugar topping, begin with a low flame held a bit farther from the sugar to gently melt it before moving closer to achieve that perfect dark caramel without burning.
- Don’t Skip the Chill: Chilling the custards for at least 2 hours (preferably overnight) before brûléeing helps the caramelized sugar form a crisp, crackling crust and keeps the custard smooth and cool beneath.
How to Serve Creamy Vanilla Crème Brûlée Recipe
Garnishes
While the classic caramelized sugar topping steals the show, you can enhance your creamy vanilla crème brûlée with a few thoughtful garnishes. Fresh berries, especially raspberries or blueberries, add a lovely pop of color and tartness. A small sprig of fresh mint or a light dusting of powdered sugar can bring elegance to your presentation. For a subtle twist, sprinkle some finely chopped toasted pistachios or a pinch of cinnamon on top before serving.
Side Dishes
This dessert shines wonderfully on its own, but if you want to add some company, try serving it alongside a simple mixed greens salad with a citrus vinaigrette to balance the richness, or pair it with light, crisp cookies like almond biscotti. A glass of dessert wine or a rich espresso also complements the flavors beautifully.
Make Ahead and Storage
Storing Leftovers
Once your crème brûlée has fully cooled and set, cover each ramekin tightly with plastic wrap and store them in the refrigerator. They’ll stay fresh and delicious for up to one week. Just remember to brûlée the sugar topping right before serving to keep that irresistible crackling texture.
Freezing
Because of the delicate custard texture and caramelized top, freezing crème brûlée isn’t recommended. The texture can suffer upon thawing, and the brûlée topping won’t maintain its signature crunch. It’s best enjoyed fresh or within a few days refrigerated.
Reheating
Crème brûlée is ideally served chilled, so reheating isn’t necessary. If your custard has warmed through, simply refrigerate it to cool again before torching the sugar topping. If you want a warm custard with a caramel crust, consider gently warming just before torching—but be careful not to overheat as it may affect the texture.
Frequently Asked Questions:
Absolutely! While vanilla beans add a wonderful depth of flavor, you can substitute with 1 teaspoon of vanilla extract. Just stir it in with the eggs for a lovely vanilla taste in your custard.
No kitchen torch? No problem! You can make dry caramel in a pot by heating granulated sugar until it melts and turns amber, then carefully pour it over the chilled custard. This creates a thicker caramel layer and a slightly different but still delicious crust.
Look for centers that jiggle gently like jello but aren’t liquid. You can also gently place a spoon on the surface; it should hold its weight. This ensures a smooth, creamy texture without overbaking.
Yes! Prepare and bake the custard, then chill covered for at least 2 hours or overnight. Brûlée the sugar topping right before serving for the best crackling caramel crust and contrast with the creamy custard.
Final Thoughts
Making a classic French creamy vanilla crème brûlée recipe at home is such a rewarding experience. With its rich custard and satisfyingly crisp caramel top, it’s a dessert that feels special yet approachable. Take your time, enjoy the process, and don’t be afraid to make it your own with little tweaks and personal touches. Once you master this recipe, you’ll have a timeless dessert to impress friends and family again and again.
Print
Creamy Vanilla Crème Brûlée Recipe
- Prep Time: 15 minutes
- Cooling Time: 2 hours
- Cook Time: 30 minutes
- Total Time: 2 hours 45 minutes
- Yield: 6 servings
- Category: Dessert
- Method: Baking
- Cuisine: French
- Diet: Vegetarian
Description
Classic French crème brûlée with a rich, velvety vanilla custard base topped with a perfectly caramelized sugar crust. This easy-to-make dessert is baked in a water bath for a smooth texture and finished with a crackling brûlée topping.
Ingredients
Custard
- 2 cups heavy cream
- ⅓ cup granulated sugar, divided
- ¼ teaspoon kosher salt
- ½ vanilla bean, scraped
- 1 egg yolk
- 1 large egg
- 1 teaspoon vanilla extract
Topping
- ¼ cup granulated sugar, for brûlée
Instructions
- Preheat Oven: Preheat the oven to 325°F to prepare for baking the custards in a water bath.
- Prepare Cream Mixture: In a small saucepan, combine the heavy cream, half of the granulated sugar, kosher salt, and the scraped vanilla bean with its pod. Heat the mixture until it just begins to boil and simmer.
- Whisk Eggs: In a separate bowl, vigorously whisk together the egg yolk, whole egg, and remaining sugar until the mixture lightens slightly, a technique known as blanchir.
- Temper Eggs: Slowly add the hot cream mixture into the egg mixture while whisking constantly to prevent curdling. Continue until all the cream is incorporated.
- Strain and Remove Foam: Skim off any foam from the top of the custard mixture to ensure smooth texture.
- Divide Custard: Evenly divide the custard into six 3 oz ramekins, using a scale or measuring cup for consistency.
- Setup Water Bath: Place the ramekins in a large deep baking dish or roasting pan. Cover the pan with foil, leaving a corner open to monitor the process.
- Add Hot Water: Carefully pour hot water into the baking dish until it reaches halfway up the sides of the ramekins, avoiding splashing water into the custards. Re-cover the dish with foil.
- Bake Custards: Bake for 30 minutes or until the centers jiggle like jello but are set and no longer liquid. Use the jiggle test or place a spoon gently on top to check firmness.
- Cool and Chill: Remove ramekins carefully using tongs or a spatula. Cool to room temperature, then cover with plastic wrap and refrigerate for at least 2 hours, preferably overnight, to fully set.
- Prepare Sugar Topping: Before serving, sprinkle about half a tablespoon of granulated sugar evenly on top of each custard, tilting the ramekin to coat the surface in a thin layer.
- Caramelize Sugar: Use a kitchen torch to melt and caramelize the sugar starting from a distance with a low flame, gradually increasing speed and flame to form a dark caramel crust evenly over the custard's surface.
- Set Caramel: Allow the caramelized sugar to harden for approximately 3 minutes for the signature crackling crust, then serve immediately.
Notes
- If you don’t have a kitchen torch, you can make dry caramel in a pot by heating 1 cup sugar over medium-high heat until melting and amber color forms, then carefully pour over the chilled custards. This method will create a thicker caramel layer.
- Use extracts like almond, coffee, or peppermint instead of vanilla bean for flavor variations—add extracts cautiously due to their potency.
- Store crème brûlée covered in plastic wrap in the refrigerator for up to 1 week.
- For best crackle effect, brûlée the sugar topping right before serving.
- Use a scale to evenly portion custard for consistent baking results.
Nutrition
- Serving Size: 1 ramekin (about 100 g)
- Calories: 350 kcal
- Sugar: 28 g
- Sodium: 80 mg
- Fat: 25 g
- Saturated Fat: 16 g
- Unsaturated Fat: 7 g
- Trans Fat: 0 g
- Carbohydrates: 25 g
- Fiber: 0 g
- Protein: 5 g
- Cholesterol: 200 mg


Leave a Reply