There’s something about the cool, sweet burst of peppermint that instantly lifts your spirits. This Festive Peppermint Mints Recipe brings that classic flavor to life in soft, colorful candies that are perfect for sharing or savoring yourself over the holidays.

Jump to:
Why You'll Love This Recipe
I’ve made these peppermint mints every Christmas for years, and they never fail to bring smiles. They’re soft but firm, vibrantly festive, and carry that unmistakable cooling peppermint flavor you crave during the holidays.
- Vibrant Holiday Colors: The trio of red, green, and white doughs make these mints visually festive and fun to eat.
- Soft, Melting Texture: Unlike hard candies, these mints are tender and dissolve luxuriously in your mouth.
- Simple Ingredients: You probably already have everything on hand, which means no last-minute ingredient runs.
- Great for Gifting: These make charming homemade gifts that are as delightful to give as they are to receive.

Ingredients & Why They Work
This Festive Peppermint Mints Recipe blends creamy and sweet perfectly. Each ingredient plays a deliberate role, ensuring you get the right texture and that classic minty zing.

- Granulated sugar: Used for coating the candies, giving a slight crunch and sparkle on the outside.
- Cream cheese: Adds creaminess and helps the mints stay soft but hold shape without being greasy.
- Unsalted butter: Contributes richness and smooth mouthfeel without overpowering the peppermint.
- Corn syrup (light or clear): Keeps the mints from crystallizing, helping with smooth texture and a subtle sweetness.
- Peppermint extract: The star flavor — fresh, strong, and refreshing.
- Powdered sugar: Essential not just for sweetness but for achieving the perfect dough consistency.
- Liquid food coloring (red & green): Gives those classic Christmas colors that brighten up any tray of treats.
Make It Your Way
While I keep this recipe just as is most years, I’ve played around with variations when I'm feeling adventurous or catering to friends with dietary needs.
- Variation: I once swapped peppermint extract for a drop of spearmint or even vanilla—surprisingly lovely for a more mellow mint flavor that kids adore.
- Color tweaks: For a fun twist, try swirling the red and green doughs together before cutting for marbled peppermint mints that wow guests visually.
- Dietary mods: Using vegan butter and cream cheese alternatives works well here, just expect a slightly different texture but the same festive spirit.
Step-by-Step: How I Make Festive Peppermint Mints Recipe
Step 1: Whip Up the Creamy Base
Start by beating the cream cheese, butter, light corn syrup, and peppermint extract on low speed until everything’s smooth and combined—about a minute. This step sets your base for the mints, so don’t rush. If you see lumps, keep mixing gently; smoothness is key here.
Step 2: Incorporate Powdered Sugar Carefully
Add powdered sugar gradually, about half a cup at a time, mixing on low. Your dough will thicken fast, so when your mixer can’t handle it, switch to folding by hand with a spatula. This helps you control the dough’s consistency and avoid overworking it.
Step 3: Divide and Color Your Dough
Split your dough into three equal parts. Remember to make a shallow well in two pieces so you can add the red and green liquid food coloring. Color those well by kneading gently with a sprinkle of powdered sugar to stop stickiness. The white remains plain — no color needed here.
Step 4: Roll, Slice, and Shape
Roll each dough ball into a rope roughly 18 inches long and about an inch thick. Slice these ropes into half-inch pieces, then roll each piece into a small ball with your hands. This makes them nice and even for the final shaping.
Step 5: Sugar Coat and Press
Toss clusters of 2-3 dough balls in granulated sugar to coat, then place them on your parchment-lined tray. Use a fork’s tines to gently press each ball into a disc — those lovely stripes they leave are classic and charming. Let them rest for up to 24 hours to dry and set before serving.
Top Tip
From many batches over the years, I've learned a few tricks that make all the difference in your Festive Peppermint Mints Recipe success.
- Gradual Powdered Sugar Adding: Adding powdered sugar slowly prevents the dough from becoming too dry and crumbly.
- Use Gel Food Coloring: Gel colors keep your dough vibrant without loosening it like liquid colors might.
- Knead With Powdered Sugar: When coloring the dough, knead gently with small amounts of powdered sugar to avoid sticky messes.
- Patience with Setting: Allow your mints to rest up to 24 hours before serving—they firm up beautifully and taste even better.
How to Serve Festive Peppermint Mints Recipe

Garnishes
I love dusting a little extra granulated sugar or even finely crushed candy canes over these mints before serving to add sparkle and extra crunch. Tiny edible glitter or silver dragees also add a festive touch if you’re feeling fancy!
Side Dishes
Pair these mints with warm drinks like hot cocoa, spiced cider, or peppermint tea for a holiday-perfect combo. They’re also a refreshing palette cleanser after a rich holiday meal.
Creative Ways to Present
Try arranging your peppermint mints in glass jars layered by color or wrapped beautifully in wax paper tied with twine for gifting. For parties, a peppermint-themed candy jar or festive tins lined with parchment make for eye-catching displays.
Make Ahead and Storage
Storing Leftovers
I store leftover peppermint mints in an airtight container in the fridge. This keeps them fresh and firm for up to two weeks without losing that lovely chewiness.
Freezing
Freezing is a wonderful option! I place them in a freezer-safe container layered with parchment. When I thaw them in the fridge for a day before serving, they come back soft and flavorful without any texture changes.
Reheating
Reheating isn’t typically needed since these are best served cool or at room temp. But if the mints get too firm in the fridge, I just let them sit on the counter for 15–20 minutes to soften naturally.
Frequently Asked Questions:
Absolutely! Gel food coloring is recommended because it provides vibrant colors without adding extra liquid that could make the dough sticky. Just knead it in carefully with powdered sugar as needed.
When stored in an airtight container in the refrigerator, these mints stay fresh for up to two weeks. For longer storage, freezing them is a great option—just thaw in the fridge before serving.
Yes! You can substitute the cream cheese and butter with plant-based alternatives. The texture might be slightly different, but the flavor remains delicious and festive.
If your dough feels sticky when kneading, gradually add more powdered sugar until it’s manageable—but don’t rush adding too much at once. If it’s too stiff or dry, try mixing in a small amount of cream cheese or butter to balance it out.
Final Thoughts
This Festive Peppermint Mints Recipe holds a special place on my holiday to-do list because it brings everyone together — the colors, the flavor, the joy of making something homemade and beautiful. I really hope you give it a go and find as much fun in crafting these little candies as I do. Whether you treat yourself or gift them, these mints are a sweet holiday hug in each bite.
Print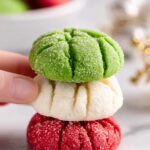
Festive Peppermint Mints Recipe
- Prep Time: 15 minutes
- Cook Time: 0 minutes
- Total Time: 1 hour 15 minutes
- Yield: 100 pieces
- Category: Dessert
- Method: No-Cook
- Cuisine: American
- Diet: Vegetarian
Description
These festive Christmas Mints are soft, creamy peppermint candies perfect for holiday celebrations. Easy to make with cream cheese, butter, and peppermint extract, they come in red, green, and white colors with a lovely striped fork pattern on top. They set up by drying at room temperature and can be stored chilled or frozen for later enjoyment.
Ingredients
Main Ingredients
- ⅓ cup granulated sugar
- 4 ounces cream cheese, room temperature
- 2 tablespoons unsalted butter, room temperature
- 2 tablespoons light/clear corn syrup
- 1 teaspoon peppermint extract
- 4¼ cups powdered sugar, divided
- 6 drops green liquid food coloring
- 6 drops red liquid food coloring
Instructions
- Prepare the baking tray: Line a large rimmed baking tray with parchment paper. Set aside. Place the granulated sugar into a small bowl for coating the candies later.
- Make the dough base: In a large mixing bowl, beat the cream cheese, unsalted butter, corn syrup, and peppermint extract on low speed for 1 minute or until smooth using a handheld mixer.
- Add powdered sugar: Gradually add 4¼ cups powdered sugar to the mixture, ½ cup at a time, mixing on low speed. As the dough thickens, switch to a spatula or wooden spoon and finish mixing by hand until fully combined.
- Prepare dough for coloring: Lay a piece of parchment paper on a clean surface and sprinkle with ¼ cup powdered sugar. Turn the dough onto the parchment sugar.
- Divide and color: Divide dough into three equal parts. Make a shallow well in the center of two parts, adding red food coloring to one, green to the other, and leave the third white. Knead each colored dough thoroughly to distribute color evenly, adding up to ¼ cup additional powdered sugar as needed to reduce stickiness.
- Shape dough ropes: Roll each dough ball into an 18-inch rope about 1 inch thick.
- Cut pieces: Slice each rope into ½-inch pieces, cutting from one end to the other.
- Form balls: Roll each piece into a small ball using the palm of your hand. Set aside.
- Coat in sugar: Drop 2-3 dough balls at a time into the granulated sugar bowl and toss to coat. Place coated balls on the prepared baking tray. Repeat with all dough balls.
- Flatten patties: Use the tip of a fork to gently press each dough ball into a disc shape, creating a striped pattern on top.
- Set candies: Leave the Christmas mints on the tray at room temperature for up to 24 hours to dry and set before serving.
Notes
- Yields: approximately 100 peppermint candies.
- Store in an airtight container in the refrigerator for up to 2 weeks to keep fresh.
- For longer storage, freeze in a freezer-safe container for up to 3 months; thaw in the fridge before serving.
- For deeper colors, add up to ½ teaspoon liquid food coloring carefully.
- Add powdered sugar gradually to adjust dough consistency; it should be soft but not sticky or too stiff.
- Gel food coloring is recommended for vibrant colors without adding extra moisture and is safe for nut allergies.
Nutrition
- Serving Size: 1 piece
- Calories: 25 kcal
- Sugar: 3 g
- Sodium: 15 mg
- Fat: 1 g
- Saturated Fat: 0.5 g
- Unsaturated Fat: 0.4 g
- Trans Fat: 0 g
- Carbohydrates: 4 g
- Fiber: 0 g
- Protein: 0.2 g
- Cholesterol: 5 mg


Leave a Reply