There's something irresistibly cozy about a classic dessert like this Homemade Banana Pudding Recipe. Creamy layers of luscious pudding, tender banana slices, and crisp cookies create a nostalgic treat that's truly special—perfect for any time you want to impress with comfort food.

Jump to:
Why You'll Love This Recipe
This Homemade Banana Pudding Recipe is one of my all-time favorites because it strikes the perfect balance between rich, creamy pudding and fresh, fruity bananas. It’s definitely more than just a dessert—it’s a memory-maker that’s simple enough for a weeknight but elegant enough for company.
- Scratch-made Pudding: No instant mixes here—the pudding is silky, made from scratch, and tastes fresher than anything store-bought.
- Layered Goodness: Each bite is a delightful mix of soft pudding, crisp Nilla wafers, and ripe bananas giving texture and flavor contrast.
- Creamy Topping: The cream cheese and Cool Whip mix adds a tangy sweetness that pairs perfectly with the banana flavor.
- Make-Ahead Friendly: This pudding only gets better after chilling, so you can prepare it in advance and have more time to relax.

Ingredients & Why They Work
Each ingredient in this Homemade Banana Pudding Recipe plays a crucial role, creating a harmony of flavors and textures. Picking quality bananas and fresh dairy really pays off, and I like to use vanilla bean paste—it elevates the taste beyond regular vanilla extract.

- Whole Milk: Provides a creamy base without being too heavy—essential for smooth pudding texture.
- Heavy Whipping Cream: Adds richness and a luxurious mouthfeel to the pudding.
- Bourbon (optional): Just a splash heightens the flavor complexity without overwhelming the bananas.
- Egg Yolks: The thickening agent that gives pudding its signature smoothness and body.
- Vanilla Bean Paste: Offers an intense, natural vanilla flavor with those pretty vanilla specks.
- Cornstarch: Works with the egg yolks to thicken the pudding perfectly without lumps.
- Sugar (caster or granulated): Sweetens and balances the banana’s natural tartness.
- Salted Butter: Adds richness and a subtle salt contrast that brings out all the sweet flavors.
- Banana/Banana Cream Extract: Enhances the banana flavor—if you want it more pronounced.
- Cream Cheese (full fat): Makes the topping creamy with a lovely tang that cuts through the sweetness.
- Cool Whip: Lightens the topping and adds smooth fluffiness.
- Sweetened Condensed Milk: For extra sweetness and silky texture in the topping.
- Nilla Wafers: The classic cookie—crispy and slightly vanilla-flavored, they soak up pudding just right.
- Bananas: The star fruit—in ripe but firm slices to avoid mushiness.
- Fresh Mint Leaves (optional): A pretty, fresh garnish that adds a little pop of color.
Make It Your Way
I love customizing this Homemade Banana Pudding Recipe depending on the occasion or what I have on hand at home. It’s really flexible, so don’t be afraid to put your own spin on it. This keeps it fun and always something to look forward to.
- Variation: Once, I swapped out the bourbon for a little rum, and it gave the pudding a lovely tropical twist that my friends raved about.
- Dietary Modification: For a lighter version, try swapping heavy cream with coconut cream, but note it changes the flavor a bit.
- Seasonal Change: Adding a handful of toasted pecans or caramel drizzle on top adds a fabulous crunch and depth for fall gatherings.
Step-by-Step: How I Make Homemade Banana Pudding Recipe
Step 1: Gently Heat Your Cream and Milk Mixture
Start by combining whole milk, heavy cream, and bourbon (if using) in a medium saucepan over medium-high heat. Heat it until it’s steaming but not boiling—about 5 to 7 minutes. What I’ve learned is to watch carefully here; once those little bubbles form around the edges, you’re good to go. Overheating can cause curdling later, so patience is key!
Step 2: Whisk Together the Egg Yolks, Sugar, Vanilla, and Cornstarch
While the milk mixture warms up, whisk your egg yolks with caster sugar, vanilla bean paste, and cornstarch in a medium bowl. You're aiming for a smooth, paste-like mixture—no lumps here! This step might take a little elbow grease, but making sure it’s fully combined will keep your pudding silky, trust me.
Step 3: Temper the Eggs Slowly
This part is crucial. Slowly add a tablespoon of the hot cream mixture to your egg yolks while stirring constantly. Repeat two or three times. It warms up the eggs gradually, so they don’t scramble when added back to the hot milk—this tempering trick saved me from disaster the first time I made this!
Step 4: Cook the Pudding Until Perfectly Thickened
Pour the tempered egg yolk mixture back into the saucepan with the hot milk and cream. Keep whisking constantly on medium heat for about 4-5 minutes until the pudding thickens. You want it to coat the back of a spoon but don’t let it boil—that will mess with the texture. Then, take it off the heat and stir in the cubed butter and banana extract to finish it off with smooth richness.
Step 5: Chill the Pudding Properly
Transfer the pudding to an airtight container and press plastic wrap directly on the surface to prevent a skin from forming. Refrigerate for at least 4 hours, preferably overnight. This chilling step lets the flavors meld and the pudding set to a dreamy consistency you’ll love.
Step 6: Whip up the Creamy Topping
In a big mixing bowl, blend the room-temperature cream cheese, Cool Whip, sweetened condensed milk, and vanilla bean paste. I use a handheld mixer to get it ultra smooth and fluffy. This topping contrasts the velvety pudding perfectly—light but rich, tangy yet sweet.
Step 7: Assemble Your Layers
Grab your favorite dish or pretty parfait glasses. Start with a layer of pudding, then Nilla wafers, creamy topping, and banana slices. Repeat until you fill the dish, finishing with the creamy topping and cookie crumbs on top. I like to chill the assembled pudding for at least an hour so the flavors blend and the wafers soften just right.
Top Tip
From my experience, patience and temperature control are the game changers for this Homemade Banana Pudding Recipe. Don’t rush the pudding cooking or chilling steps—those moments make all the difference for texture and flavor.
- Slow Tempering: Always add hot liquid slowly to eggs, or you risk curdling—seriously, don’t skip this!
- Consistent Whisking: Keep the pudding moving in the pot to avoid lumps and stuck spots that burn.
- Plastic Wrap Trick: Lay plastic wrap directly on the pudding’s surface to prevent an unappealing skin from forming while cooling.
- Chill Time: The pudding flavors deepen and thicken beautifully if you let it rest overnight—hard to beat this for prep ahead.
How to Serve Homemade Banana Pudding Recipe

Garnishes
I love finishing this pudding with a few fresh mint leaves—it adds a lovely color and a fresh scent to contrast the richness. Sometimes, I sprinkle crushed Nilla wafers on top for added crunch and a rustic look. If I’m feeling fancy, a drizzle of caramel sauce works wonders too!
Side Dishes
This banana pudding pairs beautifully with a cup of strong coffee or a light, fruity white wine if you’re serving at a dinner party. For a full spread, I like serving it alongside simple buttery biscuits or light, crisp salads to balance out the creamy sweetness.
Creative Ways to Present
For special occasions, I’ve layered this pudding in clear glass trifle bowls or even individual mason jars, which look charming and make portioning easy. Adding edible flowers or chocolate curls on top can turn it from simple to show-stopping in minutes.
Make Ahead and Storage
Storing Leftovers
Leftover banana pudding should be stored in an airtight container in the fridge. It keeps well for up to 3 days, but I do notice the wafers get softer over time. If you want to preserve some crunch, store toppings separately until serving.
Freezing
I personally haven’t frozen this pudding because the texture can change, especially the creamy topping and bananas. If you want to try, freeze the pudding base separately before assembling, then thaw gently in the fridge.
Reheating
This pudding is best served cold, so reheating isn’t usually necessary. If you want to warm it up slightly, bring leftovers to room temperature before serving. Avoid microwaving, or you risk ruining the texture.
Frequently Asked Questions:
You can substitute the whole milk and heavy cream with coconut milk or another non-dairy milk, and use dairy-free cream cheese alternatives for the topping. Keep in mind the flavor will shift slightly, but it’s still delicious and creamy.
To keep banana slices from browning, you can toss them in a bit of lemon juice before layering. The acidity slows oxidation, helping the bananas look fresh longer in the pudding.
Absolutely! The pudding base can be made a day ahead and refrigerated. Then assemble the layers shortly before serving for the best texture, or assemble fully and chill for a few hours if you prefer softer wafers.
Yes, you can swap in vanilla extract if that’s what you have. Vanilla bean paste does add a richer flavor and tiny vanilla specks that look lovely, but regular extract works well in a pinch.
Final Thoughts
To me, this Homemade Banana Pudding Recipe feels like a warm hug in dessert form. It’s the kind of recipe I keep coming back to because it’s reliable, delicious, and can be adapted in so many ways. Give it a try—I’m confident you’ll find it becoming a family favorite, too, just like it did for me. Enjoy every creamy, banana-filled bite!
Print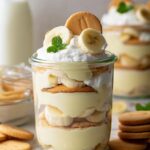
Homemade Banana Pudding Recipe
- Prep Time: 25 minutes
- Cook Time: 10 minutes
- Total Time: 35 minutes
- Yield: 6 servings
- Category: Dessert
- Method: Stovetop
- Cuisine: American
Description
This Best Homemade Banana Pudding recipe features a creamy, custard-like pudding made with whole milk, heavy cream, and banana extract, layered with crunchy Nilla wafers, fresh banana slices, and a luscious cream cheese topping. Perfect for a crowd-pleasing dessert that chills overnight for rich flavor and smooth texture.
Ingredients
For the banana pudding:
- 2 cups whole milk
- 1 cup heavy whipping cream
- 1 tablespoon bourbon (optional)
- 5 large egg yolks
- 1 tablespoon vanilla bean paste
- ¼ cup cornstarch
- ½ cup caster sugar (or granulated sugar)
- ¼ cup salted butter, cut into cubes
- 1 tablespoon banana/banana cream extract
For the creamy topping:
- 8 ounces full-fat brick cream cheese, room temperature
- 8-ounce Cool Whip container, room temperature
- ½ cup sweetened condensed milk
- 1 tablespoon vanilla bean paste
For banana pudding assembly:
- 1 (11-ounce) box Nilla wafers
- 4 medium bananas, sliced into ½-inch thick slices
- Fresh mint leaves, for garnish (optional)
Instructions
- Heat the dairy: In a saucepan over medium-high heat, combine the whole milk, heavy cream, and bourbon if using. Let the mixture simmer until barely hot but not bubbling, about 7 minutes.
- Prepare the egg mixture: In a medium bowl, whisk together the egg yolks, vanilla bean paste, cornstarch, and caster sugar until fully combined and paste-like in consistency.
- Temper the eggs: Add a tablespoon of the hot milk mixture to the egg yolk mixture, stirring immediately to combine. Repeat this 2-3 more times to gently warm the eggs and prevent curdling.
- Combine and thicken pudding: Remove the pan from heat (keep the heat on but turned off). Pour the tempered egg yolk mixture into the hot milk mixture while whisking constantly. Return the pan to medium heat and continue whisking until the pudding thickens, about 5 minutes.
- Add butter and banana flavor: Remove from heat and stir in the cubed salted butter and banana or banana cream extract until the butter melts through completely.
- Chill the pudding: Transfer pudding to an airtight container, cover the surface with plastic wrap to prevent skin formation, then cover with a lid. Refrigerate for at least 4 hours or overnight for best texture.
- Prepare the creamy topping: In a large bowl, use an electric mixer to combine room temperature cream cheese, Cool Whip, sweetened condensed milk, and vanilla bean paste until smooth and well blended.
- Assemble the banana pudding: In your chosen dish (large trifle dish, baking dish, or parfait glasses), layer pudding first, then Nilla wafers, creamy topping, and banana slices. Repeat layers to the top, finishing with creamy topping and Nilla wafer crumbs.
- Final chill and garnish: Chill the assembled pudding for at least 1 hour before serving. Garnish with fresh mint leaves if desired. Enjoy your delicious homemade banana pudding!
Notes
- For best results, chill the pudding overnight to develop rich flavor and proper texture.
- Tempering the eggs is crucial to prevent scrambling while thickening the pudding.
- You can substitute bourbon with rum or skip alcohol completely for a kid-friendly version.
- If you prefer a smoother topping, whip the cream cheese and other topping ingredients longer until fluffy.
- Use ripe but firm bananas to prevent mushiness in the layered pudding.
- Cover pudding surface with plastic wrap directly to avoid skin formation as it cools.
Nutrition
- Serving Size: 1 serving
- Calories: 420 kcal
- Sugar: 35 g
- Sodium: 150 mg
- Fat: 22 g
- Saturated Fat: 13 g
- Unsaturated Fat: 7 g
- Trans Fat: 0 g
- Carbohydrates: 43 g
- Fiber: 2 g
- Protein: 6 g
- Cholesterol: 150 mg


Leave a Reply