There’s something utterly delightful about a cookie that feels like a little bit of everything you love wrapped up in one bite. That’s exactly the charm of this Kitchen Sink Cookies with Mix-ins Recipe—packed with sweet, salty, crunchy, and melty mix-ins that make every mouthful unexpectedly amazing.

Jump to:
Why You'll Love This Recipe
This recipe is a joyful mash-up of textures and flavors, making every cookie feel like a surprise party for your taste buds. I find it perfect for when I want to bake something fun but not fussy, and the results never disappoint—thick, soft, and filled with irresistible mix-ins.
- All-in-One Mix-in Magic: You toss in all your favorite snacks and sweets, creating a cookie that’s truly unique and crowd-pleasing.
- Perfect Balance of Sweet and Salty: With potato chips, pretzels, and toffee bits alongside classic chocolate chips, it hits every craving without being over-the-top sweet.
- Thick & Chewy Texture: Rolling the dough into ovals helps keep the cookies nice and tall—no sad flat cookies here!
- Super Easy to Personalize: You can swap mix-ins based on what’s in your pantry or seasonally available treats.
Ingredients & Why They Work
This recipe’s ingredients team up to create a cookie that’s chewy with a hint of crispness, sweet with just the right dash of salty crunch. You’ll find it’s a nice mix of pantry staples and fun extras that really elevate the final cookie.
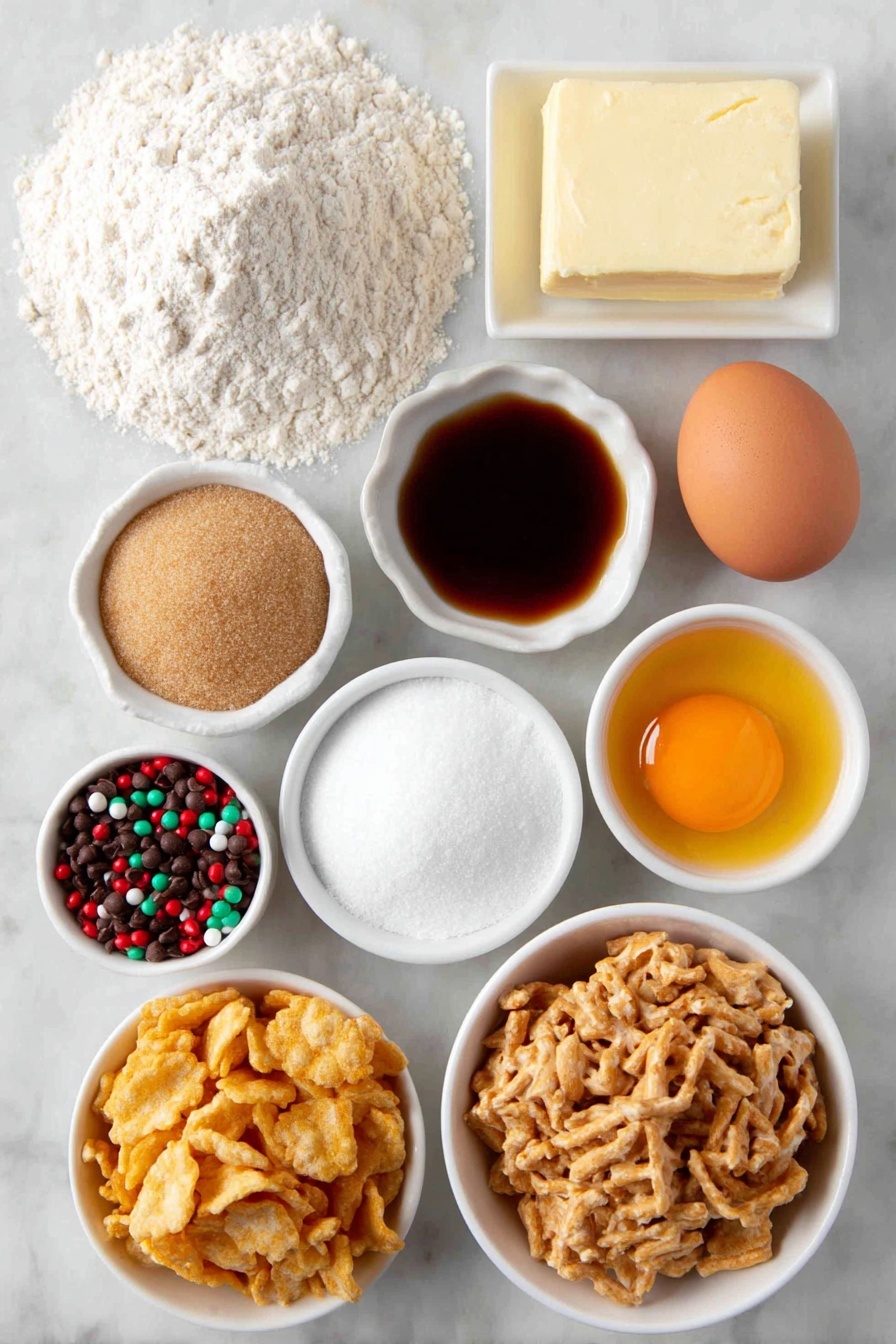
- All-purpose flour: The foundation that provides structure without weighing down the cookies.
- Baking soda: Gives just enough lift so these cookies rise nicely without becoming cakey.
- Cornstarch: A little trick to keep the cookies soft and tender.
- Salt: Balances the sweetness and enhances all the flavors.
- Unsalted butter: Room temperature butter is key here—it creams well with sugar for that lovely texture and flavor.
- Light brown sugar: Adds moisture and caramel notes.
- Granulated sugar: Helps with a slight crispness on the edges.
- Egg and egg yolk: The duo keeps cookies tender and helps bind everything.
- Vanilla extract: Brings warmth and depth to the dough.
- Semi-sweet chocolate chips: You can’t go wrong with these classic pockets of melty chocolate.
- Toffee bits or red & green M&Ms: This adds crunch or a festive pop of color and flavor.
- Crushed potato chips: The salty crunch surprise that really shines through.
- Chopped pretzels: Adds another layer of salty crunch and flavor.
- Holiday jimmies: These sprinkles hold their shape during baking, so your cookies look as colorful as they taste.
Make It Your Way
I love using this Kitchen Sink Cookies with Mix-ins Recipe as a base to get creative with whatever I have on hand. It’s like a playground for flavor—I swap in white chocolate chips or freeze-dried raspberries when I want a twist or double up on salty snacks when craving crunch. You should totally experiment!
- Add nuts: Pecans or walnuts add a lovely richness and extra texture—perfect if you like a bit of crunch beyond pretzels and chips.
- Change the chocolate: Using chunks instead of chips gives a chunkier melt, or mix white and dark chocolate for contrast.
- Seasonal flavors: Around the holidays, I throw in crushed peppermint or use red and green M&Ms for a festive vibe.
- Gluten-Free twist: Use a one-to-one gluten-free flour blend and watch these cookies stay just as tender.
Step-by-Step: How I Make Kitchen Sink Cookies with Mix-ins Recipe

Step 1: Whisk the Dry Ingredients Together
I start by combining the flour, baking soda, cornstarch, and salt in a medium bowl and whisking it well. This little step ensures everything is evenly mixed so you don’t end up with pockets of baking soda or clumps of flour in your dough. It’s those small touches that help your cookies bake evenly.
Step 2: Cream the Butter and Sugars Until Light and Fluffy
This is where patience pays off. Using room temperature butter, beat it with brown and granulated sugars for about 2-3 minutes until the mixture is pale and fluffy. This creates air pockets that give your cookies lift and softness. If your butter is too cold, the dough won’t come together as nicely.
Step 3: Add the Eggs and Vanilla
Next, add the whole egg, egg yolk, and vanilla extract. Beat them into the butter-sugar mixture until it’s light and airy. At this stage, scraping down the bowl helps you avoid any unmixed bits, so your dough is perfectly smooth every time.
Step 4: Slowly Incorporate the Dry Ingredients
Turn your mixer to low and gradually add the dry ingredient mix. Mixing at a low speed prevents flour clouds that make a mess (been there!) and helps keep the dough tender by not overworking the gluten.
Step 5: Stir in All the Magic Mix-ins
Now for the fun part—fold in your chocolate chips, holiday jimmies, toffee bits, crushed potato chips, and chopped pretzels with a spatula. Mixing by hand here lets you control the distribution and keeps all those crunchy bits from breaking down too much.
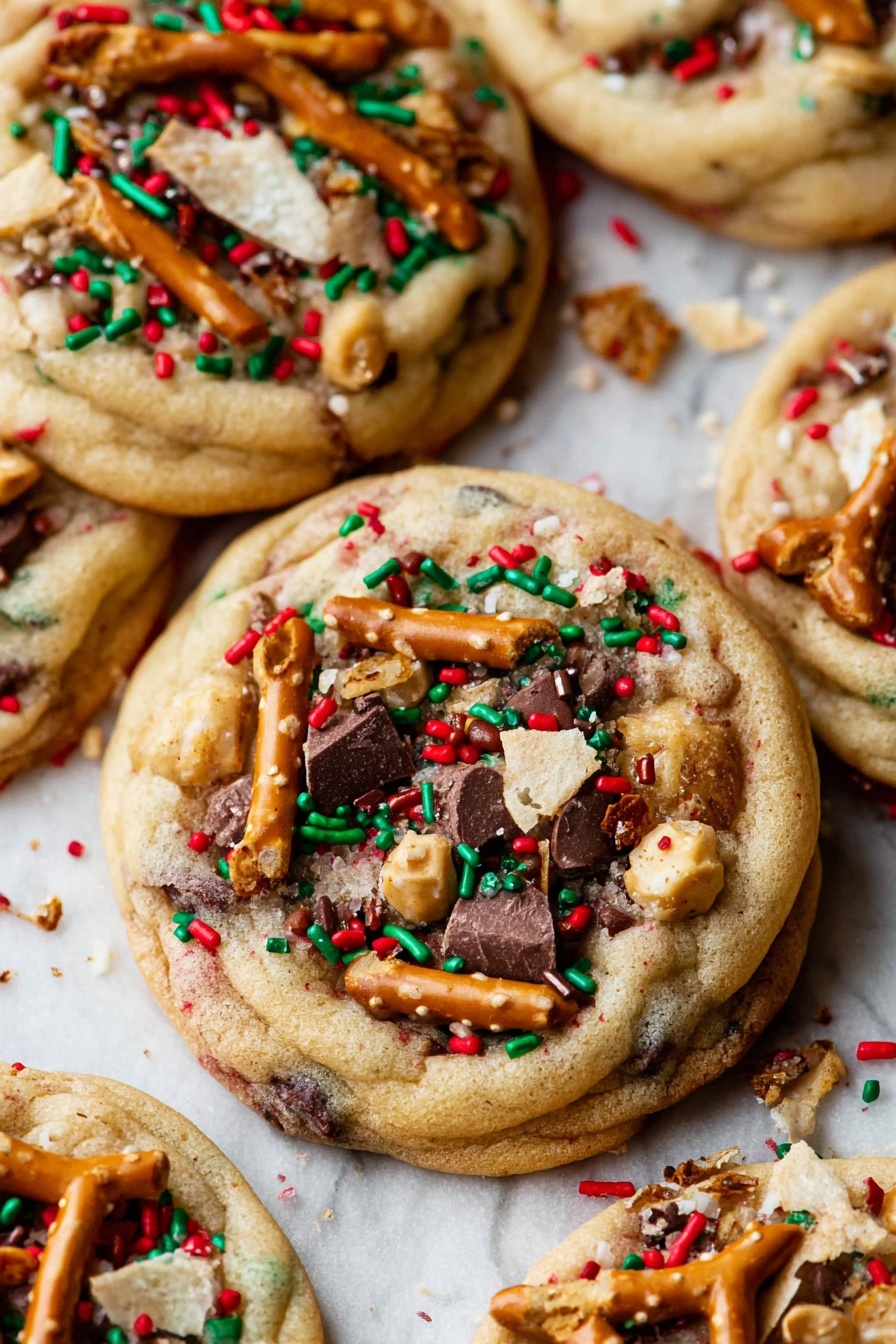
Step 6: Shape and Bake
Use a large cookie scoop or about ¼ cup of dough for each cookie. Roll the scoops into tall ovals instead of balls—this trick keeps your cookies nice and thick with a chewy center. Bake at 350°F for 12 minutes until edges are golden and tops are set. You’ll want to remove them right before they’re fully golden for that soft, chewy texture.
Step 7: The Finishing Touch
When you take the cookies out, gently swirl the rim of a glass around the edges to perfect the cookie’s shape—it’s a little kitchen trick I picked up that makes your cookies look polished and bakery-worthy. Then, press extra topping pieces on top while warm so they stick beautifully. After about 5 minutes, transfer your cookies to a wire rack to cool completely.
Top Tip
Over the years baking this Kitchen Sink Cookies with Mix-ins Recipe, I’ve learned that the butter temperature really makes or breaks these cookies—too warm and they spread too much, too cold and the texture suffers.
- Buttering Up: Leave your butter out for about 30-60 minutes. It should be cool to the touch but soft enough to cream easily.
- Don’t Skip Cornstarch: It’s the secret ingredient that gives these cookies their tender, melt-in-your-mouth texture without being cakey.
- Shape Matters: Rolling the dough into ovals instead of balls helps keep the cookies thick and chewy, a slight change that really elevates them.
- Add Toppings After Baking: Pressing some mix-ins on top while warm keeps the cookie visually interesting and gives a perfect first bite.
How to Serve Kitchen Sink Cookies with Mix-ins Recipe
Garnishes
I usually keep it simple here—extra holiday jimmies or a sprinkle of flaky sea salt goes a long way to brighten each cookie. The salt really contrasts beautifully with the sweet bits and adds that satisfying final crunch.
Side Dishes
These cookies are perfect on their own, but I love pairing them with a classic glass of cold milk or a robust cup of coffee. If you’re serving at a party, a bowl of vanilla ice cream alongside these cookies is pure magic.
Creative Ways to Present
For holiday gatherings, I’ve arranged these cookies on tiered dessert stands decorated with fresh pine sprigs or edible flowers for a festive touch. Wrapping a few in cellophane tied with ribbon also makes for a sweet homemade gift that everyone raves about.
Make Ahead and Storage
Storing Leftovers
Once your cookies are fully cooled, I store them in an airtight container at room temperature and they stay soft and delicious for about 5 days. I always put a slice of bread in the container to help keep them moist—a nifty kitchen trick I swear by.
Freezing
You can freeze both the dough balls and the baked cookies! I like to scoop the dough onto a tray, freeze until solid, then pop them into a freezer bag for up to 3 months. When ready to bake, just add a minute or two to the baking time. Baked cookies freeze beautifully as well—just thaw them uncovered at room temperature.
Reheating
Leftover cookies warmed for 10–15 seconds in the microwave taste almost fresh-baked—melting chocolate and toffee bits just so. You can also pop them in the oven at 300°F for 5 minutes to revive some crisp edges while keeping the inside chewy.
Frequently Asked Questions:
Absolutely! This recipe is designed for customization—feel free to add your favorite chocolates, nuts, candies, or salty snacks. Just keep the total amount similar to maintain the cookie's balance and texture.
Holiday jimmies are ideal because they hold their shape without melting or bleeding color into the dough during baking. Avoid using nonpareils or sprinkles that melt easily to keep those festive colors intact.
Room temperature butter is key—soft but still cool to the touch (around 69°F). Also, rolling your dough into tall ovals instead of flat balls helps keep the cookies thick and chewy without excessive spreading.
Yes! You can prepare the dough and refrigerate it, covered, for up to 2 days. Just note that some mix-ins like chips may lose crunch when chilled, but the flavor will be just as good.
Final Thoughts
This Kitchen Sink Cookies with Mix-ins Recipe has become my go-to when I want a treat that surprises and delights every time. They’re perfect for sharing but honestly, you won’t want to share many because these cookies are that good. Give this recipe a try—you’ll soon see how fun it is to mix and match, bake, and savor! And don’t forget to leave a review telling me how yours turned out; I love hearing your stories.
Print
Kitchen Sink Cookies with Mix-ins Recipe
- Prep Time: 15 minutes
- Cook Time: 12 minutes
- Total Time: 27 minutes
- Yield: 16 servings
- Category: Dessert
- Method: Baking
- Cuisine: American
Description
Kitchen Sink Cookies are a deliciously fun and indulgent treat packed with a variety of mix-ins including chocolate chips, toffee bits, pretzels, potato chips, and festive holiday jimmies. These thick, chewy cookies combine sweet, salty, and crunchy textures baked to golden perfection, making them perfect for any festive occasion or anytime snack craving.
Ingredients
Dry Ingredients
- 2 ¼ cups 270g all-purpose flour
- 1 teaspoon baking soda
- 1 Tablespoon 8g cornstarch
- ½ teaspoon salt
Wet Ingredients
- ¾ cup 170g unsalted butter, room temperature
- ¾ cup 150g light brown sugar, packed
- ¼ cup 50g granulated sugar
- 1 egg, room temperature
- 1 egg yolk, room temperature
- 1 teaspoon vanilla extract
Mix-ins
- ½ cup semi-sweet chocolate chips (chopped chocolate or white chocolate chips also work)
- ½ cup toffee bits or red & green M&Ms
- ¾ cup crushed potato chips
- ½ cup chopped pretzels
- ¼ cup holiday jimmies (not nonpareils)
Instructions
- Preheat oven: Preheat the oven to 350°F and line baking sheets with parchment paper to prepare for baking.
- Whisk dry ingredients: In a medium bowl, whisk together the flour, baking soda, cornstarch, and salt until fully combined.
- Cream butter and sugars: Using a handheld or stand mixer fitted with a paddle attachment, beat the unsalted butter, brown sugar, and granulated sugar on medium speed for 2-3 minutes until the mixture is light and creamy.
- Add wet ingredients: Beat in the egg, egg yolk, and vanilla extract for 1-2 minutes until the batter is light and fluffy, scraping down the sides of the bowl as needed.
- Combine dry ingredients: With the mixer on low speed, slowly add the dry ingredients to the wet ingredients and mix until just combined.
- Stir in mix-ins: Fold in the chocolate chips, holiday jimmies, toffee bits or M&Ms, crushed potato chips, and chopped pretzels using a rubber spatula until evenly incorporated.
- Scoop dough and bake: Use a large cookie scoop or a scant ¼ cup to scoop dough onto prepared baking sheets, rolling each scoop into a tall oval shape for thick cookies. Bake in the preheated oven for 12 minutes or until the edges are slightly golden and the tops are set.
- Finish and cool: Immediately after removing the cookies from the oven, gently swirl the rim of a large glass around the outside edge of each warm cookie to form perfect circles. Press extra topping pieces on top as desired. Let cookies cool on the sheet for 5 minutes before transferring to a cooling rack to cool completely.
Notes
- Room temperature butter is critical; aim for cool-to-the-touch butter around 69°F to prevent excessive spreading.
- Use holiday jimmies sprinkles as they hold their shape and do not melt or bleed color during baking.
- Experiment with additional mix-ins like white chocolate chips, red and green M&Ms, chocolate chunks, salted peanuts, or crushed peppermint.
- The dough can be made ahead and stored covered in the refrigerator for up to 2 days, though chips may lose their crunchiness.
- Store baked cookies in an airtight container at room temperature for up to 5 days or freeze for up to 2 months (thaw uncovered before serving).
- Freeze dough balls in a freezer bag for up to 3 months; when baking frozen dough balls, add 1-2 extra minutes to the bake time.
Nutrition
- Serving Size: 1 cookie
- Calories: 220 kcal
- Sugar: 16 g
- Sodium: 160 mg
- Fat: 11 g
- Saturated Fat: 6 g
- Unsaturated Fat: 4 g
- Trans Fat: 0 g
- Carbohydrates: 27 g
- Fiber: 1 g
- Protein: 2 g
- Cholesterol: 40 mg


Leave a Reply