There’s just something mesmerizing about a pattern you can eat — and that’s exactly why this Mint Chocolate Checkerboard Cookies Recipe has been a favorite in my kitchen. The way the cool mint and rich chocolate alternate in perfect squares is a feast for both your eyes and your taste buds.

Jump to:
- Why You'll Love This Recipe
- Ingredients & Why They Work
- Make It Your Way
- Step-by-Step: How I Make Mint Chocolate Checkerboard Cookies Recipe
- Top Tip
- How to Serve Mint Chocolate Checkerboard Cookies Recipe
- Make Ahead and Storage
- Frequently Asked Questions:
- Final Thoughts
- Mint Chocolate Checkerboard Cookies Recipe
Why You'll Love This Recipe
This recipe isn’t just about cookies; it’s about creating a fun, eye-catching treat that tastes as delightful as it looks. I love the mix of refreshing mint and deep chocolate, and the checkerboard pattern is such a conversation starter when guests arrive.
- Eye-Catching Design: The checkerboard pattern is an impressive pastry trick that’s easier than it seems once you get the hang of it.
- Perfect Flavor Balance: Mint and chocolate complement each other beautifully, delivering a refreshing yet indulgent cookie.
- Texture That Delights: Crunchy edges with a soft, buttery center make every bite satisfying.
- Customizable and Fun: You can tweak the colors, flavors, or even try espresso powder in the chocolate dough to make it your own.
Ingredients & Why They Work
With baking, good ingredients set the stage for success, and in this Mint Chocolate Checkerboard Cookies Recipe, each component plays a key role. Using quality butter and fresh eggs means better texture and flavor, while the peppermint and cocoa powders bring the signature taste and color contrast.

- All-purpose flour: The backbone of cookies, providing structure but still keeping the texture tender when handled right.
- Baking powder: Adds just a touch of lift, so the cookies hold their shape without getting too puffed out.
- Salt: A pinch enhances all the flavors, balancing sweetness and boosting the chocolate and mint.
- Unsalted butter: Adds richness and helps with that tender crumb; make sure it’s softened, not melted.
- Granulated sugar: Sweetens and helps with that perfect cookie crunch around the edges.
- Egg + egg yolk: Provides moisture, binds dough, and enriches the flavor.
- Vanilla extract: The secret to depth, even though mint and chocolate are stars, vanilla brings everything together.
- Peppermint extract: The key to that fresh minty flavor without overpowering.
- Green food dye (optional): For that iconic mint color that makes the checkerboard pattern pop.
- Cocoa powder: Deepens the chocolate notes and adds that dark contrast needed for the pattern.
- Milk: Moisturizes the chocolate dough just enough so it blends smoothly with the rest.
- Espresso powder (optional): Enhances the richness of the cocoa, but you can skip it if you prefer the basic version.
Make It Your Way
I always like to play around a bit—sometimes adding a tiny scoop of espresso powder to the chocolate dough just to deepen the flavor. You might want to start with the original and then experiment until you find your perfect combo.
- Chocolate Intensity Variation: I once added a bit of instant espresso powder, and it made the chocolate pop in a way that surprised even my biggest chocolate lovers.
- No Food Coloring Needed: If you prefer natural colors, skip the green dye. The flavor will shine through just as beautifully, even if the color is less vibrant.
- Gluten-Free Option: I've had success swapping in a gluten-free flour blend for all-purpose—just watch the dough consistency closely, since it can be slightly different.
Step-by-Step: How I Make Mint Chocolate Checkerboard Cookies Recipe

Step 1: Whip Up the Base Dough
Start by whisking together your flour, baking powder, and salt in a medium bowl—this keeps all your dry ingredients evenly distributed. Then cream your softened butter and sugar using a mixer until it's pale and fluffy (about 3 minutes). Don’t rush this step; great creaming means lighter cookies. Next, add the egg, egg yolk, and vanilla extract, beating until everything blends smoothly. Finally, on low speed, mix in your dry ingredients until a thick dough forms.
Step 2: Split and Flavor the Dough
Divide your dough roughly in half. One half will become your mint dough—add the peppermint extract and, if you want, a drop of green food coloring. Mix gently until you get that signature mint shade. The other half becomes your chocolate dough. Mix in cocoa powder, milk, and if you want, espresso powder for that deeper chocolate flavor.
Step 3: Shape Your Dough Blocks and Chill
On a floured surface, shape each dough half into neat rectangular blocks about 6 inches long, 2 inches wide, and 2 inches high. This is the trickiest part—the dough is a bit sticky, so flour your hands well, and don’t rush. Wrap them well in plastic wrap and chill for exactly 4 hours 45 minutes. This chilling step is crucial—you want the dough firm but still pliable to get that perfect checkerboard assembly later.
Step 4: Cut and Assemble the Checkerboard Pattern
Take those chilled dough blocks and slice each lengthwise into three even strips, then each strip into thirds, giving you 9 thin strips per flavor. Don’t worry if the edges aren’t perfect—just trim any rounded corners so your checkerboard looks sharp. Lay out strips alternating mint and chocolate, stacking carefully to form the checkerboard blocks. Press lightly but firmly so the dough sticks together nicely.
Step 5: Final Chill
Wrap those checkerboard dough blocks again and chill for a minimum of 2 more hours, or up to 4 days if you want to prepare in advance. This extra cold time firms everything for neat slicing.
Step 6: Slice and Bake
Slice blocks into half-inch thick cookies and arrange them spaced apart on parchment-lined baking sheets. If you want a little sparkle and crunch, brush each cookie with an egg wash made from leftover egg white plus a bit of water, then sprinkle coarse sugar on top. Bake at 350°F for 12 to 14 minutes until the edges just start to turn golden. Let them cool on the pan for 5 minutes before moving to a rack—this helps cookies hold their shape.
Top Tip
Through trial and error, I've found that the chilling steps are the secret to success when making this Mint Chocolate Checkerboard Cookies Recipe. Don’t skip or skimp on these! The dough needs to be firm yet pliable for perfect patterning and clean slicing.
- Dough Temperature Matters: Let your dough chill just long enough—not too cold or it’ll crack when slicing.
- Use a Sharp Knife: A sharp blade helps you make clean cuts without squishing your checkerboard blocks.
- Trim for Clean Edges: It may seem like extra work, but trimming those rounded edges really makes your checkerboard pattern stand out.
- Don’t Skip Egg Wash: The sprinkle of coarse sugar on egg-washed cookies brings a lovely sparkle and crunch that I can’t resist.
How to Serve Mint Chocolate Checkerboard Cookies Recipe

Garnishes
I like to keep garnishes simple with this recipe. A light dusting of powdered sugar looks elegant without overpowering the cookie’s signature look. Sometimes I’ll also add tiny chocolate shavings or a few fresh mint leaves on the serving plate for a fresh touch.
Side Dishes
These cookies are fantastic alongside a hot cup of peppermint tea or rich hot chocolate. For an afternoon treat, I love pairing them with a scoop of mint chip ice cream—turns dessert into a little celebration.
Creative Ways to Present
I once arranged a checkerboard cookie platter alternating with small mint and chocolate truffles for a festive holiday spread. For parties, cutting cookies into smaller bite-sized squares and layering them on a tiered tray adds a fun and elegant twist.
Make Ahead and Storage
Storing Leftovers
Wrapped tightly in an airtight container at room temperature, these cookies stay fresh for about a week—perfect if you want to stash some for later snacking. Just keep them away from heat or sunlight to preserve that minty freshness.
Freezing
I’ve frozen fully baked cookies for up to three months. When you’re ready to enjoy them, pop them in the refrigerator overnight to thaw gently, then bring them to room temperature. The texture and flavor hold up surprisingly well!
Reheating
If you want to revive that just-baked warmth, I like to microwave a few cookies for about 10 seconds or warm them for 3-5 minutes in a 300°F oven. Just watch closely so they don’t overbake.
Frequently Asked Questions:
Fresh mint doesn’t provide the concentrated flavor peppermint extract delivers, so the cookies may be less minty and more subtle. If you do want to experiment with fresh mint, try steeping chopped leaves in melted butter before mixing, but keep in mind the flavor won’t be as bold or consistent.
The dough needs to be firm enough to handle but still pliable so you can press and align the strips without cracking. Longer chilling makes the dough too stiff, causing cracks that ruin the checkerboard pattern when slicing and baking.
You can substitute dairy-free margarine or coconut oil for the butter and use a plant-based milk for the milk in the chocolate dough. Just note the flavor and texture might be slightly different. I recommend testing a small batch first to make sure you like the results.
Trimming the edges at each step—after cutting dough strips, assembling blocks, and slicing cookies—is key to a clean checkerboard look. The leftover scraps can be rerolled and baked separately, so you won’t waste any dough while keeping the blocks tidy and square.
Final Thoughts
This Mint Chocolate Checkerboard Cookies Recipe will quickly become your go-to if you love a bit of baking artistry paired with delicious flavors. Making these is like taking a mini kitchen adventure—you learn the craft and get to eat your masterpiece. Trust me, once you nail the technique, you’ll want to whip up batch after batch for holidays, gifts, or just regular cozy days at home. So go ahead, give it a try, and enjoy the rewarding mix of minty freshness and chocolatey goodness in every bite!
Print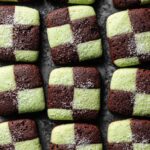
Mint Chocolate Checkerboard Cookies Recipe
- Prep Time: 4 hours 45 minutes
- Cook Time: 13 minutes
- Total Time: 5 hours
- Yield: 24 cookies
- Category: Dessert
- Method: Baking
- Cuisine: American
- Diet: Vegetarian
Description
Mint Chocolate Checkerboard Cookies are visually stunning and delicious treats featuring alternating strips of mint-flavored and chocolate-flavored dough arranged in a checkerboard pattern. These buttery, soft cookies have a perfect balance of refreshing peppermint and rich cocoa, ideal for special occasions or gifting.
Ingredients
Base Cookie Dough
- 2 and ½ cups (313g) all-purpose flour (spooned & leveled)
- ½ teaspoon baking powder
- ½ teaspoon salt
- 1 cup (16 Tbsp; 226g) unsalted butter, softened to room temperature
- 1 cup (200g) granulated sugar
- 1 large egg + 1 egg yolk, at room temperature
- 1 and ½ teaspoons pure vanilla extract
- optional: 1 Tablespoon (15ml) water and ¼ cup (50g) coarse sugar for topping
For the Mint Dough
- 1 teaspoon peppermint extract
- optional: 1 drop green food dye
For the Chocolate Dough
- 2 Tablespoons (10g) unsweetened natural or dutch-process cocoa powder
- 1 Tablespoon (15ml) milk
- optional: 1 teaspoon espresso powder
Instructions
- Make the Dry Ingredients: Whisk together the flour, baking powder, and salt in a medium bowl and set aside.
- Cream Butter and Sugar: In a large bowl, beat softened butter and granulated sugar on medium-high speed using a hand or stand mixer with a paddle attachment until light and fluffy, about 3 minutes.
- Add Eggs and Vanilla: Add the egg, egg yolk, and vanilla extract to the creamed butter mixture and beat on high speed until fully combined, about 1 minute, scraping down sides as needed.
- Combine Dry and Wet Ingredients: Slowly add the dry ingredient mixture to the wet ingredients and mix on low speed until a thick, sticky dough forms. Remove dough from bowl.
- Divide Dough: Split the dough evenly into two portions, roughly just under 2 cups each.
- Prepare Mint Dough: Place one half of the dough back into the mixing bowl. Add peppermint extract and green food dye (starting with a small drop) and mix on low until evenly colored. Adjust food dye as desired. Remove dough from bowl.
- Prepare Chocolate Dough: Place the other half of the dough into the mixing bowl. Add cocoa powder, milk, and optional espresso powder, then mix on low until combined.
- Shape and Chill Dough: On a lightly floured surface, shape each dough ball into a 6-inch long rectangle, about 2 inches tall and 2 inches wide. Wrap individually in plastic wrap or cover with foil and refrigerate for 1 hour until dough is less sticky but still pliable.
- Assemble Checkerboard Pattern: Remove chilled doughs and cut each into 3 equal strips lengthwise, then cut each strip into 3 equal pieces to create 9 strips per dough. Trim any rounded edges to create neat strips. Arrange strips alternating mint and chocolate dough, pressing tightly to form a neat checkerboard block. Repeat assembly for second block starting with the opposite dough. Wrap blocks and refrigerate for an additional 2 hours up to 4 days.
- Preheat Oven and Prepare Baking Sheets: Preheat oven to 350°F (177°C) and line two baking sheets with parchment paper or silicone mats.
- Slice and Prepare Cookies for Baking: Slice each checkerboard dough block into 12 slices about ½-inch thick for thicker cookies or 18 slices about ⅓-inch thick for thinner cookies (reduce bake time by 1 minute for thin slices). Trim edges for neat squares if desired. Arrange cookies 2-3 inches apart on baking sheets.
- Add Egg Wash and Sugar: If desired, brush each cookie lightly with egg wash (made from reserved egg white mixed with 1 tablespoon water) and sprinkle with coarse sugar for a crunchy, sparkling finish.
- Bake Cookies: Bake in preheated oven for 12-14 minutes or until edges are very lightly browned.
- Cool Cookies: Remove baking sheets from oven and let cookies cool on sheets for 5 minutes before transferring them to wire racks to cool completely.
Notes
- Make Ahead: Shaped checkerboard dough blocks can be refrigerated up to 4 days or frozen up to 3 months. Baked cookies freeze well for 3 months; thaw overnight in the refrigerator and bring to room temperature before serving.
- Egg Wash: Use the saved egg white mixed with water for a light glaze and sprinkle coarse sugar before baking to add sparkle and crunch.
- Trimming Dough: Trimming dough strips, checkerboard blocks, and cookie slices helps create neat squares. Leftover dough scraps can be combined, rolled out, cut into shapes, and baked separately.
- Food Coloring: Use gel food coloring for best results to color the mint dough without altering dough consistency.
- Chilling Dough: Avoid chilling dough blocks longer than 1 hour before shaping to maintain pliability; if longer chilling is necessary, let dough sit 15-30 minutes at room temperature before shaping.
Nutrition
- Serving Size: 1 cookie
- Calories: 150 kcal
- Sugar: 12 g
- Sodium: 80 mg
- Fat: 8 g
- Saturated Fat: 5 g
- Unsaturated Fat: 3 g
- Trans Fat: 0 g
- Carbohydrates: 18 g
- Fiber: 1 g
- Protein: 2 g
- Cholesterol: 35 mg


Leave a Reply