There's something so comforting about a dish that comes together fast yet tastes rich and satisfying. This Quick Mongolian Chicken Recipe hits that sweet spot — it's savory, slightly sweet, and ready in no time, making it my go-to for busy weeknights when you want a restaurant-quality meal without the wait.

Jump to:
Why You'll Love This Recipe
I’m genuinely excited to share this Quick Mongolian Chicken Recipe because it’s helped me transform hectic evenings into cozy dinner moments that still feel special. The balance of sweet, tangy, and savory flavors is spot-on, and the chicken gets delightfully crispy without deep frying.
- Speedy Prep: You can whip this up start to finish in just about 30 minutes, perfect for last-minute meals.
- Simplified Ingredients: Most of the components are pantry staples or easy finds — no need for complicated shopping.
- Deliciously Crispy Chicken: The cornstarch coating delivers a light crunch that holds up in the sauce without getting soggy.
- Flexible & Customizable: You can easily tweak the heat and sweetness to suit your family’s preferences.
Ingredients & Why They Work
This recipe blends familiar Asian-inspired ingredients that create layers of flavor without fuss. Using cornstarch not only thickens the sauce but crisps up the chicken beautifully, and I love how garlic and ginger add that fresh aromatic punch.

- Chicken breasts: Boneless and skinless keeps it lean and cooks quickly; cutting into uniform chunks helps everything cook evenly.
- Garlic powder: Adds a mild garlicky background note without the moisture fresh garlic sometimes introduces here.
- Cornstarch: The secret behind that addictive crispy coating and glossy sauce.
- Avocado oil: High smoke point oil perfect for searing chicken without burning.
- Green onions: They give a mild sharpness and freshness, plus a pop of color.
- Soy sauce (low sodium): Provides savory umami without overwhelming saltiness.
- Rice vinegar: Balances sweetness with a bright tang.
- Maple syrup or brown sugar: Sweetens the sauce naturally—maple syrup is my favorite for depth.
- Toasted sesame oil: Adds that classic nutty aroma that screams “Mongolian” to me.
- Sriracha: Just a touch for subtle heat you can dial up or down.
- Water: Thins the sauce to the right consistency before thickening.
- Fresh garlic & ginger: Grated for maximum flavor release and zing.
- Sesame seeds (for garnish): Toasted seeds bring lovely crunch and visual appeal at the end.
- Rice or noodles: Classic bases to serve this saucy chicken on for a complete meal.
Make It Your Way
One of my favorite things about this Quick Mongolian Chicken Recipe is how easy it is to make your own. I often tweak the heat level or try swapping the chicken for beef or tofu, depending on what’s in the fridge.
- Variation: For a little extra crunch, I once tossed in some sliced bell peppers and snap peas toward the end — it added great color and fresh texture.
- Spice it up: Increase sriracha or add chili flakes if you like a seriously spicy kick.
- Make it gluten-free: Swap regular soy sauce for tamari and double-check your cornstarch brand.
Step-by-Step: How I Make Quick Mongolian Chicken Recipe

Step 1: Coat the Chicken for Crispy Perfection
Start by tossing chicken chunks with garlic powder and cornstarch in a large bowl until every piece is evenly coated. This simple step ensures the chicken crisps up nicely when you hit the hot skillet — trust me, don’t skip or skimp on this part!
Step 2: Whisk Together Your Flavor-Packed Sauce
In a glass measuring cup or bowl, combine soy sauce, rice vinegar, maple syrup, sesame oil, sriracha, water, garlic, ginger, and cornstarch. Whisk thoroughly to dissolve lumps so the sauce thickens smoothly later. This sauce is where all the magic happens.
Step 3: Sear the Chicken Until Golden and Cooked Through
Heat avocado oil in a skillet over medium-high flame. When hot, add chicken in a single layer — don’t crowd the pan or the chicken will steam instead of crisp. Let it cook undisturbed for 3-4 minutes, then flip and finish cooking through. Remove the chicken to a plate once done.
Step 4: Build the Sauce and Toss it All Together
Toss sliced green onions in the hot skillet for 30 seconds to wake up their flavor. Pour in the prepared sauce and stir gently as it thickens — this only takes a few minutes. Return the chicken to the pan and coat it thoroughly in that glossy sauce. Remove from heat, sprinkle sesame seeds and extra scallions on top, and you’re ready to serve.
Top Tip
Over the years cooking this Quick Mongolian Chicken Recipe, I’ve learned a few tricks that really elevate the dish and make it foolproof for you.
- Don’t crowd the pan: Give the chicken space so it crisps instead of steams — if you have to, cook in two batches.
- Perfect sauce thickness: Make sure to whisk the cornstarch in the sauce fully to avoid lumps and get that beautiful glaze.
- Use fresh ginger and garlic: Grating these instead of finely chopping releases more flavor, making the sauce taste brighter and fresher.
- Rest before serving: Letting the chicken sit in the sauce off heat for a couple of minutes helps the flavors meld beautifully.
How to Serve Quick Mongolian Chicken Recipe

Garnishes
I usually finish this dish with a generous handful of sliced green onions and a sprinkle of toasted sesame seeds — it adds that perfect fresh crunch and nutty pop. Sometimes I toss on a few red pepper flakes if I’m feeling fancy with the spice level.
Side Dishes
I like serving this over steamed jasmine rice or chewy udon noodles to soak up every bit of that luscious sauce. For greens, quickly sautéed bok choy or steamed broccoli work great to balance out the meal.
Creative Ways to Present
For dinner parties, I once plated the chicken over black rice garnished with thinly sliced red chilies and a drizzle of extra sesame oil — it looked stunning and everyone said it tasted even better! You can let your presentation shine by using colorful vegetables or serving in pretty bowls.
Make Ahead and Storage
Storing Leftovers
Leftover Quick Mongolian Chicken keeps beautifully in an airtight container in the fridge for up to 3 days. The sauce deepens in flavor as it sits, which I personally love.
Freezing
I’ve frozen cooked chicken with sauce in meal-sized portions before, and it reheats well as long as you thaw overnight in the fridge first. Just note the chicken texture changes slightly but remains tasty.
Reheating
When reheating, I recommend warming it gently in a skillet over medium-low heat to keep the chicken moist and sauce glossy — microwave reheating sometimes makes the chicken a bit rubbery.
Frequently Asked Questions:
Absolutely! Chicken thighs have more fat, so they stay juicy and add extra flavor. Just cut them into chunks like breasts and follow the same recipe steps.
Swap the soy sauce with a gluten-free tamari or coconut aminos, and ensure the cornstarch is certified gluten-free. This will keep your dish safe without sacrificing flavor.
Yes! You can mix the sauce ingredients in advance and store it in the fridge for up to 2 days. Just give it a good whisk before you use it to recombine any settled ingredients.
Coating the chicken in cornstarch and cooking it in a hot skillet with some avocado oil allows the chicken to crisp up nicely without the mess and extra calories of deep frying. Remember to avoid overcrowding the pan!
Final Thoughts
This Quick Mongolian Chicken Recipe has become a staple in my kitchen because it’s consistently delicious, easy to make, and endlessly adaptable. I’m confident you’ll find it as satisfying and speedy as I do—give it a try next time you want a tasty meal without the fuss, and I bet it’ll earn a permanent spot in your rotation too.
Print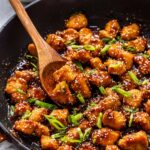
Quick Mongolian Chicken Recipe
- Prep Time: 15 minutes
- Cook Time: 15 minutes
- Total Time: 30 minutes
- Yield: 4 servings
- Category: Main Course
- Method: Frying
- Cuisine: Asian
Description
This Mongolian Chicken recipe features crispy chicken chunks tossed in a flavorful, sticky sauce made with soy sauce, maple syrup, garlic, and ginger. It's garnished with green onions and sesame seeds and pairs perfectly with rice or noodles, making for a delicious and easy-to-make dinner.
Ingredients
Chicken
- 1 ¼ pounds boneless skinless chicken breasts cut into 1 inch chunks
- ½ teaspoon garlic powder
- 3 tablespoons cornstarch
- 2 tablespoons avocado oil
- ½ cup sliced green onions plus extra for garnish
Sauce
- ⅓ cup low sodium soy sauce
- 2 tablespoons rice vinegar
- ¼ cup maple syrup or brown sugar
- 1 teaspoon toasted sesame oil
- 1 teaspoon sriracha
- ¼ cup water
- 1 teaspoon grated or minced garlic
- 1 tablespoon grated fresh ginger
- 1 tablespoon cornstarch
For Serving
- Sesame seeds for garnish
- Rice or noodles for serving
Instructions
- Prepare the chicken: In a large bowl, toss together the chicken pieces, garlic powder, and cornstarch until the chicken is completely coated evenly on all sides.
- Mix the sauce: Add all sauce ingredients into a glass measuring cup or bowl. Whisk thoroughly until everything is combined and the cornstarch is fully dissolved, forming a smooth sauce.
- Cook the chicken: Heat the avocado oil in a large skillet over medium-high heat. Once hot, add the chicken pieces in a single layer, careful not to overcrowd the pan, so they become crispy.
- Sear the chicken: Let the chicken cook undisturbed for 3 to 4 minutes until golden, then flip and continue cooking until the chicken pieces are fully cooked through. Remove from the skillet and set aside on a plate.
- Sauté the scallions and add sauce: Add the sliced green onions to the skillet and cook for about 30 seconds to release their flavor. Pour in the prepared sauce and stir well to combine.
- Combine chicken with sauce: Return the cooked chicken to the skillet and stir continuously until the sauce thickens and coats every piece of chicken beautifully.
- Garnish and serve: Remove the skillet from heat, sprinkle sesame seeds and extra sliced scallions on top. Serve hot over cooked rice or noodles for a complete meal.
Notes
- For extra crispiness, avoid overcrowding the skillet—cook the chicken in batches if needed.
- You can substitute brown sugar for maple syrup in the sauce if preferred.
- Adjust the sriracha according to your spice tolerance or omit for a milder dish.
- Use low sodium soy sauce to control the saltiness of the dish.
- Chicken thighs can be used instead of chicken breasts for a juicier texture.
Nutrition
- Serving Size: 1 serving
- Calories: 350 kcal
- Sugar: 10 g
- Sodium: 600 mg
- Fat: 12 g
- Saturated Fat: 2 g
- Unsaturated Fat: 8 g
- Trans Fat: 0 g
- Carbohydrates: 30 g
- Fiber: 1 g
- Protein: 30 g
- Cholesterol: 70 mg


Leave a Reply