If you love bold flavors with a comforting twist, this Spicy Mexican Spaghetti with Creamy Cheese Recipe is going to be your new favorite weeknight dinner. Imagine tender spaghetti soaked in a rich, taco-seasoned meat sauce, layered with a dreamy, cheesy cream sauce, and baked until bubbly—pure magic in a dish!

Jump to:
- Why You'll Love This Recipe
- Ingredients & Why They Work
- Make It Your Way
- Step-by-Step: How I Make Spicy Mexican Spaghetti with Creamy Cheese Recipe
- Top Tip
- How to Serve Spicy Mexican Spaghetti with Creamy Cheese Recipe
- Make Ahead and Storage
- Frequently Asked Questions:
- Final Thoughts
- Spicy Mexican Spaghetti with Creamy Cheese Recipe
Why You'll Love This Recipe
I’ve made this spicy Mexican spaghetti countless times, and every single bite feels like a warm hug. It's perfect for when you want something with a little kick but still loaded with creamy cheesy goodness.
- Flavor Explosion: The combination of taco seasoning and enchilada sauce creates a savory, spicy base that’s incredibly satisfying.
- Creamy & Comforting: The creamy cheese sauce takes the pasta to a whole new level of rich and indulgent.
- Easy to Make: With simple ingredients and straightforward steps, it’s perfect for busy nights.
- Family Friendly: Everyone from kids to adults will love this dish, and leftovers reheat like a dream.
Ingredients & Why They Work
For the best results, I recommend using fresh produce and good-quality cheese. The taco seasoning packet keeps things simple, but you can always jazz it up with extra spices if you like things hotter.
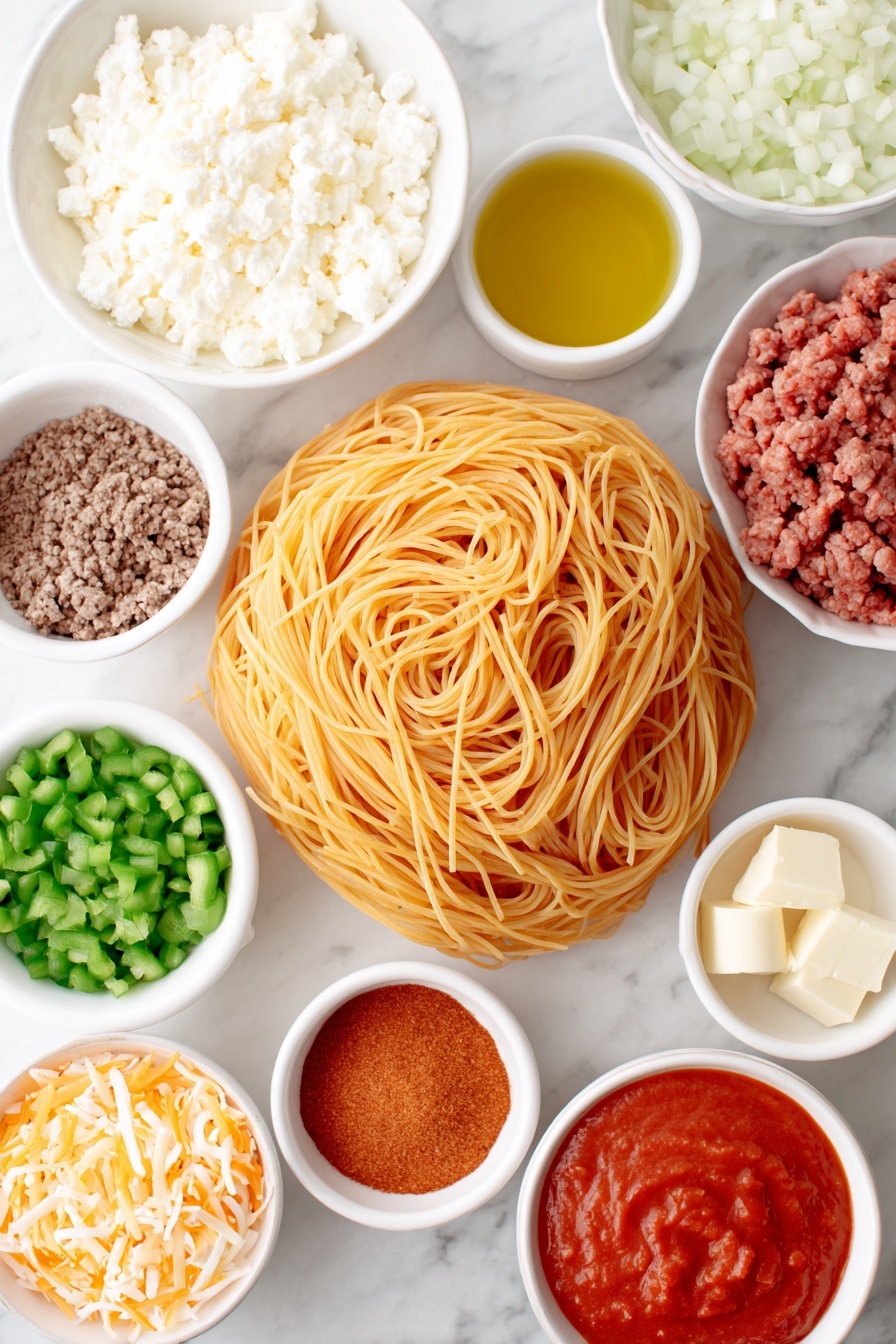
- Olive Oil: For sautéing veggies and adding a subtle fruity richness.
- Onion: Adds sweetness and depth when cooked down.
- Green Bell Pepper: Brings a fresh, slightly sweet crunch that balances the spices.
- Garlic: Essential aromatic that enhances every layer of flavor.
- Ground Beef: The hearty base of the meat sauce, full of rich flavor.
- Taco Seasoning: Brings that classic Mexican flair without the fuss.
- Salt: Enhances and balances all the flavors.
- Black Pepper: Adds just a touch of mild heat and depth.
- Crushed Tomatoes: Creates a robust, slightly chunky sauce base.
- Enchilada Sauce: Deepens the Mexican flavor profile with its unique spices and richness.
- Butter: For the creamy sauce base that makes everything silky.
- All-Purpose Flour: Helps thicken the creamy cheese sauce to the perfect texture.
- Whole Milk: Adds richness and smoothness to the sauce.
- Shredded Colby Jack Cheese: Melts beautifully to create the luscious cheesy sauce and topping.
- Spaghetti: Choose a good-quality pasta and cook it just until al dente to avoid mushiness after baking.
- Fresh Cilantro: Adds a bright, fresh finish that perfectly complements the spicy and cheesy flavors.
Make It Your Way
One of the best things about the Spicy Mexican Spaghetti with Creamy Cheese Recipe is how easy it is to tailor to your tastes or dietary needs. Whether you want a little extra heat, a lighter protein, or a gluten-free option, this dish welcomes your creative twist!
- Swap the Meat: I love switching ground beef for ground turkey or chicken when I want a leaner, lighter version. It still keeps that tasty taco seasoning vibe but cuts down on some fat.
- Add Some Heat: If you're a spice lover like me, throw in some diced jalapeños or a pinch of cayenne pepper right when you cook the veggies for an extra kick. It really wakes up the flavors beautifully!
- Make it Gluten-Free: Use gluten-free spaghetti and substitute all-purpose flour with a gluten-free flour blend for the cheese sauce. I’ve tried it a few times and it’s just as comforting and cheesy.
- Seasonal Veggies: Sometimes I swap the green bell pepper for roasted poblano peppers or add some corn kernels for a sweet pop. It’s an easy way to freshen things up depending on what’s in season.
Step-by-Step: How I Make Spicy Mexican Spaghetti with Creamy Cheese Recipe
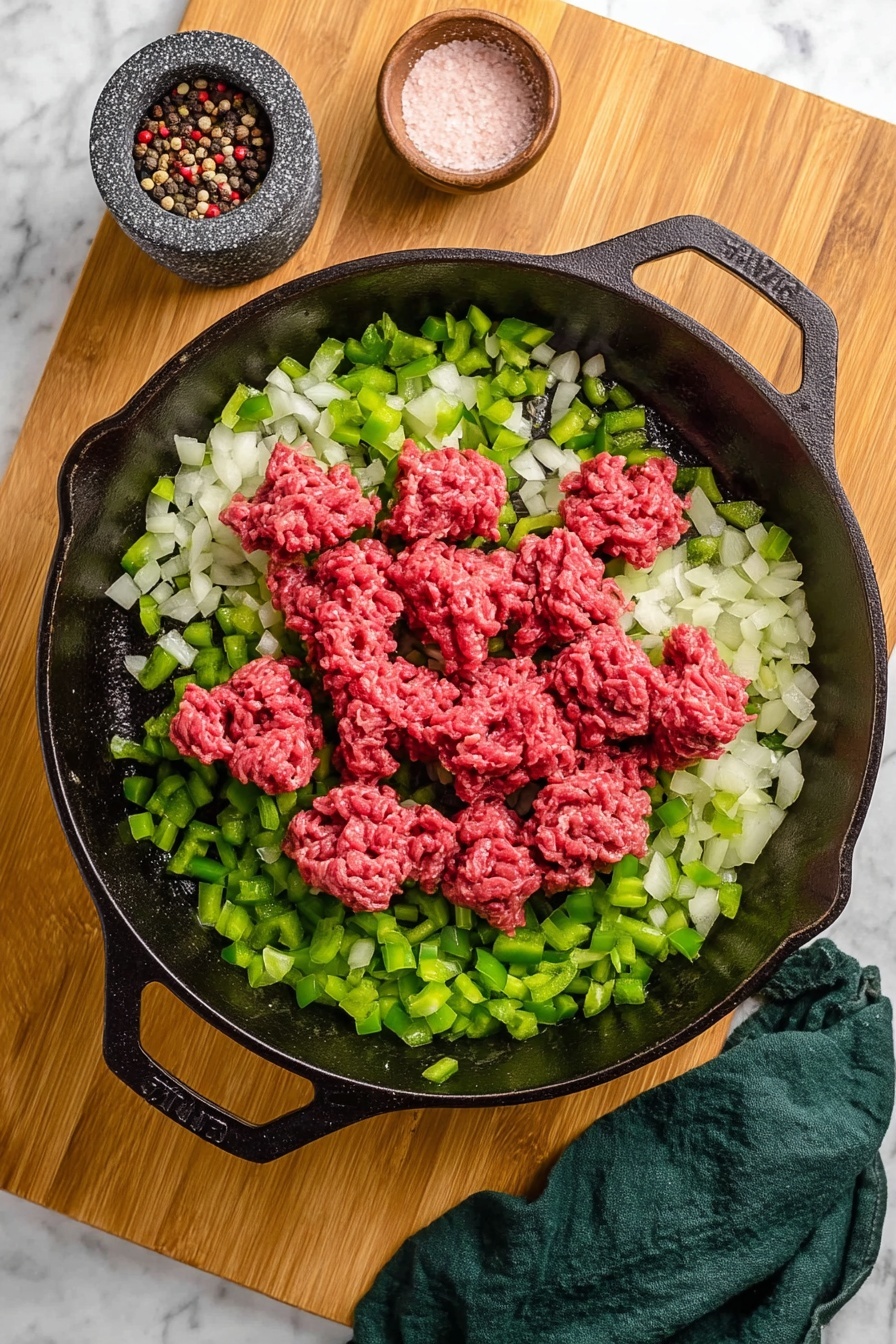
Step 1: Build a Flavor-Packed Meat Sauce
Start by heating 1 tablespoon of olive oil over medium heat in a large skillet. Toss in the diced onion and cook for about 3 minutes until they start to soften and get translucent—this adds a subtle sweetness. Next, add the diced green bell pepper and cook for another 2 minutes, stirring occasionally so everything softens evenly. Stir in 3 cloves of minced garlic and cook for just 1 minute until fragrant—you’ll notice that inviting aroma that signals you’re on the right track!
Now it’s time for the star ingredient: 1 pound of ground beef. Break it apart in the skillet and cook until nicely browned. Don’t forget to drain any excess fat to keep the dish balanced. Season with 1 packet of taco seasoning, 1 teaspoon salt, and ½ teaspoon black pepper, mixing well to coat every bit of the beef. Pour in the 15-ounce cans of crushed tomatoes and enchilada sauce, then let it simmer over low heat for 10 minutes. Stir occasionally to keep everything melded and flavorful. Once done, set the meat sauce aside and get ready for the creamy part!
Step 2: Whip Up the Lusciously Creamy Cheese Sauce
Grab a saucepan and melt 2 tablespoons of butter over medium heat. Add in 3 cloves of minced garlic and cook for about a minute until it releases a wonderful aroma but doesn’t brown. Sprinkle in 2 tablespoons of all-purpose flour and whisk constantly for about 1 minute to make a roux. This step is key for thickening your sauce without lumps.
While whisking continuously, slowly pour in 2 cups of whole milk, ensuring you keep the mixture smooth and creamy. Let it cook for 3 to 4 minutes as it thickens up beautifully. Finally, stir in 2 cups of shredded Colby Jack cheese until melted and silky. Season with ½ teaspoon salt and ¼ teaspoon black pepper, tasting and adjusting as needed. This cheese sauce is where all that creamy goodness lives!
Step 3: Coat the Spaghetti and Layer Your Casserole
Cook 16 ounces of spaghetti according to the package instructions until just al dente—you want the noodles tender but still firm enough to hold up while baking. Drain and toss the spaghetti with your creamy cheese sauce in a large bowl or directly in the saucepan so every strand gets coated with that luscious sauce.
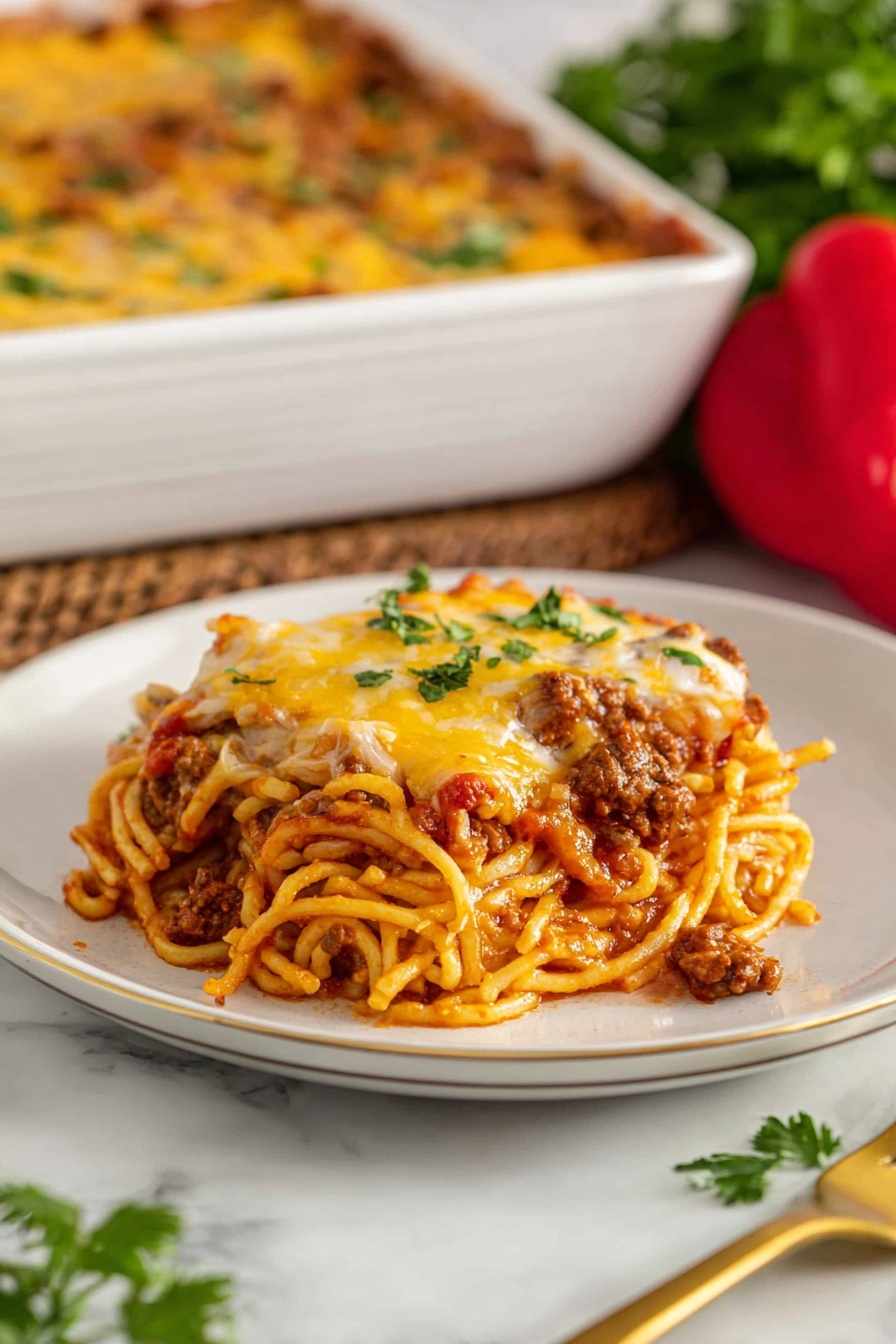
Preheat your oven to 375°F and grease a 9×13-inch casserole dish. Spread the creamy cheesy spaghetti evenly in the dish, creating a cozy base. Spoon the meat sauce over the top, then gently spread it out for even coverage. Finally, sprinkle 1 ½ cups of shredded Colby Jack cheese over everything to create a melty, golden crust once baked.
Step 4: Bake to Cheesy, Spicy Perfection
Pop your casserole into the oven and bake for 25 minutes. You’ll know it’s ready when the cheese on top has melted into bubbly, golden perfection with hints of crispy edges. This is the moment where all the flavors and textures come together—spicy, creamy, savory, and utterly comforting.
Step 5: Garnish and Dive In!
Remove the casserole from the oven and let it sit for a couple of minutes. Then sprinkle freshly chopped cilantro on top for a fresh, vibrant punch that complements the rich, cheesy goodness. Serve immediately and watch as everyone dives in, happy and satisfied!
Top Tip
These tips will help you master the Spicy Mexican Spaghetti with Creamy Cheese Recipe, ensuring your dish comes out perfectly every time — flavorful, creamy, and irresistibly cheesy!
- Perfectly Cooked Spaghetti: Be sure to cook your spaghetti just until al dente. This avoids mushiness after baking and keeps the texture just right for soaking up the creamy cheese sauce.
- Layering Flavors: I always let the meat sauce simmer for the full 10 minutes to really develop those deep, rich taco-seasoned flavors. Skipping this step means missed layers of savory goodness.
- Melting Cheese Magic: Stirring the Colby Jack cheese into the warm milk roux slowly helps it melt smoothly without clumping—this little technique makes the creamy cheese sauce silky and luscious.
- Avoid Overbaking: Keep an eye on the oven when baking the casserole. Pull it out once the cheese is bubbly and golden, around 25 minutes, to keep the cheese soft and prevent drying out.
How to Serve Spicy Mexican Spaghetti with Creamy Cheese Recipe
Garnishes
Freshly chopped cilantro is the star garnish here, adding a pop of brightness and a fresh, herbal note that contrasts beautifully with the rich, cheesy casserole. You can also add a sprinkle of sliced green onions or diced avocado for an extra creamy, fresh kick. A few slices of pickled jalapeños on top will elevate the spiciness to a delightful level if you want to turn up the heat!
Side Dishes
This dish is hearty and flavorful enough to stand on its own, but a crisp side salad with a tangy lime vinaigrette or a bowl of fresh Mexican street corn salad (elote) makes an excellent accompaniment. For something lighter, consider serving with roasted or grilled vegetables like zucchini or bell peppers seasoned with a squeeze of lime and a sprinkle of chili powder.
Make Ahead and Storage
Storing Leftovers
Any leftover Spicy Mexican Spaghetti with Creamy Cheese should be cooled to room temperature, then stored in an airtight container in the refrigerator. It will keep well for up to 3 days, perfect for quick meals later in the week.
Freezing
You can freeze leftovers by placing the cooled casserole in a freezer-safe container or wrapping tightly with foil and plastic wrap. Freeze for up to 2 months. To enjoy later, thaw in the refrigerator overnight before reheating.
Reheating
Reheat leftovers in the oven at 350°F until warmed through and the cheese is bubbly again, about 15–20 minutes. Alternatively, reheat individual portions in the microwave until hot, stirring halfway to ensure even heating.
Frequently Asked Questions:
Absolutely! Substitute the ground beef with your favorite plant-based ground meat or sautéed mushrooms and vegetables. You can still follow the same steps for seasoning and sauce to keep all those delicious flavors.
Yes! Use gluten-free spaghetti and swap the all-purpose flour in the cheese sauce for a gluten-free flour blend. The rest of the ingredients are naturally gluten-free.
The base recipe has a mild to moderate spice level due to the taco seasoning and enchilada sauce. If you prefer more heat, you can add diced jalapeños or a pinch of cayenne to the meat sauce as you cook.
Yes! You can assemble the casserole up to the baking step, then cover and refrigerate it for several hours before baking. Just add a few extra minutes to the baking time if baking from cold.
Final Thoughts
This Spicy Mexican Spaghetti with Creamy Cheese Recipe is truly a crowd-pleaser—comforting, cheesy, with just the right kick of Mexican spices. Whether you’re feeding a family or meal prepping for the week, it’s simple, satisfying, and bursting with flavor from the very first bite. Give it a try and I promise it’ll become one of your go-to recipes for cozy nights in!
Print
Spicy Mexican Spaghetti with Creamy Cheese Recipe
- Prep Time: 20 minutes
- Cook Time: 30 minutes
- Total Time: 50 minutes
- Yield: 6 servings
- Category: Main Course
- Method: Baking
- Cuisine: Mexican
Description
Mexican Spaghetti is a flavorful and comforting dish combining a savory ground beef taco-seasoned meat sauce with a creamy cheesy sauce over tender spaghetti, all baked to bubbly perfection and garnished with fresh cilantro.
Ingredients
Meat Sauce:
- 1 tablespoon olive oil
- 1 medium onion diced
- 1 green bell pepper diced
- 3 cloves garlic minced
- 1 pound ground beef
- 1 packet taco seasoning
- 1 teaspoon salt
- ½ teaspoon black pepper
- 15 ounce can crushed tomatoes
- 15 ounce can enchilada sauce
Creamy Cheese Sauce:
- 2 tablespoons butter
- 3 cloves garlic minced
- 2 tablespoons all-purpose flour
- 2 cups whole milk
- 2 cups shredded Colby Jack cheese
- ½ teaspoon salt
- ¼ teaspoon black pepper
- 16 ounces spaghetti cooked according to package instructions
Topping/Garnish:
- 1 ½ cups shredded Colby Jack cheese for topping
- Fresh cilantro chopped (for garnish)
Instructions
- Prepare the Meat Sauce: Heat olive oil in a large skillet over medium heat. Add the diced onion and cook for about 3 minutes until it starts to soften. Add the green bell pepper and cook for another 2 minutes, stirring occasionally. Stir in the minced garlic and cook for 1 more minute until fragrant. Add ground beef to the skillet and cook until browned, breaking it apart as it cooks. Drain any excess fat. Season the beef with taco seasoning, salt, and pepper. Stir well. Pour in the crushed tomatoes and enchilada sauce. Simmer the mixture over low heat for 10 minutes, stirring occasionally. Set the meat sauce aside.
- Make the Creamy Cheese Sauce: Melt butter in a saucepan over medium heat. Add the minced garlic and cook for about 1 minute. Sprinkle in the flour, whisking constantly for about 1 minute to form a roux. Slowly pour in the milk while whisking continuously to ensure the mixture is smooth. Cook for 3 to 4 minutes until thickened. Stir in the shredded Colby Jack cheese until melted. Season with salt and pepper.
- Combine Spaghetti with Cheese Sauce: Toss the cooked spaghetti with the creamy cheese sauce in a large bowl or the saucepan until evenly coated.
- Assemble the Dish: Preheat the oven to 375 degrees Fahrenheit and grease a 9 by 13-inch casserole dish. Spread the creamy spaghetti mixture evenly into the dish. Spoon the meat sauce over the top and spread evenly. Sprinkle the remaining shredded Colby Jack cheese over the meat sauce.
- Bake: Bake in the preheated oven for 25 minutes or until the cheese is melted and bubbly.
- Garnish and Serve: Remove from the oven. Garnish with freshly chopped cilantro. Serve immediately and enjoy!
Notes
- You can substitute ground turkey or chicken instead of beef for a leaner option.
- For a spicier dish, add diced jalapeños or a pinch of cayenne pepper to the meat sauce.
- Use gluten-free spaghetti and flour to make this recipe gluten-free.
- Leftovers can be refrigerated for up to 3 days and reheated in the oven or microwave.
- Make sure to cook the spaghetti just until al dente to avoid it getting mushy when baked.
Nutrition
- Serving Size: 1 serving
- Calories: 550 kcal
- Sugar: 6 g
- Sodium: 850 mg
- Fat: 27 g
- Saturated Fat: 15 g
- Unsaturated Fat: 10 g
- Trans Fat: 0.5 g
- Carbohydrates: 50 g
- Fiber: 4 g
- Protein: 28 g
- Cholesterol: 80 mg


Leave a Reply