There’s something so sweet and satisfying about making Valentine’s Heart Cookies with Sweet Sprinkles Recipe. These charming slice-and-bake cookies not only taste buttery and delicious but also look like little edible valentines you can gift (or sneakily keep all to yourself!). Let’s dive into why these cookies are an absolute must-bake this season.

Jump to:
- Why You'll Love This Recipe
- Ingredients & Why They Work
- Make It Your Way
- Step-by-Step: How I Make Valentine’s Heart Cookies with Sweet Sprinkles Recipe
- Top Tip
- How to Serve Valentine’s Heart Cookies with Sweet Sprinkles Recipe
- Make Ahead and Storage
- Frequently Asked Questions:
- Final Thoughts
- Valentine’s Heart Cookies with Sweet Sprinkles Recipe
Why You'll Love This Recipe
I first tried this recipe last Valentine’s Day, and it quickly became a favorite for gifting friends and family. The buttery texture, soft vanilla-bean notes, and bright pop of pink from the food coloring make these cookies feel both special and homey.
- Simple Slice-and-Bake Process: The dough log makes prepping and baking a breeze, perfect for when you want cuteness without fuss.
- Buttery and Tender: These cookies have a light, melt-in-your-mouth texture thanks to European butter and balanced ingredients.
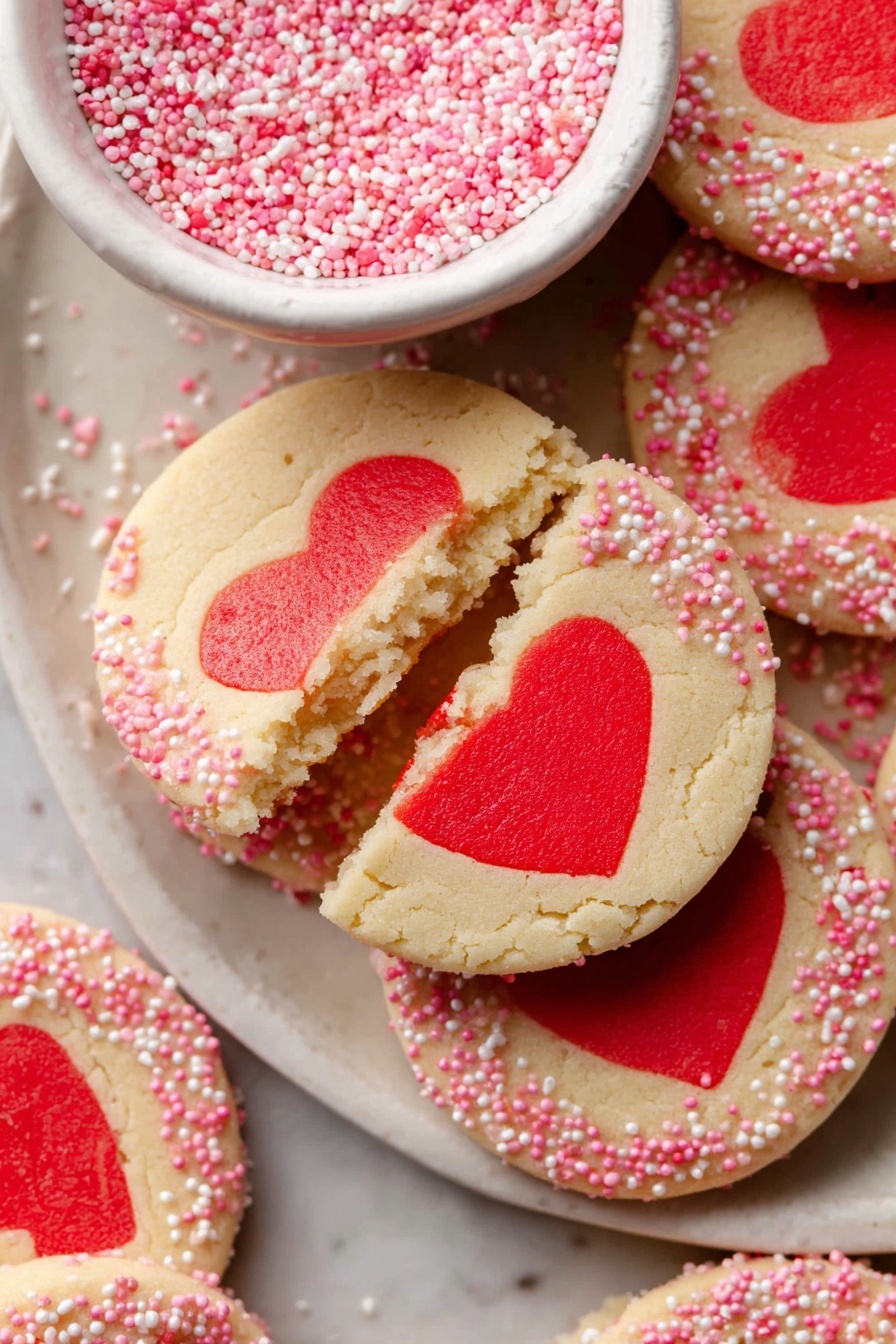
- Festive Look: Layered heart shapes coated with pink and white sprinkles give each cookie an adorable, Valentine’s Day-ready charm.
- Customizable Color: You control the shade of pink or red—so make them bright or soft depending on your mood!
Ingredients & Why They Work
Before you start, gather your ingredients and pay special attention to the butter and flour. Using European-style butter adds a richer taste, and measuring your flour accurately ensures the dough has the perfect texture. Here’s a quick breakdown of what you’ll need and why each plays an important role.

- All-purpose flour: Provides structure and the right crumb; measuring accurately is key here.
- Baking powder: Gives the cookies a subtle lift without making them cakey.
- Fine sea salt: Enhances the buttery sweetness with just a hint of balance.
- Unsalted European butter: Adds richness and tender flakiness, superior to standard butter.
- Granulated sugar: Sweetens the dough and helps with that crisp edge on baking.
- Large eggs and egg yolk: Provide moisture, structure, and richness.
- Heavy cream: Keeps the dough soft and smooth for rolling.
- Vanilla bean paste: Infuses warm, fragrant vanilla notes far beyond basic extract.
- Red gel food coloring: Creates the vibrant pink-red hue without altering dough texture.
- Pink and white jimmies sprinkles: Give the cookies their festive Valentine’s sparkle and crunch.
Make It Your Way
One of the best parts about the Valentine’s Heart Cookies with Sweet Sprinkles Recipe is how easily you can make it your own. Whether you want to amp up the color, switch up flavors, or adjust textures, there’s plenty of room for some creative spins.
- Flavored Dough Variation: I love adding a hint of almond extract to the plain dough for a subtle nutty undertone that complements the vanilla bean paste beautifully. It gives the cookies an extra layer of flavor that feels special without overpowering the buttery base.
- Sprinkle Substitutions: If you prefer a different look or crunch, try swapping out the pink and white jimmies with sanding sugar or edible pearls. I once used multicolor pearls for a whimsical twist, and it brought a fun, jewel-like sparkle perfect for a festive occasion beyond Valentine’s Day.
- Diet-Friendly Option: For a dairy-free approach, I recommend substituting the butter with a plant-based alternative and heavy cream with coconut cream. The texture changes slightly, but the heart shapes and slice-and-bake convenience remain unchanged—perfect for sharing with everyone.
- Color Fun: Don’t hesitate to experiment with the red gel food coloring. A softer blush pink or a deep crimson can set a totally different mood. Once, I made a batch with ombré hearts by mixing different intensities of red—super eye-catching and perfect for a romantic gift!
Step-by-Step: How I Make Valentine’s Heart Cookies with Sweet Sprinkles Recipe
Step 1: Whisk and Set Your Dry Ingredients
Start by whisking together the all-purpose flour, baking powder, and fine sea salt in a small bowl. This ensures the leavening agent and salt are evenly distributed throughout the flour for consistent texture and flavor. Set this mixture aside—you’ll fold it in shortly, so keep it close at hand.
Step 2: Cream Butter and Sugar to Fluffy Perfection
In your mixing bowl, beat the cool room temperature butter and granulated sugar together for about 3 minutes. You’re aiming for a light, fluffy mixture that looks pale and airy. This step is key for tender cookies, as it incorporates air into the dough. Don’t forget to scrape down the bowl's sides once or twice to keep everything evenly mixed.
Step 3: Add Eggs, Cream & Vanilla for Rich Flavor
Next, blend in the whole egg, egg yolk, heavy cream, and vanilla bean paste. The vanilla bean paste really elevates the flavor profile with its authentic, fragrant notes—don’t skip this if you want that bakery-quality richness. Mix just until everything is incorporated evenly.
Step 4: Gently Fold in Dry Ingredients for Soft Dough
Gradually add your preseasoned flour mixture into the wet ingredients. Mix carefully until just combined. You want the dough to be soft but not overworked—that helps keep these cookies tender and melt-in-your-mouth.
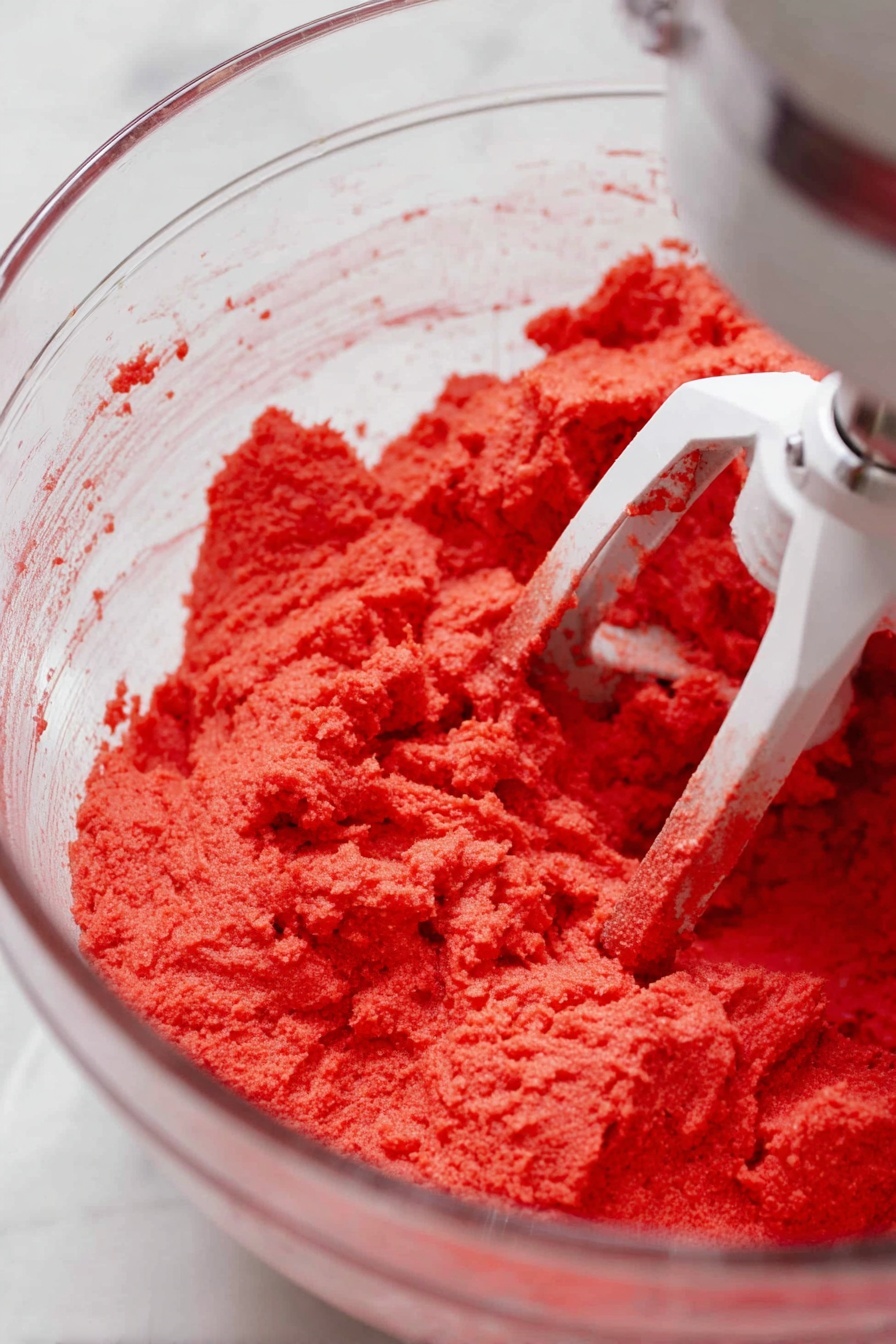
Step 5: Divide and Tint to Your Desired Pink or Red
Divide the dough roughly in half, keeping about half (375 to 400 grams) in the bowl. Add red gel food coloring to this portion and knead it gently until the color is evenly distributed and you’ve reached your perfect shade of pink or red. This is where you can really make the cookie your own—whether bright and bold or soft and romantic.
Step 6: Roll, Chill, and Cut Your Heart Shapes
Roll the colored dough between two sheets of parchment paper to about ½ inch thick. Freeze it for 10 minutes to firm it up—this makes cutting neat, crisp shapes much easier. Use a 1 ½-inch heart-shaped cookie cutter to go to town cutting as many hearts as you can, rerolling scraps once for maximum yield.
Step 7: Stack Hearts and Freeze the Log
Lightly dab the center of each heart with a little water to help them stick, then stack them into a log about 9 to 10 inches long on a lined baking sheet. Freeze this heart log for at least 30 minutes until it’s firm—you want it solid to make wrapping with the plain dough easier.
Step 8: Wrap the Hearts in Plain Dough and Chill
Remove the frozen heart stack from the freezer. Wrap the remaining plain dough smoothly around the heart log, sealing all gaps. Next, wrap the entire log tightly in plastic wrap and refrigerate for 2 to 3 hours or even overnight. This chilling step is crucial for easy slicing and beautiful, defined shapes.
Step 9: Prep Your Oven and Sprinkles for Baking
When your dough log is fully chilled, preheat your oven to 350°F (180°C). Unwrap the log and gently roll it in your chosen pink and white sprinkles until the surface is coated evenly—this adds the perfect sweet crunch and holiday-ready sparkle.
Step 10: Slice and Bake to Golden Perfection
Slice your dough log into roughly ½-inch thick cookies and place them on a parchment- or silicone-lined baking sheet. Bake them for 12 minutes, or until the bottoms are just turning golden and the tops have a matte finish. If you prefer crispier cookies, bake them a little longer—just keep a close eye so they don’t burn!
Step 11: Cool and Enjoy Your Sweet Creations
Once baked, transfer the cookies to a wire rack to cool completely. This helps them set and reach the ideal texture—soft, buttery centers with a light crunch from the sprinkles. Now, grab your favorite cup of tea or coffee and enjoy these charming valentine treats!
Top Tip
These tips truly make all the difference when baking your Valentine’s Heart Cookies with Sweet Sprinkles Recipe. They’ll help you achieve perfectly tender, vibrantly colored, and wonderfully festive cookies every time!
- Coloring with Care: I found that adding the red gel food coloring gradually and mixing thoroughly helps you reach that gorgeous shade of pink or red without turning the dough too soft or sticky.
- Freeze for Success: Freezing the colored dough before cutting the hearts made slicing neat and easy—no messy shapes, just crisp, defined hearts to stack and bake.
- Stacking Hearts: Lightly dabbing water between the hearts before stacking helped them stick together firmly during freezing and wrapping, preventing gaps inside the plain dough layer.
- Patience with Chilling: The 2 to 3 hours refrigeration step for the dough log is key. Skipping this led to misshapen cookies for me, so definitely give that time for the dough to firm up and slice smoothly!
How to Serve Valentine’s Heart Cookies with Sweet Sprinkles Recipe
Garnishes
These heart cookies are already adorable with their pink and white sprinkles, but you can add a little extra flair by serving them on a delicate doily or placing a small edible rose petal on each cookie for an elegant touch. A light dusting of powdered sugar just before serving can add a soft romantic shimmer as well.
Side Dishes
Pair your Valentine’s Heart Cookies with a cup of rich hot chocolate or a creamy vanilla latte for a cozy celebration. If you want to add a fresh element, a bowl of mixed berries or a fruity sparkling rosé complements the buttery sweetness beautifully.
Make Ahead and Storage
Storing Leftovers
Store your baked Valentine’s Heart Cookies in an airtight container at room temperature for up to 5 days. To keep them crisp, separate layers with parchment paper so they don’t stick together or lose their pretty sprinkle coating.
Freezing
You can freeze both the sliced, unbaked cookies and the baked ones. For unbaked slices, arrange them on a parchment-lined tray, freeze until firm, then transfer to a freezer-safe bag for up to 3 months. For baked cookies, store them in an airtight container with parchment between layers and freeze for up to 2 months.
Reheating
To enjoy frozen baked cookies, thaw at room temperature for about 30 minutes, then warm in a preheated 300°F (150°C) oven for 3-5 minutes to refresh that just-baked magic. For frozen unbaked slices, place directly on a baking sheet and bake according to the recipe, adding a couple of minutes if needed.
Frequently Asked Questions:
Yes, you can substitute vanilla bean paste with regular vanilla extract, but using the paste gives an extra depth and visible specks of vanilla that enhances both flavor and appearance. Use about 1 teaspoon of vanilla extract if substituting.
If the dough feels too sticky, pop it into the freezer wrapped in parchment paper for 10-15 minutes. Keeping your butter cool is important, so chilling the dough helps it firm up and become easier to handle.
For crispier cookies, slice the dough thinner—about ¼-inch thick. Just keep an eye on baking time and check a minute or two earlier to prevent overbaking.
Absolutely! You can refrigerate the wrapped dough log for up to 3 days before slicing and baking. Just keep it securely wrapped to prevent drying out or absorbing fridge odors.
Final Thoughts
Baking these Valentine’s Heart Cookies with Sweet Sprinkles Recipe was such a joyful journey—it’s the perfect way to channel love and creativity into your kitchen. They’re simple enough to make ahead but special enough to impress anyone lucky enough to get a taste. Whether you're gifting them or keeping them all for yourself, these buttery, heart-shaped delights will fill your heart and home with sweetness. Happy baking and happy Valentine’s Day!
Print
Valentine’s Heart Cookies with Sweet Sprinkles Recipe
- Prep Time: 3 hours
- Chilling Time: 2 to 3 hours
- Cook Time: 12 minutes
- Total Time: 3 hours 12 minutes
- Yield: 20 cookies
- Category: Dessert
- Method: Baking
- Cuisine: American
- Diet: Vegetarian
Description
These Valentine's Slice and Bake Heart Cookies are charming, buttery treats perfect for celebrating love. Featuring a tender, lightly sweetened dough, they’re tinted with red gel food coloring, layered with a vanilla bean flavor, and coated with pink and white sprinkles for a festive touch. The slice-and-bake method makes preparation easy, with beautifully stacked heart shapes wrapped in a smooth dough log, ready for slicing and baking into adorable cookies.
Ingredients
Dry Ingredients
- 2 ½ cups all-purpose flour
- ½ teaspoon baking powder
- 1 teaspoon fine sea salt
Wet Ingredients
- 14 tablespoons unsalted European butter, cool room temperature
- 1 cup granulated sugar
- 1 large egg, room temperature
- 1 large egg yolk, room temperature
- 2 tablespoons heavy cream, room temperature
- 1 tablespoon vanilla bean paste
- Red gel food coloring (quantity as needed for desired shade)
Decorations
- ½ to 1 cup pink and white jimmy sprinkles
Instructions
- Mix Dry Ingredients: In a small bowl, whisk together the flour, baking powder, and salt. Set this mixture aside for later use.
- Cream Butter and Sugar: In a mixing bowl, beat the butter and sugar together until the mixture is light and fluffy, approximately 3 minutes. Scrape down the sides of the bowl to ensure even mixing.
- Add Wet Ingredients: Add the egg, egg yolk, heavy cream, and vanilla bean paste to the creamed butter and sugar. Mix until fully incorporated.
- Combine with Dry Ingredients: Gradually add the flour mixture into the wet ingredients, mixing until just combined and a soft dough forms.
- Divide and Tint Dough: Divide the dough roughly in half, keeping about half (375-400 grams) in the bowl. Add red gel food coloring to this portion and mix until it reaches your desired pink or red shade.
- Roll and Freeze Colored Dough: Roll the colored dough between two sheets of parchment paper to about ½ inch thickness. Freeze for 10 minutes to firm up.
- Cut Heart Shapes: Using a 1 ½-inch heart-shaped cookie cutter, cut hearts from the chilled colored dough. Re-roll scraps and cut additional hearts as needed.
- Stack and Freeze Hearts: Lightly dab the center of each heart with water and stack them to form a single layered log approximately 9 to 10 inches long on a parchment-lined baking sheet. Freeze for at least 30 minutes until firm.
- Wrap in Plain Dough: Remove the heart log from the freezer. Wrap the remaining plain dough around the heart log, covering all gaps. Wrap the combined log in plastic wrap and roll it smoothly.
- Chill Dough Log: Refrigerate the wrapped dough log for at least 2 to 3 hours or overnight to chill fully and prepare for slicing.
- Preheat Oven and Prepare for Baking: When ready to bake, preheat your oven to 350°F (180°C). Unwrap the chilled dough log and roll it gently in the pink and white sprinkles to coat the surface.
- Slice and Arrange Cookies: Slice the dough log into approximately ½-inch thick cookies. Place the slices on a lined baking sheet, spacing them adequately.
- Bake Cookies: Bake the cookies for 12 minutes until the bottoms are lightly golden and the tops appear matte. For crispier cookies, bake slightly longer while monitoring closely.
- Cool Cookies: Remove from the oven and cool the cookies on a wire rack before serving or storing.
Notes
- Measure dry ingredients properly using the spoon-level method or a kitchen scale to ensure accuracy.
- Keep butter cool but not too hard—ideally between 64-68°F for optimal dough texture.
- You can substitute sprinkles with sanding sugar, pearls, or any preferred decorative topping.
- For crispier cookies, slice the dough thinner, about ¼ inch thick, before baking.
Nutrition
- Serving Size: 1 cookie
- Calories: 180 kcal
- Sugar: 11 g
- Sodium: 90 mg
- Fat: 9 g
- Saturated Fat: 5 g
- Unsaturated Fat: 3 g
- Trans Fat: 0 g
- Carbohydrates: 22 g
- Fiber: 0.5 g
- Protein: 2 g
- Cholesterol: 45 mg


Leave a Reply